10.3.2: Open Forms and Closed Forms
- Page ID
- 18476

\( \newcommand{\vecs}[1]{\overset { \scriptstyle \rightharpoonup} {\mathbf{#1}} } \)
\( \newcommand{\vecd}[1]{\overset{-\!-\!\rightharpoonup}{\vphantom{a}\smash {#1}}} \)
\( \newcommand{\id}{\mathrm{id}}\) \( \newcommand{\Span}{\mathrm{span}}\)
( \newcommand{\kernel}{\mathrm{null}\,}\) \( \newcommand{\range}{\mathrm{range}\,}\)
\( \newcommand{\RealPart}{\mathrm{Re}}\) \( \newcommand{\ImaginaryPart}{\mathrm{Im}}\)
\( \newcommand{\Argument}{\mathrm{Arg}}\) \( \newcommand{\norm}[1]{\| #1 \|}\)
\( \newcommand{\inner}[2]{\langle #1, #2 \rangle}\)
\( \newcommand{\Span}{\mathrm{span}}\)
\( \newcommand{\id}{\mathrm{id}}\)
\( \newcommand{\Span}{\mathrm{span}}\)
\( \newcommand{\kernel}{\mathrm{null}\,}\)
\( \newcommand{\range}{\mathrm{range}\,}\)
\( \newcommand{\RealPart}{\mathrm{Re}}\)
\( \newcommand{\ImaginaryPart}{\mathrm{Im}}\)
\( \newcommand{\Argument}{\mathrm{Arg}}\)
\( \newcommand{\norm}[1]{\| #1 \|}\)
\( \newcommand{\inner}[2]{\langle #1, #2 \rangle}\)
\( \newcommand{\Span}{\mathrm{span}}\) \( \newcommand{\AA}{\unicode[.8,0]{x212B}}\)
\( \newcommand{\vectorA}[1]{\vec{#1}} % arrow\)
\( \newcommand{\vectorAt}[1]{\vec{\text{#1}}} % arrow\)
\( \newcommand{\vectorB}[1]{\overset { \scriptstyle \rightharpoonup} {\mathbf{#1}} } \)
\( \newcommand{\vectorC}[1]{\textbf{#1}} \)
\( \newcommand{\vectorD}[1]{\overrightarrow{#1}} \)
\( \newcommand{\vectorDt}[1]{\overrightarrow{\text{#1}}} \)
\( \newcommand{\vectE}[1]{\overset{-\!-\!\rightharpoonup}{\vphantom{a}\smash{\mathbf {#1}}}} \)
\( \newcommand{\vecs}[1]{\overset { \scriptstyle \rightharpoonup} {\mathbf{#1}} } \)
\( \newcommand{\vecd}[1]{\overset{-\!-\!\rightharpoonup}{\vphantom{a}\smash {#1}}} \)
\(\newcommand{\avec}{\mathbf a}\) \(\newcommand{\bvec}{\mathbf b}\) \(\newcommand{\cvec}{\mathbf c}\) \(\newcommand{\dvec}{\mathbf d}\) \(\newcommand{\dtil}{\widetilde{\mathbf d}}\) \(\newcommand{\evec}{\mathbf e}\) \(\newcommand{\fvec}{\mathbf f}\) \(\newcommand{\nvec}{\mathbf n}\) \(\newcommand{\pvec}{\mathbf p}\) \(\newcommand{\qvec}{\mathbf q}\) \(\newcommand{\svec}{\mathbf s}\) \(\newcommand{\tvec}{\mathbf t}\) \(\newcommand{\uvec}{\mathbf u}\) \(\newcommand{\vvec}{\mathbf v}\) \(\newcommand{\wvec}{\mathbf w}\) \(\newcommand{\xvec}{\mathbf x}\) \(\newcommand{\yvec}{\mathbf y}\) \(\newcommand{\zvec}{\mathbf z}\) \(\newcommand{\rvec}{\mathbf r}\) \(\newcommand{\mvec}{\mathbf m}\) \(\newcommand{\zerovec}{\mathbf 0}\) \(\newcommand{\onevec}{\mathbf 1}\) \(\newcommand{\real}{\mathbb R}\) \(\newcommand{\twovec}[2]{\left[\begin{array}{r}#1 \\ #2 \end{array}\right]}\) \(\newcommand{\ctwovec}[2]{\left[\begin{array}{c}#1 \\ #2 \end{array}\right]}\) \(\newcommand{\threevec}[3]{\left[\begin{array}{r}#1 \\ #2 \\ #3 \end{array}\right]}\) \(\newcommand{\cthreevec}[3]{\left[\begin{array}{c}#1 \\ #2 \\ #3 \end{array}\right]}\) \(\newcommand{\fourvec}[4]{\left[\begin{array}{r}#1 \\ #2 \\ #3 \\ #4 \end{array}\right]}\) \(\newcommand{\cfourvec}[4]{\left[\begin{array}{c}#1 \\ #2 \\ #3 \\ #4 \end{array}\right]}\) \(\newcommand{\fivevec}[5]{\left[\begin{array}{r}#1 \\ #2 \\ #3 \\ #4 \\ #5 \\ \end{array}\right]}\) \(\newcommand{\cfivevec}[5]{\left[\begin{array}{c}#1 \\ #2 \\ #3 \\ #4 \\ #5 \\ \end{array}\right]}\) \(\newcommand{\mattwo}[4]{\left[\begin{array}{rr}#1 \amp #2 \\ #3 \amp #4 \\ \end{array}\right]}\) \(\newcommand{\laspan}[1]{\text{Span}\{#1\}}\) \(\newcommand{\bcal}{\cal B}\) \(\newcommand{\ccal}{\cal C}\) \(\newcommand{\scal}{\cal S}\) \(\newcommand{\wcal}{\cal W}\) \(\newcommand{\ecal}{\cal E}\) \(\newcommand{\coords}[2]{\left\{#1\right\}_{#2}}\) \(\newcommand{\gray}[1]{\color{gray}{#1}}\) \(\newcommand{\lgray}[1]{\color{lightgray}{#1}}\) \(\newcommand{\rank}{\operatorname{rank}}\) \(\newcommand{\row}{\text{Row}}\) \(\newcommand{\col}{\text{Col}}\) \(\renewcommand{\row}{\text{Row}}\) \(\newcommand{\nul}{\text{Nul}}\) \(\newcommand{\var}{\text{Var}}\) \(\newcommand{\corr}{\text{corr}}\) \(\newcommand{\len}[1]{\left|#1\right|}\) \(\newcommand{\bbar}{\overline{\bvec}}\) \(\newcommand{\bhat}{\widehat{\bvec}}\) \(\newcommand{\bperp}{\bvec^\perp}\) \(\newcommand{\xhat}{\widehat{\xvec}}\) \(\newcommand{\vhat}{\widehat{\vvec}}\) \(\newcommand{\uhat}{\widehat{\uvec}}\) \(\newcommand{\what}{\widehat{\wvec}}\) \(\newcommand{\Sighat}{\widehat{\Sigma}}\) \(\newcommand{\lt}{<}\) \(\newcommand{\gt}{>}\) \(\newcommand{\amp}{&}\) \(\definecolor{fillinmathshade}{gray}{0.9}\)Figure 10.36 shows another example of form combinations. The figure contains four stereo diagrams depicting points related by 2/m symmetry (a 2-fold axis with a perpendicular mirror). Drawings beneath each diagram show the same symmetry using crystal faces. The four faces of the prism (10.36a) are the general form; they are neither parallel nor perpendicular to the 2-fold axis or mirror plane. This form does not enclose space and so we call it an open form. (In contrast, the cubic forms we saw previously are all closed forms – they enclose a volume of space.) Because crystals cannot be open sided, additional crystal faces must terminate open forms. So, crystals with only one form must, of necessity, have a closed form.


Diagrams 10.36b and c show pinacoids. Pinacoids, which are pairs of parallel faces, are open forms. The pinacoids are special forms because the faces are perpendicular (10.36b) or parallel (10.36c) to the 2-fold axis. The pinacoids include two faces compared with the general form’s four. A combination of the general form and the two pinacoids produces a crystal with 2/m symmetry (Figure 10.36d). Crystals with 2/m symmetry always contain at least three forms. Compare this drawing with the shapes of the twinned feldspar crystals in Figure 10.37.
The Most Important Form Names
The table below lists the most commonly used form names. This nomenclature derives from the work of A. F. Rogers’s in the 1930s. They are based on geometric shape or symmetry, but some of the names are unique to crystallography. Mineralogists group crystals into crystal systems based on common symmetry elements. We discuss the systems in detail later in this chapter. Most of the forms occur in more than one system, but the ones at the bottom of the table are exclusive to the cubic system. Figure 10.47 (later in this chapter) contains drawings of some of the cubic forms.
| The Most Common Form Names | |
| Open Forms | |
| pedions pinacoids prisms pyramids domes sphenoids |
single face two parallel faces 3, 4, 6, 8, or 12 faces parallel to a common line 3, 4, 6, 8, or 12 sloping faces that meet at a point two nonparallel faces related by a mirror two nonparallel faces related by a 2-fold axis |
| Closed forms | |
| scalenohedrons trapezohedrons disphenoids dipyramids rhombohedrons |
8 or 12 scalene triangle faces 6, 8, or 12 trapezoid faces four nonequilateral triangular faces two 3-, 4-, 6-, 8-, or 12-sided pyramids six rhomb-shaped faces |
| Cubic forms (closed) | |
| tetrahedrons cubes (hexoctahedrons) octahedrons dodecahedrons pyritohedrons tetartoids diploids and gyroids |
four equilateral triangular faces six square faces eight equilateral triangular faces 12 rhomb-shaped faces 12 irregular 5 sided faces 12 five-sided faces 24 five-sided faces |
.
In form names, the suffix –hedron means face. Prefixes describe the shape of faces: scaleno– (scalene triangle), rhombo– (rhomb shaped), and trapezo– (trapezoid shaped).
We use descriptive modifiers to make the basic names more specific. For example, prisms may be hexagonal-, tetragonal-, orthorhombic- or monoclinic-prisms (having six, four, four, and two faces, respectively). Thus, the modifiers hexagonal, tetragonal, and orthorhombic identify the number of faces. For example, Figure 10.38a (below) shows a tetragonal (four faces) prism.
We use these same modifiers for pyramids. For example, a hexagonal pyramid has six sides, while a tetragonal pyramid has only four (Figure 10.38b). An orthorhombic pyramid has four sides but they are of two different shapes.

We can add a further modifying prefix to the word pyramid. The prefix di– indicates that there are two equivalent pyramids related by a mirror plane. Figure 10.38c is a tetragonal dipyramid.
The prefixes di-, tris-, tetra-, and hex– describe a doubling, tripling, and so on, of faces. If each of the four sides on a tetragonal prism is split down the middle to produce two faces we get a ditetragonal prism (Figure 10.38d). And, if each face on a tetragonal pyramid is split into two, we get a ditetragonal pyramid (Figure 10.38e). These different forms can combine in a single crystal; Figures 10.38f and g show some combinations.
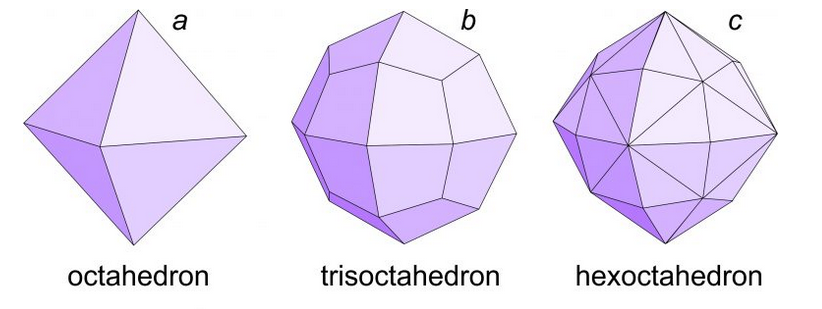
Similarly, if each face on an octahedron (Figure 10.39a) is replaced by three faces, the result is a trisoctahedron (Figure 10.39b). If each face on an octahedron is replaced by six faces, the result is a hexoctahedron (Figure 10.39c).