Geosciences LibreTexts

7.5: Contact Metamorphism and Hydrothermal Processes

  • Page ID
    7816
  • \( \newcommand{\vecs}[1]{\overset { \scriptstyle \rightharpoonup} {\mathbf{#1}} } \)

    \( \newcommand{\vecd}[1]{\overset{-\!-\!\rightharpoonup}{\vphantom{a}\smash {#1}}} \)

    \( \newcommand{\id}{\mathrm{id}}\) \( \newcommand{\Span}{\mathrm{span}}\)

    ( \newcommand{\kernel}{\mathrm{null}\,}\) \( \newcommand{\range}{\mathrm{range}\,}\)

    \( \newcommand{\RealPart}{\mathrm{Re}}\) \( \newcommand{\ImaginaryPart}{\mathrm{Im}}\)

    \( \newcommand{\Argument}{\mathrm{Arg}}\) \( \newcommand{\norm}[1]{\| #1 \|}\)

    \( \newcommand{\inner}[2]{\langle #1, #2 \rangle}\)

    \( \newcommand{\Span}{\mathrm{span}}\)

    \( \newcommand{\id}{\mathrm{id}}\)

    \( \newcommand{\Span}{\mathrm{span}}\)

    \( \newcommand{\kernel}{\mathrm{null}\,}\)

    \( \newcommand{\range}{\mathrm{range}\,}\)

    \( \newcommand{\RealPart}{\mathrm{Re}}\)

    \( \newcommand{\ImaginaryPart}{\mathrm{Im}}\)

    \( \newcommand{\Argument}{\mathrm{Arg}}\)

    \( \newcommand{\norm}[1]{\| #1 \|}\)

    \( \newcommand{\inner}[2]{\langle #1, #2 \rangle}\)

    \( \newcommand{\Span}{\mathrm{span}}\) \( \newcommand{\AA}{\unicode[.8,0]{x212B}}\)

    \( \newcommand{\vectorA}[1]{\vec{#1}}      % arrow\)

    \( \newcommand{\vectorAt}[1]{\vec{\text{#1}}}      % arrow\)

    \( \newcommand{\vectorB}[1]{\overset { \scriptstyle \rightharpoonup} {\mathbf{#1}} } \)

    \( \newcommand{\vectorC}[1]{\textbf{#1}} \)

    \( \newcommand{\vectorD}[1]{\overrightarrow{#1}} \)

    \( \newcommand{\vectorDt}[1]{\overrightarrow{\text{#1}}} \)

    \( \newcommand{\vectE}[1]{\overset{-\!-\!\rightharpoonup}{\vphantom{a}\smash{\mathbf {#1}}}} \)

    \( \newcommand{\vecs}[1]{\overset { \scriptstyle \rightharpoonup} {\mathbf{#1}} } \)

    \( \newcommand{\vecd}[1]{\overset{-\!-\!\rightharpoonup}{\vphantom{a}\smash {#1}}} \)

    \(\newcommand{\avec}{\mathbf a}\) \(\newcommand{\bvec}{\mathbf b}\) \(\newcommand{\cvec}{\mathbf c}\) \(\newcommand{\dvec}{\mathbf d}\) \(\newcommand{\dtil}{\widetilde{\mathbf d}}\) \(\newcommand{\evec}{\mathbf e}\) \(\newcommand{\fvec}{\mathbf f}\) \(\newcommand{\nvec}{\mathbf n}\) \(\newcommand{\pvec}{\mathbf p}\) \(\newcommand{\qvec}{\mathbf q}\) \(\newcommand{\svec}{\mathbf s}\) \(\newcommand{\tvec}{\mathbf t}\) \(\newcommand{\uvec}{\mathbf u}\) \(\newcommand{\vvec}{\mathbf v}\) \(\newcommand{\wvec}{\mathbf w}\) \(\newcommand{\xvec}{\mathbf x}\) \(\newcommand{\yvec}{\mathbf y}\) \(\newcommand{\zvec}{\mathbf z}\) \(\newcommand{\rvec}{\mathbf r}\) \(\newcommand{\mvec}{\mathbf m}\) \(\newcommand{\zerovec}{\mathbf 0}\) \(\newcommand{\onevec}{\mathbf 1}\) \(\newcommand{\real}{\mathbb R}\) \(\newcommand{\twovec}[2]{\left[\begin{array}{r}#1 \\ #2 \end{array}\right]}\) \(\newcommand{\ctwovec}[2]{\left[\begin{array}{c}#1 \\ #2 \end{array}\right]}\) \(\newcommand{\threevec}[3]{\left[\begin{array}{r}#1 \\ #2 \\ #3 \end{array}\right]}\) \(\newcommand{\cthreevec}[3]{\left[\begin{array}{c}#1 \\ #2 \\ #3 \end{array}\right]}\) \(\newcommand{\fourvec}[4]{\left[\begin{array}{r}#1 \\ #2 \\ #3 \\ #4 \end{array}\right]}\) \(\newcommand{\cfourvec}[4]{\left[\begin{array}{c}#1 \\ #2 \\ #3 \\ #4 \end{array}\right]}\) \(\newcommand{\fivevec}[5]{\left[\begin{array}{r}#1 \\ #2 \\ #3 \\ #4 \\ #5 \\ \end{array}\right]}\) \(\newcommand{\cfivevec}[5]{\left[\begin{array}{c}#1 \\ #2 \\ #3 \\ #4 \\ #5 \\ \end{array}\right]}\) \(\newcommand{\mattwo}[4]{\left[\begin{array}{rr}#1 \amp #2 \\ #3 \amp #4 \\ \end{array}\right]}\) \(\newcommand{\laspan}[1]{\text{Span}\{#1\}}\) \(\newcommand{\bcal}{\cal B}\) \(\newcommand{\ccal}{\cal C}\) \(\newcommand{\scal}{\cal S}\) \(\newcommand{\wcal}{\cal W}\) \(\newcommand{\ecal}{\cal E}\) \(\newcommand{\coords}[2]{\left\{#1\right\}_{#2}}\) \(\newcommand{\gray}[1]{\color{gray}{#1}}\) \(\newcommand{\lgray}[1]{\color{lightgray}{#1}}\) \(\newcommand{\rank}{\operatorname{rank}}\) \(\newcommand{\row}{\text{Row}}\) \(\newcommand{\col}{\text{Col}}\) \(\renewcommand{\row}{\text{Row}}\) \(\newcommand{\nul}{\text{Nul}}\) \(\newcommand{\var}{\text{Var}}\) \(\newcommand{\corr}{\text{corr}}\) \(\newcommand{\len}[1]{\left|#1\right|}\) \(\newcommand{\bbar}{\overline{\bvec}}\) \(\newcommand{\bhat}{\widehat{\bvec}}\) \(\newcommand{\bperp}{\bvec^\perp}\) \(\newcommand{\xhat}{\widehat{\xvec}}\) \(\newcommand{\vhat}{\widehat{\vvec}}\) \(\newcommand{\uhat}{\widehat{\uvec}}\) \(\newcommand{\what}{\widehat{\wvec}}\) \(\newcommand{\Sighat}{\widehat{\Sigma}}\) \(\newcommand{\lt}{<}\) \(\newcommand{\gt}{>}\) \(\newcommand{\amp}{&}\) \(\definecolor{fillinmathshade}{gray}{0.9}\)

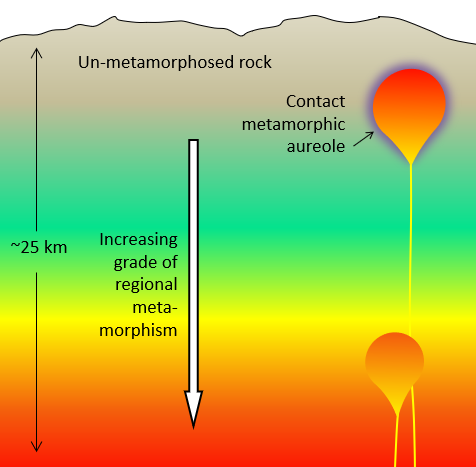
    Contact metamorphism takes place where a body of magma intrudes into the upper part of the crust. Any type of magma body can lead to contact metamorphism, from a thin dyke to a large stock. The type and intensity of the metamorphism, and width of the metamorphic aureole will depend on a number of factors, including the type of country rock, the temperature of the intruding body and the size of the body (Figure \(\PageIndex{1}\)). A large intrusion will contain more thermal energy and will cool much more slowly than a small one, and therefore will provide a longer time and more heat for metamorphism. That will allow the heat to extend farther into the country rock, creating a larger aureole.
    contact-1.png
    Figure \(\PageIndex{1}\) Schematic cross-section of the middle and upper crust showing two magma bodies. The upper body has intruded into cool unmetamorphosed rock near to the surface and has created a zone of contact metamorphism. The lower body is surrounded by rock that is already hot (and probably already metamorphosed), and so it does not have a significant metamorphic aureole.

    Contact metamorphic aureoles are typically quite small, from just a few centimeters around small dykes and sills, to several 10s of meters around a large stock. As was shown in Figure \(\PageIndex{7}\), contact metamorphism can take place over a wide range of temperatures—from around 300° to over 800°C—and of course the type of metamorphism, and new minerals formed, will vary accordingly. The nature of the country rock (or parent rock) is also important.

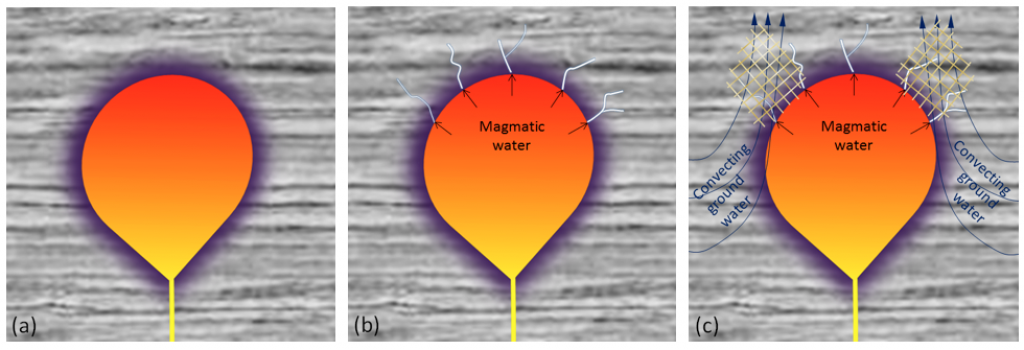
    A hot body of magma in the upper crust can create a very dynamic situation that may have geologically interesting and economically important implications. In the simplest cases, water does not play a big role, and the main process is transfer of heat from the pluton to the surrounding rock, creating a zone of contact metamorphism (Figure \(\PageIndex{2}\)a). In that situation mudrock or volcanic rock will likely be metamorphosed to hornfels (Figure \(\PageIndex{9}\)), limestone will be metamorphosed to marble (Figure \(\PageIndex{6}\)), and sandstone to quartzite (Figure \(\PageIndex{7}\)). (But don’t forget that marble and quartzite can also form during regional metamorphism!)

    In many cases, however, water is released from the magma body as crystallization takes place, and this water is dispersed along fractures in the country rock (Figure \(\PageIndex{2}\)b). The water released from a magma chamber is typically rich in dissolved minerals. As this water cools, is chemically changed by the surrounding rocks, or boils because of a drop in pressure, minerals are deposited, forming veins within the fractures in the country rock. Quartz veins are common in this situation, and they might also include pyrite, hematite, calcite, and even silver and gold.
    metamorphism-and-alteration-around-a-pluton.png
    Figure \(\PageIndex{2}\) Depiction of metamorphism and alteration around a pluton in the upper crust. (a) Thermal metamorphism only (within the purple zone). (b) Thermal metamorphism plus veining (white) related to dispersal of magmatic fluids into the overlying rock. (c) Thermal metamorphism plus veining from magmatic fluids plus alteration and possible formation of metallic minerals (hatched yellow areas) from convection of groundwater.

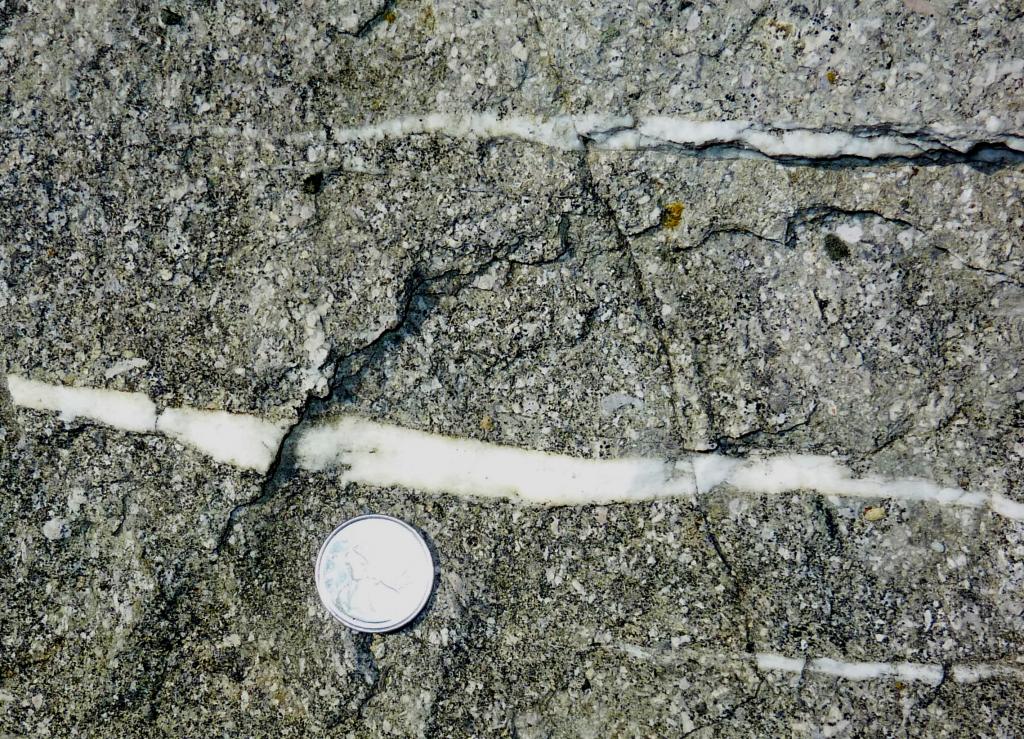
    Heat from the magma body will heat the surrounding groundwater, causing it to expand and then rise toward the surface. In some cases, this may initiate a convection system where groundwater circulates past the pluton. Such a system could operate for many thousands of years, resulting in the circulation of billions of litres of groundwater from the surrounding region past the pluton. Hot water circulating through the rocks can lead to significant changes in the mineralogy of the rock, including alteration of feldspars to clays, and deposition of quartz, calcite, and other minerals in fractures and other open spaces (Figure \(\PageIndex{3}\)). As with the magmatic fluids, the nature of this circulating groundwater can also change adjacent to, or above, the pluton, resulting in deposition of other minerals, including ore minerals. Metamorphism in which much of the change is derived from fluids passing through the rock is known as metasomatism. When hot water contributes to changes in rocks, including mineral alteration and formation of veins, it is known as hydrothermal alteration.
    calcite-vein-2.jpg
    Figure \(\PageIndex{3}\) Calcite veins in limestone of the Comox Formation, Nanaimo, B.C

    A special type of metasomatism can take place where a hot pluton intrudes into carbonate rock such as limestone. When magmatic fluids rich in silica, calcium, magnesium, iron, and other elements flow through the carbonate rock, their chemistry can change dramatically, resulting in the deposition of minerals that would not normally exist in either the igneous rock or limestone. These include garnet, epidote (another silicate), magnetite, pyroxene, and a variety of copper and other minerals (Figure \(\PageIndex{4}\)). This type of metamorphism is known as skarn, and again, some important types of mineral deposits can form this way.
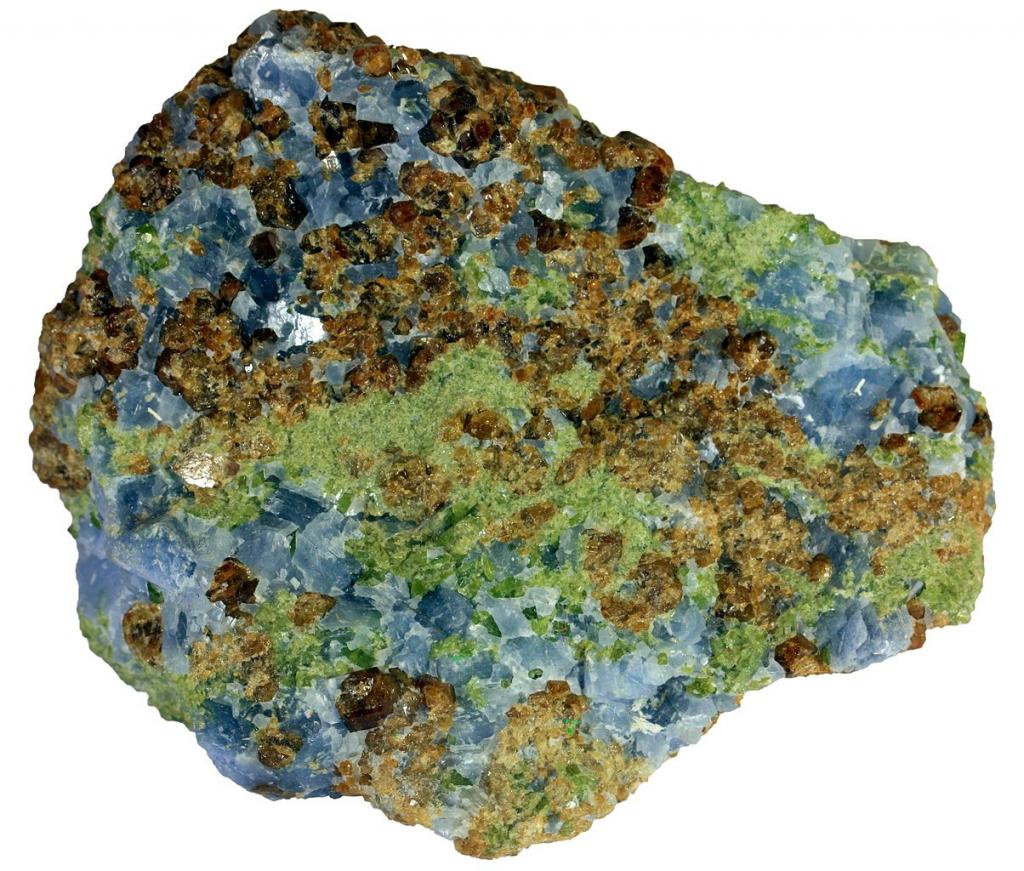
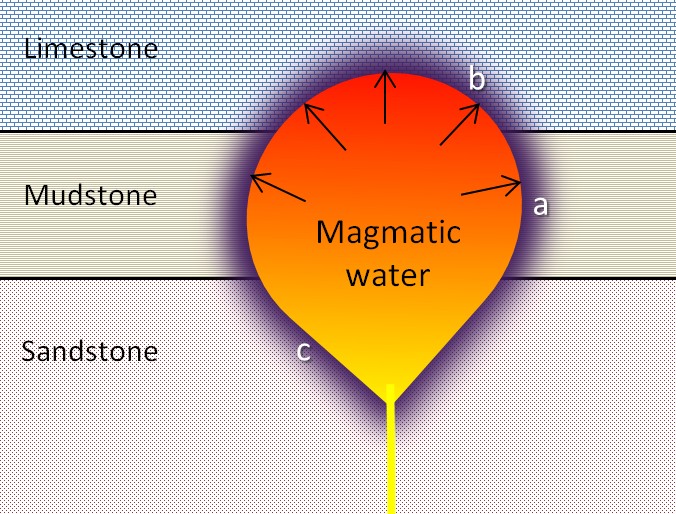
    image037.jpg
    Figure \(\PageIndex{4}\) A skarn rock from Mount Monzoni, Northern Italy, with recrystallized calcite (blue), garnet (brown), and pyroxene (green). The rock is 6 centimeters across.
    Exercise 7.5 Contact metamorphism and metasomatism
    image038.png
    Figure \(\PageIndex{5}\)

    This diagram shows a pluton that has intruded into a series of sedimentary rocks. What type of metamorphic rock would you expect to see at locations:

    a) Mudstone? _____________________

    b) Limestone? _____________________

    c) Sandstone? _____________________

    See Appendix 3 for Exercise 7.5 answers.

    Media Attributions

    • Figures 7.5.1, 7.5.2, 7.5.3, 7.5.5: © Steven Earle. CC BY.
    • Figure \(\PageIndex{4}\): 00031 6 cm grossular calcite augite skarn © Siim. CC BY SA.

    This page titled 7.5: Contact Metamorphism and Hydrothermal Processes is shared under a CC BY 4.0 license and was authored, remixed, and/or curated by Steven Earle (BCCampus) via source content that was edited to the style and standards of the LibreTexts platform.

    • Was this article helpful?