
8.8: Earthquake Risk
- Page ID
- 28271

\( \newcommand{\vecs}[1]{\overset { \scriptstyle \rightharpoonup} {\mathbf{#1}} } \)
\( \newcommand{\vecd}[1]{\overset{-\!-\!\rightharpoonup}{\vphantom{a}\smash {#1}}} \)
\( \newcommand{\id}{\mathrm{id}}\) \( \newcommand{\Span}{\mathrm{span}}\)
( \newcommand{\kernel}{\mathrm{null}\,}\) \( \newcommand{\range}{\mathrm{range}\,}\)
\( \newcommand{\RealPart}{\mathrm{Re}}\) \( \newcommand{\ImaginaryPart}{\mathrm{Im}}\)
\( \newcommand{\Argument}{\mathrm{Arg}}\) \( \newcommand{\norm}[1]{\| #1 \|}\)
\( \newcommand{\inner}[2]{\langle #1, #2 \rangle}\)
\( \newcommand{\Span}{\mathrm{span}}\)
\( \newcommand{\id}{\mathrm{id}}\)
\( \newcommand{\Span}{\mathrm{span}}\)
\( \newcommand{\kernel}{\mathrm{null}\,}\)
\( \newcommand{\range}{\mathrm{range}\,}\)
\( \newcommand{\RealPart}{\mathrm{Re}}\)
\( \newcommand{\ImaginaryPart}{\mathrm{Im}}\)
\( \newcommand{\Argument}{\mathrm{Arg}}\)
\( \newcommand{\norm}[1]{\| #1 \|}\)
\( \newcommand{\inner}[2]{\langle #1, #2 \rangle}\)
\( \newcommand{\Span}{\mathrm{span}}\) \( \newcommand{\AA}{\unicode[.8,0]{x212B}}\)
\( \newcommand{\vectorA}[1]{\vec{#1}} % arrow\)
\( \newcommand{\vectorAt}[1]{\vec{\text{#1}}} % arrow\)
\( \newcommand{\vectorB}[1]{\overset { \scriptstyle \rightharpoonup} {\mathbf{#1}} } \)
\( \newcommand{\vectorC}[1]{\textbf{#1}} \)
\( \newcommand{\vectorD}[1]{\overrightarrow{#1}} \)
\( \newcommand{\vectorDt}[1]{\overrightarrow{\text{#1}}} \)
\( \newcommand{\vectE}[1]{\overset{-\!-\!\rightharpoonup}{\vphantom{a}\smash{\mathbf {#1}}}} \)
\( \newcommand{\vecs}[1]{\overset { \scriptstyle \rightharpoonup} {\mathbf{#1}} } \)
\( \newcommand{\vecd}[1]{\overset{-\!-\!\rightharpoonup}{\vphantom{a}\smash {#1}}} \)
\(\newcommand{\avec}{\mathbf a}\) \(\newcommand{\bvec}{\mathbf b}\) \(\newcommand{\cvec}{\mathbf c}\) \(\newcommand{\dvec}{\mathbf d}\) \(\newcommand{\dtil}{\widetilde{\mathbf d}}\) \(\newcommand{\evec}{\mathbf e}\) \(\newcommand{\fvec}{\mathbf f}\) \(\newcommand{\nvec}{\mathbf n}\) \(\newcommand{\pvec}{\mathbf p}\) \(\newcommand{\qvec}{\mathbf q}\) \(\newcommand{\svec}{\mathbf s}\) \(\newcommand{\tvec}{\mathbf t}\) \(\newcommand{\uvec}{\mathbf u}\) \(\newcommand{\vvec}{\mathbf v}\) \(\newcommand{\wvec}{\mathbf w}\) \(\newcommand{\xvec}{\mathbf x}\) \(\newcommand{\yvec}{\mathbf y}\) \(\newcommand{\zvec}{\mathbf z}\) \(\newcommand{\rvec}{\mathbf r}\) \(\newcommand{\mvec}{\mathbf m}\) \(\newcommand{\zerovec}{\mathbf 0}\) \(\newcommand{\onevec}{\mathbf 1}\) \(\newcommand{\real}{\mathbb R}\) \(\newcommand{\twovec}[2]{\left[\begin{array}{r}#1 \\ #2 \end{array}\right]}\) \(\newcommand{\ctwovec}[2]{\left[\begin{array}{c}#1 \\ #2 \end{array}\right]}\) \(\newcommand{\threevec}[3]{\left[\begin{array}{r}#1 \\ #2 \\ #3 \end{array}\right]}\) \(\newcommand{\cthreevec}[3]{\left[\begin{array}{c}#1 \\ #2 \\ #3 \end{array}\right]}\) \(\newcommand{\fourvec}[4]{\left[\begin{array}{r}#1 \\ #2 \\ #3 \\ #4 \end{array}\right]}\) \(\newcommand{\cfourvec}[4]{\left[\begin{array}{c}#1 \\ #2 \\ #3 \\ #4 \end{array}\right]}\) \(\newcommand{\fivevec}[5]{\left[\begin{array}{r}#1 \\ #2 \\ #3 \\ #4 \\ #5 \\ \end{array}\right]}\) \(\newcommand{\cfivevec}[5]{\left[\begin{array}{c}#1 \\ #2 \\ #3 \\ #4 \\ #5 \\ \end{array}\right]}\) \(\newcommand{\mattwo}[4]{\left[\begin{array}{rr}#1 \amp #2 \\ #3 \amp #4 \\ \end{array}\right]}\) \(\newcommand{\laspan}[1]{\text{Span}\{#1\}}\) \(\newcommand{\bcal}{\cal B}\) \(\newcommand{\ccal}{\cal C}\) \(\newcommand{\scal}{\cal S}\) \(\newcommand{\wcal}{\cal W}\) \(\newcommand{\ecal}{\cal E}\) \(\newcommand{\coords}[2]{\left\{#1\right\}_{#2}}\) \(\newcommand{\gray}[1]{\color{gray}{#1}}\) \(\newcommand{\lgray}[1]{\color{lightgray}{#1}}\) \(\newcommand{\rank}{\operatorname{rank}}\) \(\newcommand{\row}{\text{Row}}\) \(\newcommand{\col}{\text{Col}}\) \(\renewcommand{\row}{\text{Row}}\) \(\newcommand{\nul}{\text{Nul}}\) \(\newcommand{\var}{\text{Var}}\) \(\newcommand{\corr}{\text{corr}}\) \(\newcommand{\len}[1]{\left|#1\right|}\) \(\newcommand{\bbar}{\overline{\bvec}}\) \(\newcommand{\bhat}{\widehat{\bvec}}\) \(\newcommand{\bperp}{\bvec^\perp}\) \(\newcommand{\xhat}{\widehat{\xvec}}\) \(\newcommand{\vhat}{\widehat{\vvec}}\) \(\newcommand{\uhat}{\widehat{\uvec}}\) \(\newcommand{\what}{\widehat{\wvec}}\) \(\newcommand{\Sighat}{\widehat{\Sigma}}\) \(\newcommand{\lt}{<}\) \(\newcommand{\gt}{>}\) \(\newcommand{\amp}{&}\) \(\definecolor{fillinmathshade}{gray}{0.9}\)Factors that Determine Shaking
Earthquake magnitude is an absolute value that measures pure energy release. Intensity, however, i.e. how much the ground shakes, is determined by several factors.
Earthquake Magnitude—In general, the larger the magnitude, the stronger the shaking and the longer the shaking will last.
This table is taken from the USGS and shows scales of magnitude and Mercalli Intensity and descriptions of shaking and resulting damage.
| Magnitude | Modified Mercalli Intensity | Shaking/Damage Description |
| 1.0 – 3.0 | I | Only felt by a very few. |
| 3.0 – 3.9 | II – III | Noticeable indoors, especially on upper floors. |
| 4.0 – 4.9 | IV – V | Most to all feel it. Dishes, doors, cars shake and possibly break. |
| 5.0 – 5.9 | VI – VII | Everyone feels it. Some items knocked over or broken. Building damage possible. |
| 6.0 – 6.9 | VII – IX | Frightening amounts of shaking. Significant damage especially with poorly constructed buildings |
| ≥ 7.0 | ≥ VIII | Significant destruction of buildings. Potential for objects to be thrown in the air from shaking. |
Location and Direction—Shaking is more severe closer to the epicenter. The severity of shaking is influenced by the location of the observer relative to the epicenter, the direction of rupture propagation, and the path of greatest rupture.
Local Geologic Conditions—Seismic waves are affected by the nature of the ground materials through which they pass. Different materials respond differently to an earthquake. Think of shaking a block of Jello versus a meatloaf, one will jiggle much more when hit by waves of the same amplitude. Solid sedimentary, igneous, or metamorphic bedrock shakes less than unconsolidated sediments.
Seismic waves move fastest through consolidated bedrock, slower through unconsolidated sediments, and slowest through unconsolidated sediments with a high water content. When seismic waves slow down, energy is transferred to the amplitude, increasing the motion of surface waves, which in turn amplifies ground shaking.
Focus depth—Deeper earthquakes cause less surface shaking because much of their energy, transmitted as body waves, is lost before reaching the surface. Recall that surface waves are generated by P and S waves impacting the Earth’s surface.
Factors that Determine Destruction
Just as certain conditions will impact the intensity of ground-shaking, several factors affect how much destruction is caused.
 [Public domain], <a data-cke-saved-href=\"https://commons.wikimedia.org/wiki/File%3ACollapse_of_Unreinforced_Masonry_Buildings%2C_Iran_(Persia)_-_1990_Manjil_Roudbar_Earthquake.jpg\" href=\"https://commons.wikimedia.org/wiki/File%3ACollapse_of_Unreinforced_Masonry_Buildings%2C_Iran_(Persia)_-_1990_Manjil_Roudbar_Earthquake.jpg\"")
Building Materials—The flexibility of a building material determines its resistance to earthquake damage. Unreinforced masonry (URM) is the material most devastated by ground shaking. Wood framing fastened with nails bends and flexes during seismic wave passage and is more likely to survive intact. Steel also has the ability to deform elastically before brittle failure.
Intensity and Duration—Greater shaking and duration of shaking causes more destruction than lower and shorter shaking.
Resonance—Resonance occurs when seismic wave frequency matches a building’s natural shaking frequency and increases the shaking happened in the 1985 Mexico City Earthquake, where buildings of heights between 6 and 15 stories were especially vulnerable to earthquake damage. Skyscrapers designed with earthquake resilience have dampers and base isolation features to reduce resonance.
Earthquake Distribution
Like volcanoes, earthquakes tend to aggregate around active boundaries of tectonic plates. The exception is intraplate earthquakes, which are comparatively rare.
Subduction Zones—Subduction zones, found at convergent plate boundaries, are where the largest and deepest earthquakes, called megathrust earthquakes, occur. Examples of subduction-zone earthquake areas include the Sumatran Islands, Aleutian Islands, west coast of South America, and Cascadia Subduction Zone off the coast of Washington and Oregon.
Collision Zones—Collisions between converging continental plates create broad earthquake zones that may generate deep, large earthquakes from the remnants of past subduction events or other deep-crustal processes. The Himalayan Mountains (northern border of the Indian subcontinent) and Alps (southern Europe and Asia) are active regions of collision-zone earthquakes.
Transform Boundaries—Strike-slip faults created at transform boundaries produce moderate-to-large earthquakes, usually having a maximum moment magnitude of about 8. Transform fault boundaries create moderate and large earthquakes, usually having a maximum magnitude of about 8. The San Andreas fault (California) is an example of a transform-boundary earthquake zone.
Divergent Boundaries—Continental rifts and mid-ocean ridges found at divergent boundaries generally produce moderate earthquakes. Examples of active earthquake zones include the East African Rift System (southwestern Asia through eastern Africa), Iceland, and Basin and Range province (Nevada, Utah, California, Arizona, and northwestern Mexico).
 [CC BY-SA 3.0 (http://creativecommons.org/licenses/by-sa/3.0)], via Wikimedia Commons")
Intraplate Earthquakes—Intraplate earthquakes are not found near tectonic plate boundaries, but generally occur in areas of weakened crust or concentrated tectonic stress. The New Madrid seismic zone, which covers Missouri, Illinois, Tennessee, Arkansas, and Indiana, is thought to represent the failed Reelfoot rift [9]. The failed rift zone weakened the crust, making it more responsive to tectonic plate movement and interaction.
Secondary Hazards Caused by Earthquakes
Most earthquake damage is caused by ground shaking and fault-block displacement In addition, there are secondary hazards that endanger structures and people, in some cases after the shaking stops.

Liquefaction—Liquefaction occurs when water-saturated, unconsolidated sediments, usually silt or sand, become fluid-like from shaking. The shaking breaks the cohesion between grains of sediment, creating a slurry of particles suspended in water. Buildings settle or tilt in the liquified sediment, which looks very much like quicksand in the movies.
Tsunamis—Among the most devastating natural disasters are tsunamis, earthquake-induced ocean waves. When the seafloor is offset by fault movement or an underwater landslide, the ground displacement lifts a volume of ocean water and generates the tsunami wave. When a tsunami is about to strike land, the drawback of the trough preceding the wave crest causes the water to recede dramatically from shore. Tragically, curious people wander out and follow the disappearing water, only to be overcome by an oncoming wall of water that can be upwards of a 30 m (100 ft) high. Early warning systems help mitigate the loss of life caused by tsunamis.

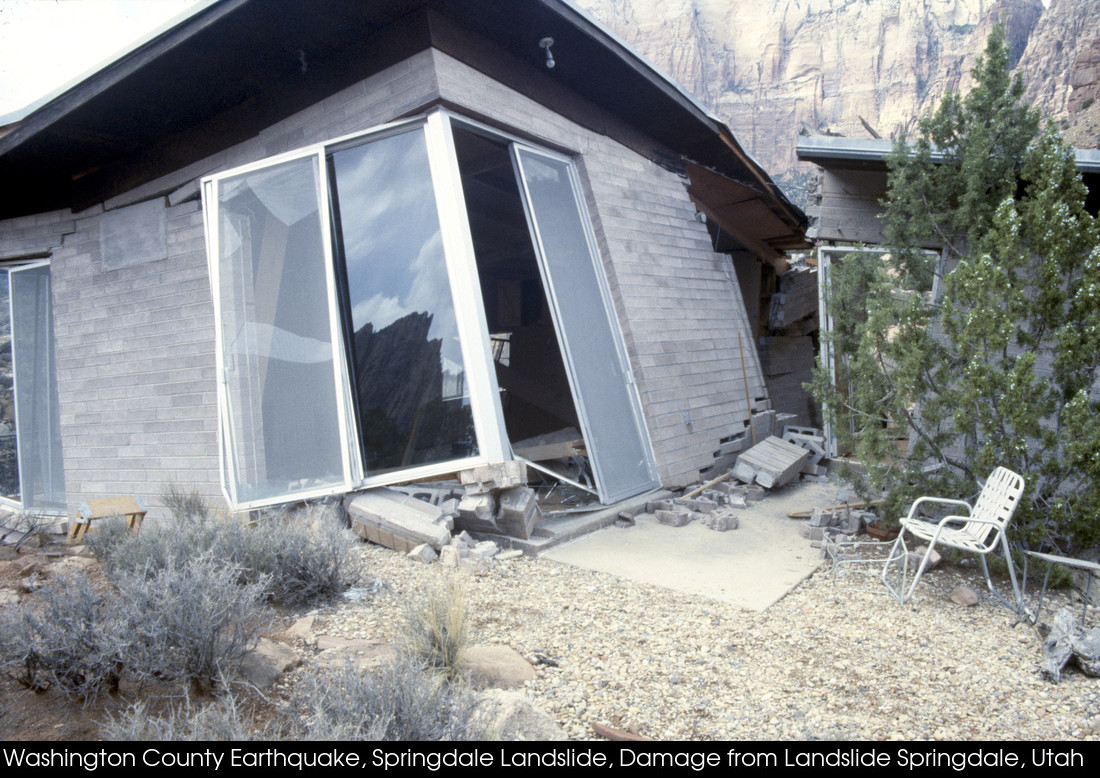
Landslides—Shaking can trigger landslides. In 1992, a moment magnitude 5.9 earthquake in St. George, Utah, caused a landslide that destroyed several structures in the Balanced Rock Hills subdivision in Springville, Utah [10].