8.6: Flumes
- Page ID
- 4907
\( \newcommand{\vecs}[1]{\overset { \scriptstyle \rightharpoonup} {\mathbf{#1}} } \)
\( \newcommand{\vecd}[1]{\overset{-\!-\!\rightharpoonup}{\vphantom{a}\smash {#1}}} \)
\( \newcommand{\id}{\mathrm{id}}\) \( \newcommand{\Span}{\mathrm{span}}\)
( \newcommand{\kernel}{\mathrm{null}\,}\) \( \newcommand{\range}{\mathrm{range}\,}\)
\( \newcommand{\RealPart}{\mathrm{Re}}\) \( \newcommand{\ImaginaryPart}{\mathrm{Im}}\)
\( \newcommand{\Argument}{\mathrm{Arg}}\) \( \newcommand{\norm}[1]{\| #1 \|}\)
\( \newcommand{\inner}[2]{\langle #1, #2 \rangle}\)
\( \newcommand{\Span}{\mathrm{span}}\)
\( \newcommand{\id}{\mathrm{id}}\)
\( \newcommand{\Span}{\mathrm{span}}\)
\( \newcommand{\kernel}{\mathrm{null}\,}\)
\( \newcommand{\range}{\mathrm{range}\,}\)
\( \newcommand{\RealPart}{\mathrm{Re}}\)
\( \newcommand{\ImaginaryPart}{\mathrm{Im}}\)
\( \newcommand{\Argument}{\mathrm{Arg}}\)
\( \newcommand{\norm}[1]{\| #1 \|}\)
\( \newcommand{\inner}[2]{\langle #1, #2 \rangle}\)
\( \newcommand{\Span}{\mathrm{span}}\) \( \newcommand{\AA}{\unicode[.8,0]{x212B}}\)
\( \newcommand{\vectorA}[1]{\vec{#1}} % arrow\)
\( \newcommand{\vectorAt}[1]{\vec{\text{#1}}} % arrow\)
\( \newcommand{\vectorB}[1]{\overset { \scriptstyle \rightharpoonup} {\mathbf{#1}} } \)
\( \newcommand{\vectorC}[1]{\textbf{#1}} \)
\( \newcommand{\vectorD}[1]{\overrightarrow{#1}} \)
\( \newcommand{\vectorDt}[1]{\overrightarrow{\text{#1}}} \)
\( \newcommand{\vectE}[1]{\overset{-\!-\!\rightharpoonup}{\vphantom{a}\smash{\mathbf {#1}}}} \)
\( \newcommand{\vecs}[1]{\overset { \scriptstyle \rightharpoonup} {\mathbf{#1}} } \)
\( \newcommand{\vecd}[1]{\overset{-\!-\!\rightharpoonup}{\vphantom{a}\smash {#1}}} \)
\(\newcommand{\avec}{\mathbf a}\) \(\newcommand{\bvec}{\mathbf b}\) \(\newcommand{\cvec}{\mathbf c}\) \(\newcommand{\dvec}{\mathbf d}\) \(\newcommand{\dtil}{\widetilde{\mathbf d}}\) \(\newcommand{\evec}{\mathbf e}\) \(\newcommand{\fvec}{\mathbf f}\) \(\newcommand{\nvec}{\mathbf n}\) \(\newcommand{\pvec}{\mathbf p}\) \(\newcommand{\qvec}{\mathbf q}\) \(\newcommand{\svec}{\mathbf s}\) \(\newcommand{\tvec}{\mathbf t}\) \(\newcommand{\uvec}{\mathbf u}\) \(\newcommand{\vvec}{\mathbf v}\) \(\newcommand{\wvec}{\mathbf w}\) \(\newcommand{\xvec}{\mathbf x}\) \(\newcommand{\yvec}{\mathbf y}\) \(\newcommand{\zvec}{\mathbf z}\) \(\newcommand{\rvec}{\mathbf r}\) \(\newcommand{\mvec}{\mathbf m}\) \(\newcommand{\zerovec}{\mathbf 0}\) \(\newcommand{\onevec}{\mathbf 1}\) \(\newcommand{\real}{\mathbb R}\) \(\newcommand{\twovec}[2]{\left[\begin{array}{r}#1 \\ #2 \end{array}\right]}\) \(\newcommand{\ctwovec}[2]{\left[\begin{array}{c}#1 \\ #2 \end{array}\right]}\) \(\newcommand{\threevec}[3]{\left[\begin{array}{r}#1 \\ #2 \\ #3 \end{array}\right]}\) \(\newcommand{\cthreevec}[3]{\left[\begin{array}{c}#1 \\ #2 \\ #3 \end{array}\right]}\) \(\newcommand{\fourvec}[4]{\left[\begin{array}{r}#1 \\ #2 \\ #3 \\ #4 \end{array}\right]}\) \(\newcommand{\cfourvec}[4]{\left[\begin{array}{c}#1 \\ #2 \\ #3 \\ #4 \end{array}\right]}\) \(\newcommand{\fivevec}[5]{\left[\begin{array}{r}#1 \\ #2 \\ #3 \\ #4 \\ #5 \\ \end{array}\right]}\) \(\newcommand{\cfivevec}[5]{\left[\begin{array}{c}#1 \\ #2 \\ #3 \\ #4 \\ #5 \\ \end{array}\right]}\) \(\newcommand{\mattwo}[4]{\left[\begin{array}{rr}#1 \amp #2 \\ #3 \amp #4 \\ \end{array}\right]}\) \(\newcommand{\laspan}[1]{\text{Span}\{#1\}}\) \(\newcommand{\bcal}{\cal B}\) \(\newcommand{\ccal}{\cal C}\) \(\newcommand{\scal}{\cal S}\) \(\newcommand{\wcal}{\cal W}\) \(\newcommand{\ecal}{\cal E}\) \(\newcommand{\coords}[2]{\left\{#1\right\}_{#2}}\) \(\newcommand{\gray}[1]{\color{gray}{#1}}\) \(\newcommand{\lgray}[1]{\color{lightgray}{#1}}\) \(\newcommand{\rank}{\operatorname{rank}}\) \(\newcommand{\row}{\text{Row}}\) \(\newcommand{\col}{\text{Col}}\) \(\renewcommand{\row}{\text{Row}}\) \(\newcommand{\nul}{\text{Nul}}\) \(\newcommand{\var}{\text{Var}}\) \(\newcommand{\corr}{\text{corr}}\) \(\newcommand{\len}[1]{\left|#1\right|}\) \(\newcommand{\bbar}{\overline{\bvec}}\) \(\newcommand{\bhat}{\widehat{\bvec}}\) \(\newcommand{\bperp}{\bvec^\perp}\) \(\newcommand{\xhat}{\widehat{\xvec}}\) \(\newcommand{\vhat}{\widehat{\vvec}}\) \(\newcommand{\uhat}{\widehat{\uvec}}\) \(\newcommand{\what}{\widehat{\wvec}}\) \(\newcommand{\Sighat}{\widehat{\Sigma}}\) \(\newcommand{\lt}{<}\) \(\newcommand{\gt}{>}\) \(\newcommand{\amp}{&}\) \(\definecolor{fillinmathshade}{gray}{0.9}\)Out beyond the edge of official terminology, sedimentologists often refer to flumology—presumably meaning the science and art of gaining knowledge and understanding of physical sedimentary processes by passing water and sediment through laboratory open channels, called flumes. I thought that it might be useful to include this brief section on flumes before launching upon chapters dealing with sediment transport, because much of our understanding of sediment transport has been developed by watching and measuring the movement of sediment in flumes (and oscillatory-flow channels and tanks as well). I will be referring to flume experiments often in coming chapters.
Dictionaries define flumes as artificial channels for transporting water. That is really not restrictive enough for our purposes, though: flumes designed for nonscientific uses are usually fairly steep and crude in structure. In the context of scientific and engineering studies, I might define a flume as a laboratory channel through which liquid is passed in order to study hydraulic processes and phenomena under controlled conditions.
Flumes are built both indoors and outdoors. One of the most famous flumes—among geologists, at least—was G.K. Gilbert’s flume, outdoors on the campus of the University of California at Berkeley. Around the turn of the twentieth century Gilbert made a pioneering study of modes and processes of sediment transport by currents, which stands to this day as a valuable source of data and ideas. But hydraulic engineers had been using flumes for decades before that.
Flumes are built of wood, metal, glass, or plastic. Each material has its advantages and disadvantages. The cross section is usually but not always rectangular. Widths usually are from several centimeters to a few meters, and lengths range from a few meters to well over a hundred meters. The largest recirculating flume in the world is at the University of Tsukuba, in Japan; it is 160 m long and 4 m wide, and it can recirculate both water and sediment. I am sure that any objective observer would consider it to be an impressive structure. (I certainly did, when I was first shown it.) I am not sure where the largest tilting flume is.
The technology of construction of all but the largest flumes is straightforward, and the problems were for the most part solved long ago. In sediment-recirculating flumes, the most critical design decision revolves around the kind of pump used and/or the arrangement for extracting sediment from the flow and delivering it to the head of the channel.
Flumes are only one kind of large-scale hydraulic equipment used for studying sediment movement. Flumes, carrying unidirectional gravity-driven free-surface flow, are distinct from closed ducts and conduits, also widely used for hydraulic studies, which have pressure-gradient-driven flow without a free surface. Closed ducts may be used for unidirectional, oscillatory, or combined flow. Also widely used are simple tanks or basins arranged mainly for oscillatory flows under surface gravity waves.
Advantages of flumes:
- sediment transport is relatively easy to watch and measure
- particular processes can be isolated for study
Disadvantages of flumes:
- flow and sedimentation can be oversimplified
- the physical scale of the flow and sediment movement is usually too small
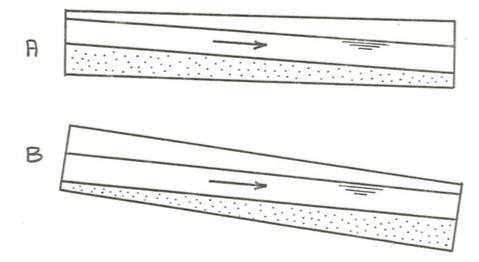
The slope of the flume may be fixed or adjustable; most flumes, except the very largest, are tilting. But when you are working with sediment transport, your flume does not really need to be tilting, because the flow itself redistributes the sediment to produce a sediment bed with slope equal to the energy slope as uniform flow is established. If you prepare a planar and uniform bed of sediment and then set up a flow over it, if the flume slope is too steep there will be erosion near the upstream end and deposition near the downstream end until a uniform flow is attained over a sediment bed that tapers upstream (Figure \(\PageIndex{1}\)A). Conversely, if you start with a flume slope that is too gentle, the result is a bed that tapers downstream (Figure \(\PageIndex{1}\)B). You just have to make sure that the flume slope you start with is near enough the slope for uniform flow that you have a full bed of sediment everywhere in the flume once the flow stops adjusting to uniformity.

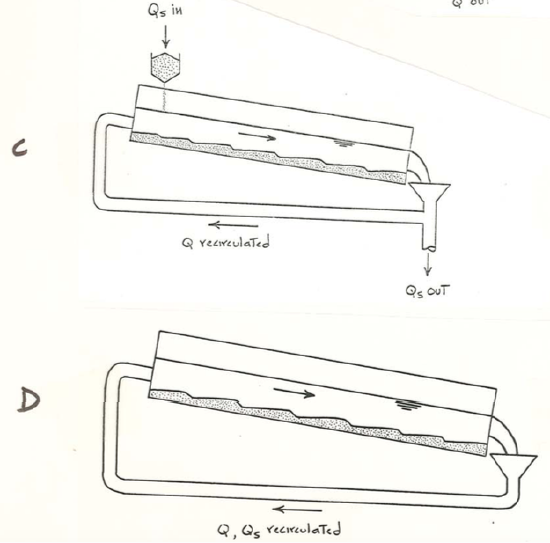
Flumes vary in their arrangements for recirculation of water and sediment. Logically there are four possible combinations of recirculation; see Figure \(\PageIndex {2}\).

Water no, sediment no (Figure \(\PageIndex {2}\)A). This arrangement is uncommon, because it is limited by water supply. Only laboratories located near dams on large rivers can afford to run large discharges of water through flumes without recirculation. Also, water temperature cannot be controlled independently. And if you do not catch the sediment, you lose it.
Water no, sediment yes (Figure \(\PageIndex {2}\)B). The same comments apply as in the preceding case, except that you do not lose the sediment.
Water yes, sediment no (Figure \(\PageIndex {2}\)C). This arrangement is more common. Its advantages are that the sediment discharge is imposed independently upon the flow. But it can be a technical challenge to separate all the sediment from the water and then feed new sediment at the upstream end.
Water yes, sediment yes (Figure \(\PageIndex {2}\)D). This arrangement is simplest and also common. Here the flow establishes its own sediment discharge; you cannot impose sediment discharge on the system. Provided that the sediment is not too coarse, this is the easiest arrangement technologically. But it is difficult to arrange for gravels.
There are two different arrangement for water-recirculating flumes:

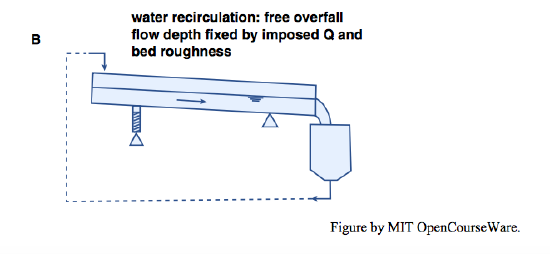
Overfall flumes (Figure \(\PageIndex{3}\)A). In some flumes, which I will call overfall flumes, there is a free overfall at the downstream end of the channel into a separate tailbox, from which water (and in many cases also the sediment) is pumped to the head of the channel. In such flumes, the flow depth in uniform flow is fixed by the imposed water discharge and bed roughness. You can set or adjust the slope only by fiddling with a weir or gate of some kind at the downstream end of the channel, to change the water depth and therefore the mean velocity.
Closed-circuit flumes (Figure \(\PageIndex{3}\)B). In other flumes, which I will call closed-circuit flumes, there is no overfall at the downstream end; the flow passes continuously into the tailbox, to be pumped back to the head of the channel. In closed-circuit flumes, the flow depth is fixed by the volume of water in the system. You impose the water discharge and flow depth and thereby the mean velocity, which in turn determines all aspects of the sediment transport as well as the slope.
Both overfall flumes and closed-circuit flumes are in wide use. Each has advantages and disadvantages. They are used for slightly different purposes, which I will touch upon in passing in later chapters.
You will see, in Chapter 13, on mixed-size sediment, that the differences between sediment-feed flumes and sediment-recirculating flumes has significant implications (Parker and Wilcock, 1993). In a sediment-feed flume, the sediment discharge is imposed upon the flow and the flow must become adjusted to accomplish the necessary transport of all of the size fractions in the feed mix. In sediment-recirculating flumes, there is no such constraint: the flow is free to adjust its sediment-transporting behavior without any external constraint imposed except for water discharge and bed material.
References Cited Chapter 8
Parker, G., and Wilcock, P.R., 1993, Sediment feed and recirculating flumes: A fundamental difference: Journal of Hydraulic Engineering, v. 119, p. 1192- 1204.


