
5: Mass Wasting
- Page ID
- 25486

\( \newcommand{\vecs}[1]{\overset { \scriptstyle \rightharpoonup} {\mathbf{#1}} } \)
\( \newcommand{\vecd}[1]{\overset{-\!-\!\rightharpoonup}{\vphantom{a}\smash {#1}}} \)
\( \newcommand{\dsum}{\displaystyle\sum\limits} \)
\( \newcommand{\dint}{\displaystyle\int\limits} \)
\( \newcommand{\dlim}{\displaystyle\lim\limits} \)
\( \newcommand{\id}{\mathrm{id}}\) \( \newcommand{\Span}{\mathrm{span}}\)
( \newcommand{\kernel}{\mathrm{null}\,}\) \( \newcommand{\range}{\mathrm{range}\,}\)
\( \newcommand{\RealPart}{\mathrm{Re}}\) \( \newcommand{\ImaginaryPart}{\mathrm{Im}}\)
\( \newcommand{\Argument}{\mathrm{Arg}}\) \( \newcommand{\norm}[1]{\| #1 \|}\)
\( \newcommand{\inner}[2]{\langle #1, #2 \rangle}\)
\( \newcommand{\Span}{\mathrm{span}}\)
\( \newcommand{\id}{\mathrm{id}}\)
\( \newcommand{\Span}{\mathrm{span}}\)
\( \newcommand{\kernel}{\mathrm{null}\,}\)
\( \newcommand{\range}{\mathrm{range}\,}\)
\( \newcommand{\RealPart}{\mathrm{Re}}\)
\( \newcommand{\ImaginaryPart}{\mathrm{Im}}\)
\( \newcommand{\Argument}{\mathrm{Arg}}\)
\( \newcommand{\norm}[1]{\| #1 \|}\)
\( \newcommand{\inner}[2]{\langle #1, #2 \rangle}\)
\( \newcommand{\Span}{\mathrm{span}}\) \( \newcommand{\AA}{\unicode[.8,0]{x212B}}\)
\( \newcommand{\vectorA}[1]{\vec{#1}} % arrow\)
\( \newcommand{\vectorAt}[1]{\vec{\text{#1}}} % arrow\)
\( \newcommand{\vectorB}[1]{\overset { \scriptstyle \rightharpoonup} {\mathbf{#1}} } \)
\( \newcommand{\vectorC}[1]{\textbf{#1}} \)
\( \newcommand{\vectorD}[1]{\overrightarrow{#1}} \)
\( \newcommand{\vectorDt}[1]{\overrightarrow{\text{#1}}} \)
\( \newcommand{\vectE}[1]{\overset{-\!-\!\rightharpoonup}{\vphantom{a}\smash{\mathbf {#1}}}} \)
\( \newcommand{\vecs}[1]{\overset { \scriptstyle \rightharpoonup} {\mathbf{#1}} } \)
\(\newcommand{\longvect}{\overrightarrow}\)
\( \newcommand{\vecd}[1]{\overset{-\!-\!\rightharpoonup}{\vphantom{a}\smash {#1}}} \)
\(\newcommand{\avec}{\mathbf a}\) \(\newcommand{\bvec}{\mathbf b}\) \(\newcommand{\cvec}{\mathbf c}\) \(\newcommand{\dvec}{\mathbf d}\) \(\newcommand{\dtil}{\widetilde{\mathbf d}}\) \(\newcommand{\evec}{\mathbf e}\) \(\newcommand{\fvec}{\mathbf f}\) \(\newcommand{\nvec}{\mathbf n}\) \(\newcommand{\pvec}{\mathbf p}\) \(\newcommand{\qvec}{\mathbf q}\) \(\newcommand{\svec}{\mathbf s}\) \(\newcommand{\tvec}{\mathbf t}\) \(\newcommand{\uvec}{\mathbf u}\) \(\newcommand{\vvec}{\mathbf v}\) \(\newcommand{\wvec}{\mathbf w}\) \(\newcommand{\xvec}{\mathbf x}\) \(\newcommand{\yvec}{\mathbf y}\) \(\newcommand{\zvec}{\mathbf z}\) \(\newcommand{\rvec}{\mathbf r}\) \(\newcommand{\mvec}{\mathbf m}\) \(\newcommand{\zerovec}{\mathbf 0}\) \(\newcommand{\onevec}{\mathbf 1}\) \(\newcommand{\real}{\mathbb R}\) \(\newcommand{\twovec}[2]{\left[\begin{array}{r}#1 \\ #2 \end{array}\right]}\) \(\newcommand{\ctwovec}[2]{\left[\begin{array}{c}#1 \\ #2 \end{array}\right]}\) \(\newcommand{\threevec}[3]{\left[\begin{array}{r}#1 \\ #2 \\ #3 \end{array}\right]}\) \(\newcommand{\cthreevec}[3]{\left[\begin{array}{c}#1 \\ #2 \\ #3 \end{array}\right]}\) \(\newcommand{\fourvec}[4]{\left[\begin{array}{r}#1 \\ #2 \\ #3 \\ #4 \end{array}\right]}\) \(\newcommand{\cfourvec}[4]{\left[\begin{array}{c}#1 \\ #2 \\ #3 \\ #4 \end{array}\right]}\) \(\newcommand{\fivevec}[5]{\left[\begin{array}{r}#1 \\ #2 \\ #3 \\ #4 \\ #5 \\ \end{array}\right]}\) \(\newcommand{\cfivevec}[5]{\left[\begin{array}{c}#1 \\ #2 \\ #3 \\ #4 \\ #5 \\ \end{array}\right]}\) \(\newcommand{\mattwo}[4]{\left[\begin{array}{rr}#1 \amp #2 \\ #3 \amp #4 \\ \end{array}\right]}\) \(\newcommand{\laspan}[1]{\text{Span}\{#1\}}\) \(\newcommand{\bcal}{\cal B}\) \(\newcommand{\ccal}{\cal C}\) \(\newcommand{\scal}{\cal S}\) \(\newcommand{\wcal}{\cal W}\) \(\newcommand{\ecal}{\cal E}\) \(\newcommand{\coords}[2]{\left\{#1\right\}_{#2}}\) \(\newcommand{\gray}[1]{\color{gray}{#1}}\) \(\newcommand{\lgray}[1]{\color{lightgray}{#1}}\) \(\newcommand{\rank}{\operatorname{rank}}\) \(\newcommand{\row}{\text{Row}}\) \(\newcommand{\col}{\text{Col}}\) \(\renewcommand{\row}{\text{Row}}\) \(\newcommand{\nul}{\text{Nul}}\) \(\newcommand{\var}{\text{Var}}\) \(\newcommand{\corr}{\text{corr}}\) \(\newcommand{\len}[1]{\left|#1\right|}\) \(\newcommand{\bbar}{\overline{\bvec}}\) \(\newcommand{\bhat}{\widehat{\bvec}}\) \(\newcommand{\bperp}{\bvec^\perp}\) \(\newcommand{\xhat}{\widehat{\xvec}}\) \(\newcommand{\vhat}{\widehat{\vvec}}\) \(\newcommand{\uhat}{\widehat{\uvec}}\) \(\newcommand{\what}{\widehat{\wvec}}\) \(\newcommand{\Sighat}{\widehat{\Sigma}}\) \(\newcommand{\lt}{<}\) \(\newcommand{\gt}{>}\) \(\newcommand{\amp}{&}\) \(\definecolor{fillinmathshade}{gray}{0.9}\)After reading this chapter, completing the exercises within it, and answering the questions at the end, you should be able to:
- Explain how slope stability is related to slope angle,
- Summarize some of the factors that influence the strength of materials on slopes, including type of rock, presence and orientation of planes of weakness such as bedding or fractures, type of unconsolidated material, and the effects of water,
- Describe what types of events can trigger mass wasting,
- Summarize the types of motion that take place with different types of mass wasting,
- Describe the main types of mass wasting—creep, slump, translational slide, rotational slide, fall, and debris flow or mud flow—in terms of the types of materials involved, the type of motion, and the likely rates of motion,
- Explain what steps we can take to delay mass wasting, and why we cannot prevent it permanently, and
- Describe some of the measures that can be taken to mitigate the risks associated with mass wasting.
- 5.1: Factors that Control Slope Stability
- This page discusses mass wasting, the downhill movement of materials influenced by factors like slope stability, material strength, and water content. Wet conditions, particularly in clay-rich soils, greatly reduce stability and can trigger events like landslides during heavy rain or snowmelt, as seen in incidents like the 2005 North Vancouver debris flow and Hokkaido slope failures. Understanding these interactions is vital for assessing slope stability in various environments.
- 5.2: Classification of Mass Wasting
- This page provides a detailed overview of slope failures, classifying them by material type, failure mechanism, and motion rate, including falls, slides, and flows. It covers specific types like rock slides, slumps, and mud flows, particularly in the Lethbridge area and Elliot Creek in BC, emphasizing their causes and characteristics.
- 5.3: Mitigating the Effects of Mass Wasting
- This page discusses a major mass wasting incident that caused significant damage and loss of life, highlighting the importance of monitoring and preventive measures. It emphasizes that while total prevention is not possible, mitigation strategies are crucial, especially in high-risk areas. Additionally, it recounts the consequences of the 1980 Mt. St.
- 5.4: Mass Wasting and Earth Systems
- This page discusses the dual relationship between mass wasting and Earth systems, highlighting factors such as tectonic activity, erosion, sediment accumulation, and weathering. It notes that mass wasting results in new rock surfaces, greenhouse gas emissions, altered drainage, and sediment changes, affecting ecosystems and facilitating material transfer from land to oceans.
- 5.5: Chapter 5 Summary and Questions for Review
- This page discusses slope stability and mass wasting, including their classification, mitigation strategies, and connections to Earth systems. Key factors influencing slope stability include angle, material strength, and water content, with excess water heightening failure risks. Types of mass wasting, such as creep and slides, are categorized by movement and material. Mitigation efforts focus on slope reinforcement, drainage improvements, and avoiding risky practices.
Early in the morning on January 9th, 1965, 47 million cubic metres of rock broke away from the steep upper slopes of Johnson Peak (16 km southeast of Hope, BC) and screamed 2000 m down into the valley, where it gouged out the contents of a small lake and continued a few hundred metres up the other side (Figure \(\PageIndex{1}\). Four people, who had been stopped on the highway by a snow avalanche, were killed. Many more might have become victims, except that a Greyhound bus driver, en route to Vancouver, turned his bus around on seeing the avalanche. The rock first failed along planes of metamorphic foliation on Johnson Peak in an area that had been eroded into a steep slope by glacial ice.[1] There is no evidence that it was triggered by any specific event, and there was no warning that it was about to happen. Even if there had been warning, there is absolutely nothing that could have been done to prevent it. There are thousands of similar situations throughout the mountainous regions of the Earth.
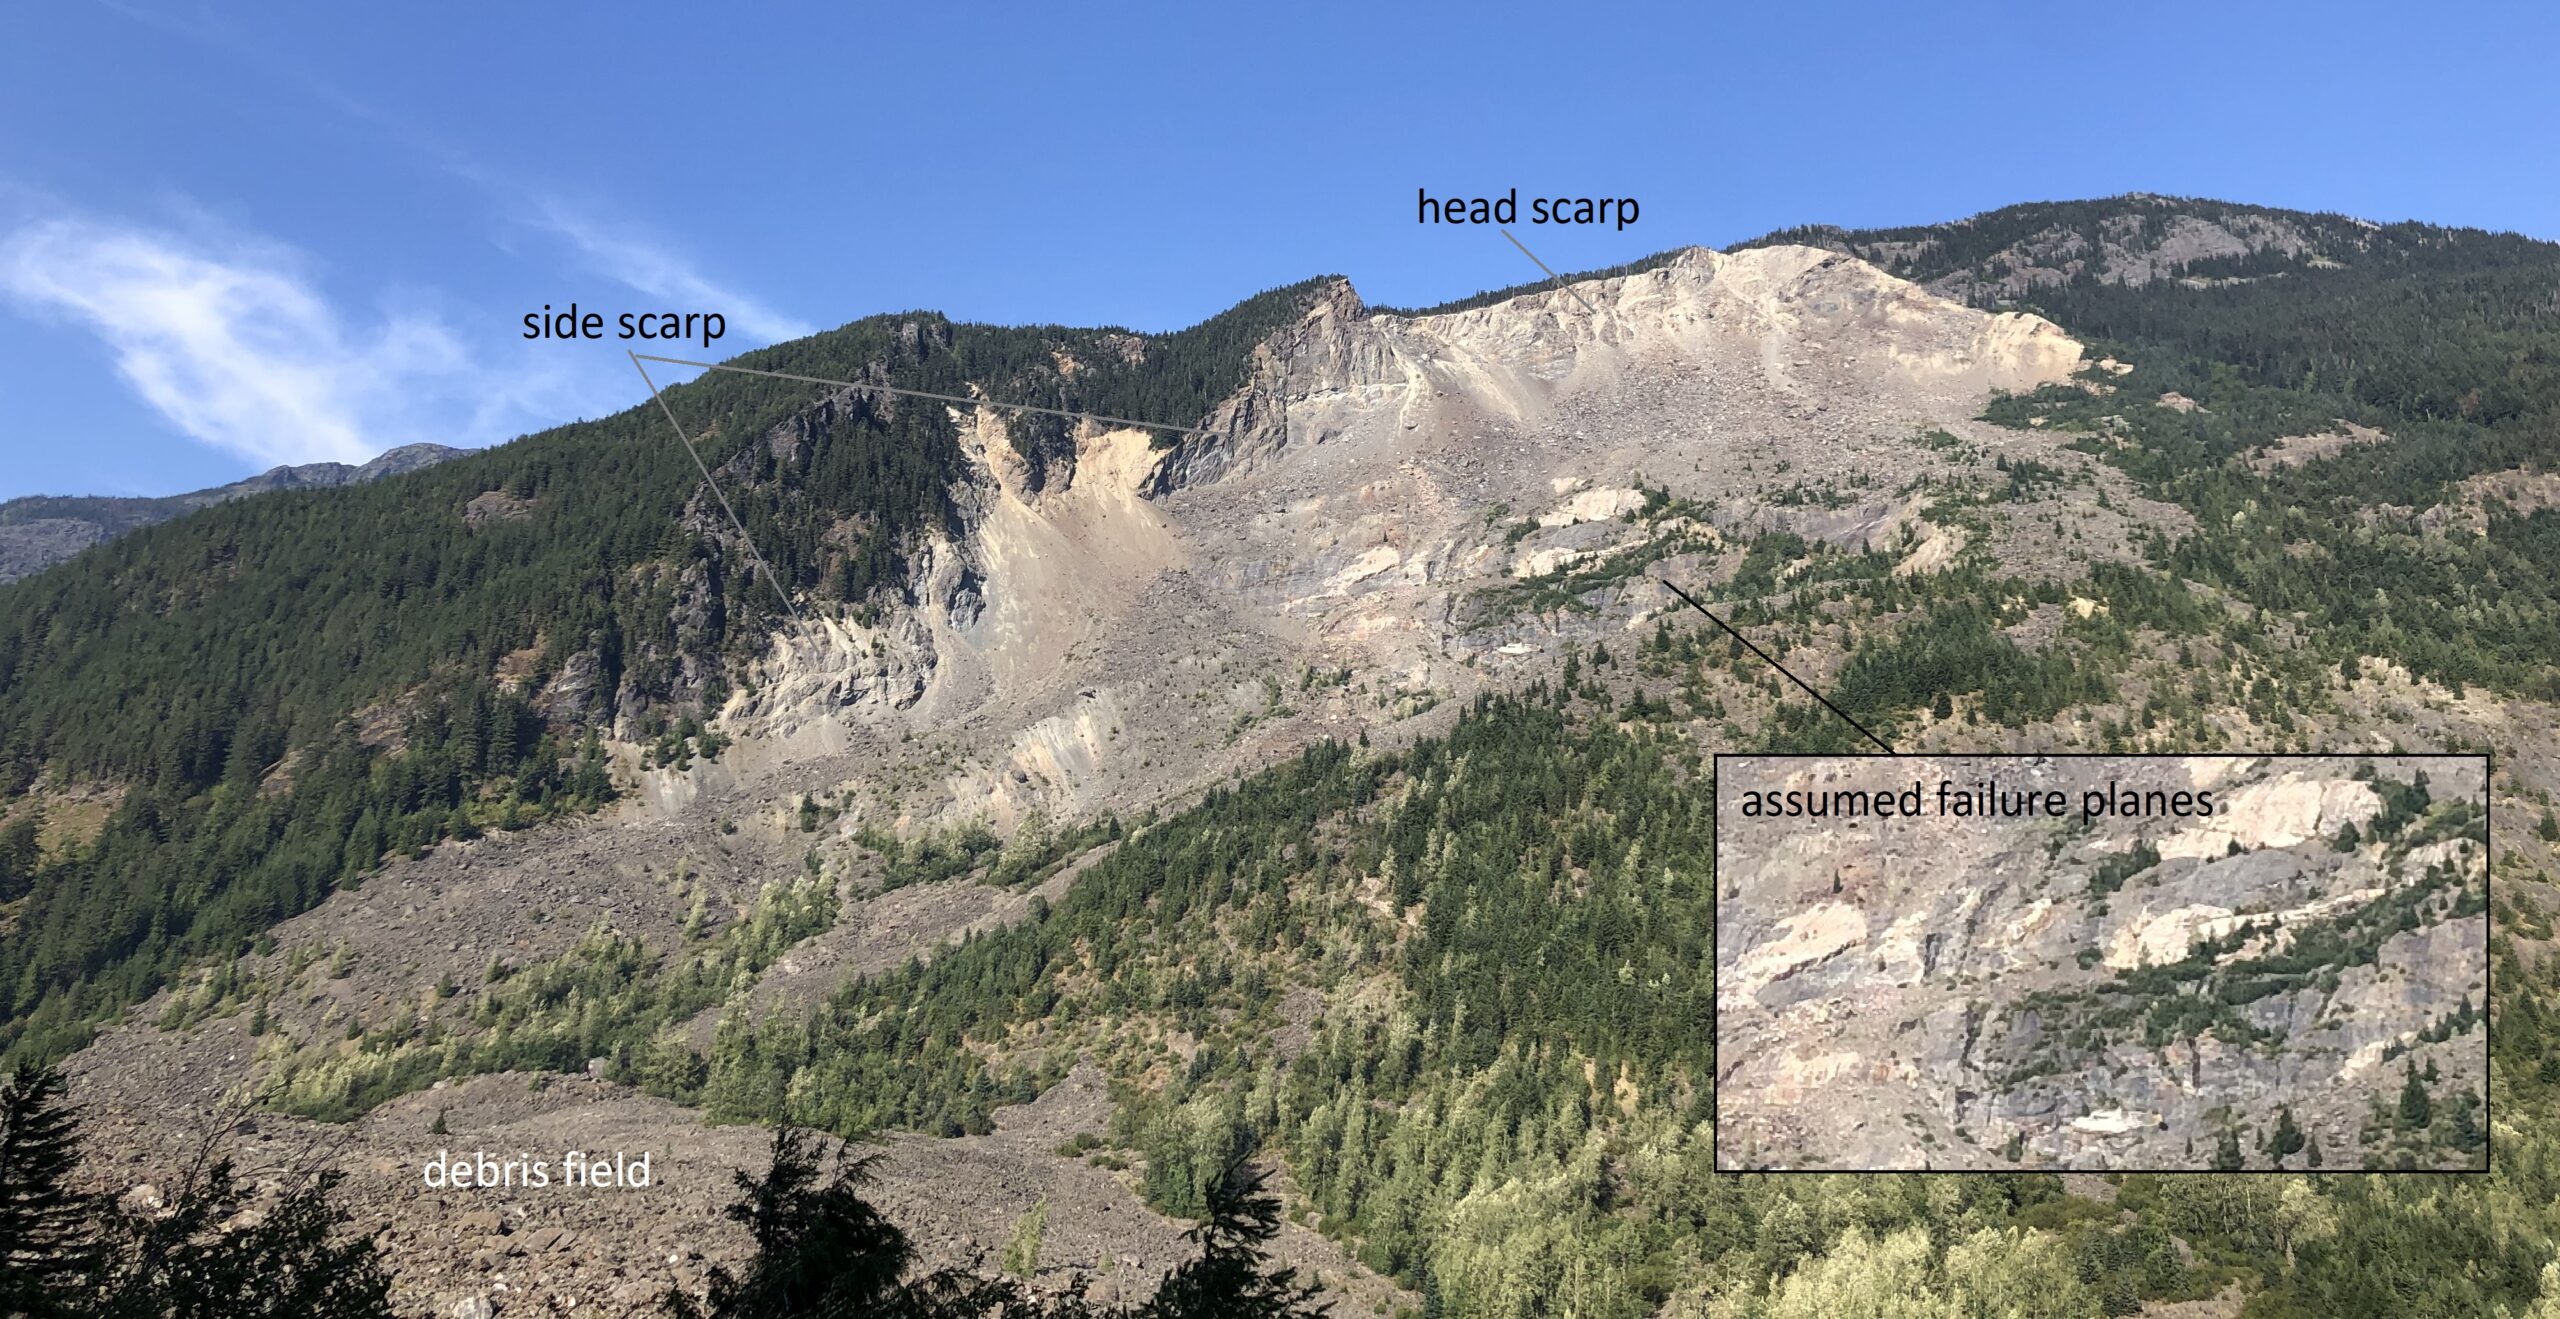
Figure \(\PageIndex{1}\ The Site of the 1965 Hope Slide as Seen in 2021. The initial failure is thought to have taken place along weaknesses in the rock known as foliation planes. They are the light-coloured surfaces visible within the area shown in the inset and labelled as “failure planes”.
What can we learn from the Hope Slide? In general, we cannot prevent mass wasting, and we’re not very good at predicting it. Understanding the underlying geology is critical to understanding mass wasting. Although failures are inevitable in a region with steep slopes, dangerous ones happen infrequently and the risk to individuals is low compared with other risks that we accept, like walking across a road or spending mots of the day sitting down.
An important reason to learn about mass wasting is to understand the nature of the materials that failed and how and why they failed so that we can minimize risks from similar events in the future. For this reason, we need to be able to classify mass wasting events and we need to know the terms that geologists, engineers and others use to communicate about them.
Media Attribution
- Figure 5.0.1 C. Aperocho, CC BY SA 4.0