
3.2: Mapping
- Page ID
- 40883

\( \newcommand{\vecs}[1]{\overset { \scriptstyle \rightharpoonup} {\mathbf{#1}} } \)
\( \newcommand{\vecd}[1]{\overset{-\!-\!\rightharpoonup}{\vphantom{a}\smash {#1}}} \)
\( \newcommand{\dsum}{\displaystyle\sum\limits} \)
\( \newcommand{\dint}{\displaystyle\int\limits} \)
\( \newcommand{\dlim}{\displaystyle\lim\limits} \)
\( \newcommand{\id}{\mathrm{id}}\) \( \newcommand{\Span}{\mathrm{span}}\)
( \newcommand{\kernel}{\mathrm{null}\,}\) \( \newcommand{\range}{\mathrm{range}\,}\)
\( \newcommand{\RealPart}{\mathrm{Re}}\) \( \newcommand{\ImaginaryPart}{\mathrm{Im}}\)
\( \newcommand{\Argument}{\mathrm{Arg}}\) \( \newcommand{\norm}[1]{\| #1 \|}\)
\( \newcommand{\inner}[2]{\langle #1, #2 \rangle}\)
\( \newcommand{\Span}{\mathrm{span}}\)
\( \newcommand{\id}{\mathrm{id}}\)
\( \newcommand{\Span}{\mathrm{span}}\)
\( \newcommand{\kernel}{\mathrm{null}\,}\)
\( \newcommand{\range}{\mathrm{range}\,}\)
\( \newcommand{\RealPart}{\mathrm{Re}}\)
\( \newcommand{\ImaginaryPart}{\mathrm{Im}}\)
\( \newcommand{\Argument}{\mathrm{Arg}}\)
\( \newcommand{\norm}[1]{\| #1 \|}\)
\( \newcommand{\inner}[2]{\langle #1, #2 \rangle}\)
\( \newcommand{\Span}{\mathrm{span}}\) \( \newcommand{\AA}{\unicode[.8,0]{x212B}}\)
\( \newcommand{\vectorA}[1]{\vec{#1}} % arrow\)
\( \newcommand{\vectorAt}[1]{\vec{\text{#1}}} % arrow\)
\( \newcommand{\vectorB}[1]{\overset { \scriptstyle \rightharpoonup} {\mathbf{#1}} } \)
\( \newcommand{\vectorC}[1]{\textbf{#1}} \)
\( \newcommand{\vectorD}[1]{\overrightarrow{#1}} \)
\( \newcommand{\vectorDt}[1]{\overrightarrow{\text{#1}}} \)
\( \newcommand{\vectE}[1]{\overset{-\!-\!\rightharpoonup}{\vphantom{a}\smash{\mathbf {#1}}}} \)
\( \newcommand{\vecs}[1]{\overset { \scriptstyle \rightharpoonup} {\mathbf{#1}} } \)
\(\newcommand{\longvect}{\overrightarrow}\)
\( \newcommand{\vecd}[1]{\overset{-\!-\!\rightharpoonup}{\vphantom{a}\smash {#1}}} \)
\(\newcommand{\avec}{\mathbf a}\) \(\newcommand{\bvec}{\mathbf b}\) \(\newcommand{\cvec}{\mathbf c}\) \(\newcommand{\dvec}{\mathbf d}\) \(\newcommand{\dtil}{\widetilde{\mathbf d}}\) \(\newcommand{\evec}{\mathbf e}\) \(\newcommand{\fvec}{\mathbf f}\) \(\newcommand{\nvec}{\mathbf n}\) \(\newcommand{\pvec}{\mathbf p}\) \(\newcommand{\qvec}{\mathbf q}\) \(\newcommand{\svec}{\mathbf s}\) \(\newcommand{\tvec}{\mathbf t}\) \(\newcommand{\uvec}{\mathbf u}\) \(\newcommand{\vvec}{\mathbf v}\) \(\newcommand{\wvec}{\mathbf w}\) \(\newcommand{\xvec}{\mathbf x}\) \(\newcommand{\yvec}{\mathbf y}\) \(\newcommand{\zvec}{\mathbf z}\) \(\newcommand{\rvec}{\mathbf r}\) \(\newcommand{\mvec}{\mathbf m}\) \(\newcommand{\zerovec}{\mathbf 0}\) \(\newcommand{\onevec}{\mathbf 1}\) \(\newcommand{\real}{\mathbb R}\) \(\newcommand{\twovec}[2]{\left[\begin{array}{r}#1 \\ #2 \end{array}\right]}\) \(\newcommand{\ctwovec}[2]{\left[\begin{array}{c}#1 \\ #2 \end{array}\right]}\) \(\newcommand{\threevec}[3]{\left[\begin{array}{r}#1 \\ #2 \\ #3 \end{array}\right]}\) \(\newcommand{\cthreevec}[3]{\left[\begin{array}{c}#1 \\ #2 \\ #3 \end{array}\right]}\) \(\newcommand{\fourvec}[4]{\left[\begin{array}{r}#1 \\ #2 \\ #3 \\ #4 \end{array}\right]}\) \(\newcommand{\cfourvec}[4]{\left[\begin{array}{c}#1 \\ #2 \\ #3 \\ #4 \end{array}\right]}\) \(\newcommand{\fivevec}[5]{\left[\begin{array}{r}#1 \\ #2 \\ #3 \\ #4 \\ #5 \\ \end{array}\right]}\) \(\newcommand{\cfivevec}[5]{\left[\begin{array}{c}#1 \\ #2 \\ #3 \\ #4 \\ #5 \\ \end{array}\right]}\) \(\newcommand{\mattwo}[4]{\left[\begin{array}{rr}#1 \amp #2 \\ #3 \amp #4 \\ \end{array}\right]}\) \(\newcommand{\laspan}[1]{\text{Span}\{#1\}}\) \(\newcommand{\bcal}{\cal B}\) \(\newcommand{\ccal}{\cal C}\) \(\newcommand{\scal}{\cal S}\) \(\newcommand{\wcal}{\cal W}\) \(\newcommand{\ecal}{\cal E}\) \(\newcommand{\coords}[2]{\left\{#1\right\}_{#2}}\) \(\newcommand{\gray}[1]{\color{gray}{#1}}\) \(\newcommand{\lgray}[1]{\color{lightgray}{#1}}\) \(\newcommand{\rank}{\operatorname{rank}}\) \(\newcommand{\row}{\text{Row}}\) \(\newcommand{\col}{\text{Col}}\) \(\renewcommand{\row}{\text{Row}}\) \(\newcommand{\nul}{\text{Nul}}\) \(\newcommand{\var}{\text{Var}}\) \(\newcommand{\corr}{\text{corr}}\) \(\newcommand{\len}[1]{\left|#1\right|}\) \(\newcommand{\bbar}{\overline{\bvec}}\) \(\newcommand{\bhat}{\widehat{\bvec}}\) \(\newcommand{\bperp}{\bvec^\perp}\) \(\newcommand{\xhat}{\widehat{\xvec}}\) \(\newcommand{\vhat}{\widehat{\vvec}}\) \(\newcommand{\uhat}{\widehat{\uvec}}\) \(\newcommand{\what}{\widehat{\wvec}}\) \(\newcommand{\Sighat}{\widehat{\Sigma}}\) \(\newcommand{\lt}{<}\) \(\newcommand{\gt}{>}\) \(\newcommand{\amp}{&}\) \(\definecolor{fillinmathshade}{gray}{0.9}\)Air Temperature on a Map
Meteorologists need to understand how air temperature varies across the country to warn specific regions about current weather conditions (e.g., heatwaves, cold fronts) and to predict future changes (e.g., future heatwaves or cold fronts). Thus, once air temperature data is collected from weather stations across the country using the previously mentioned methods, it is then plotted on a temperature map similar to Figure \(\PageIndex{1}\). This map provides Meteorologists a broad perspective of current weather conditions across the country.

Let's identify any notable air temperature patterns on the weather map.
- The coldest air temperature on the map is 54°F, which is located near:
- Seattle, Washington
- Halifax, Nova Scotia
- Portland, Maine
- The warmest air temperature on the map is 110°F, which is located near:
- Miami, Florida
- Del Rio, Texas
- Blythe, California
Isotherms
It probably took some time to find the maximum and minimum temperatures on the map. Well, the good news is that to make it easier to identify air temperature patterns, we can plot lines of constant temperature on the map. These lines are called Isotherms and are formed by connecting nearby points at the same temperature. Figure \(\PageIndex{2}\) is for an hour earlier than Figure \(\PageIndex{1}\), with isotherms along with station temperatures on it.
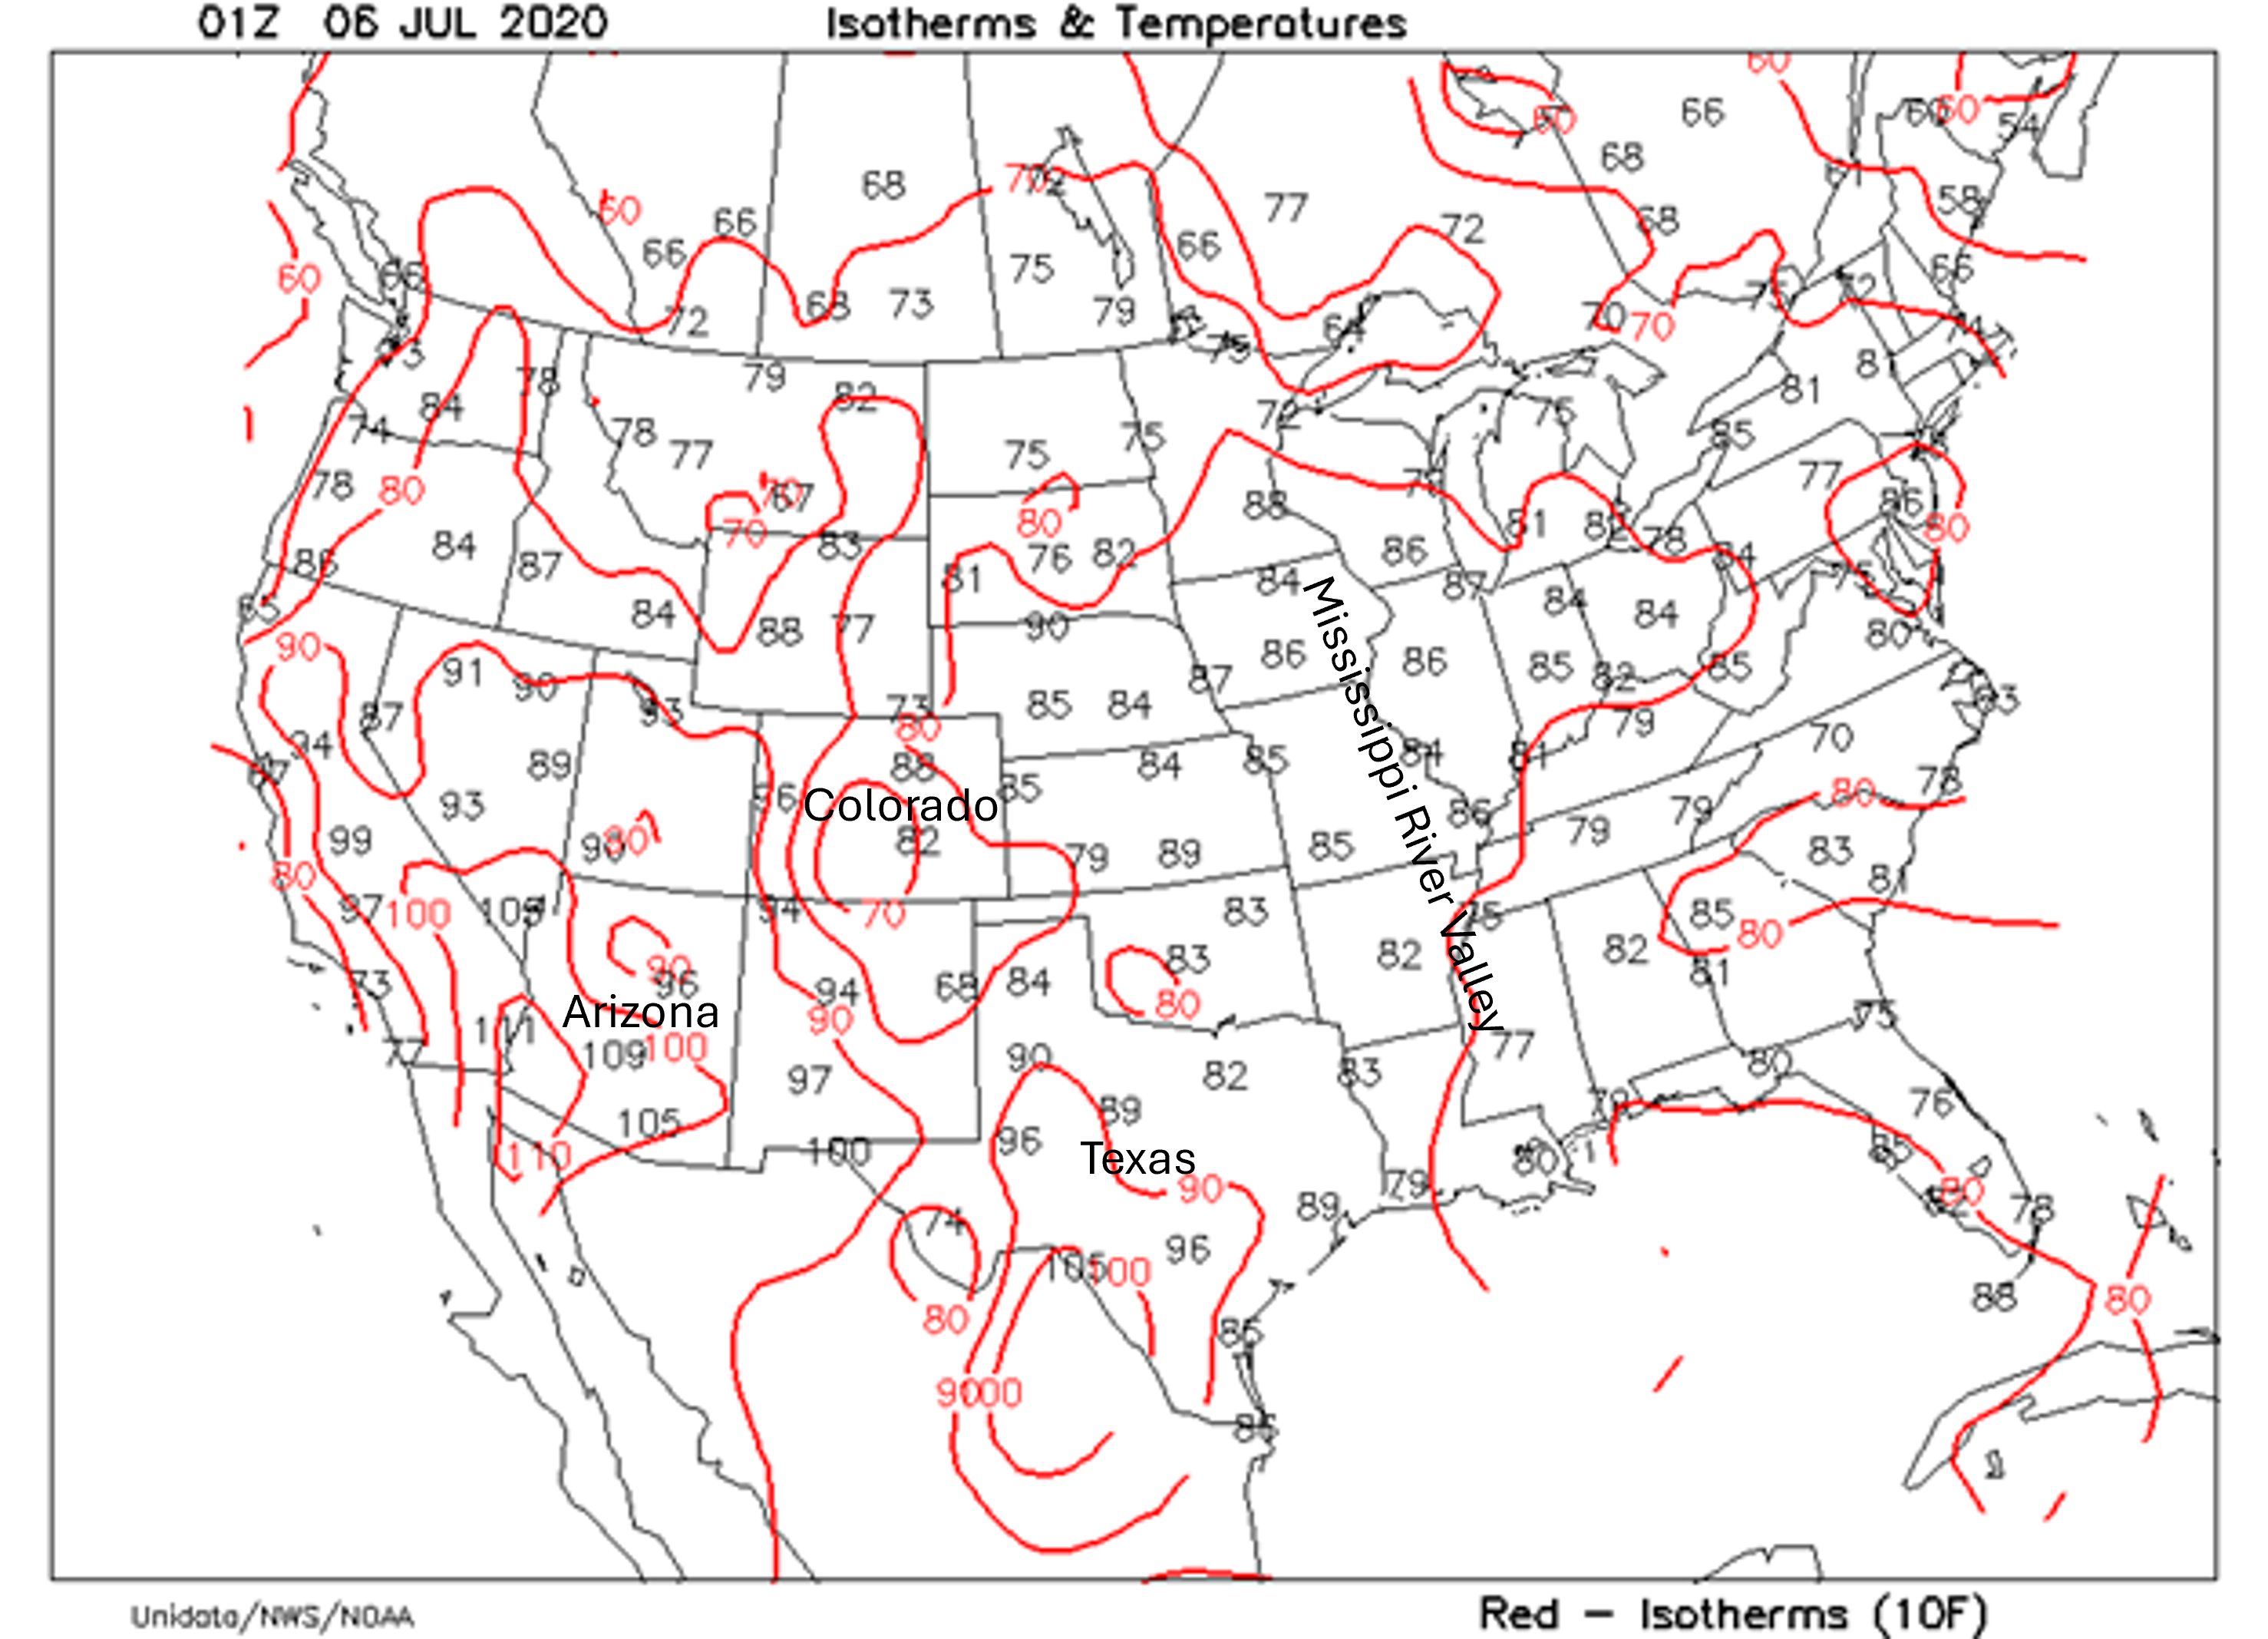
- Based on Figure \(\PageIndex{2}\), there are isotherms for temperatures of:
- 40, 50, 60, 70
- 50, 60, 70, 80, 90
- 60, 70, 80, 90, 100, 110
- 60, 65, 70, 75
- The interval, or the difference in value between two consecutive isotherms, is:
- 5
- 10
- 20
If you were now asked again to find temperatures like 54°F or 110°F on the map, you don't need to read the temperature at every station. You can search through fewer isotherm lines to find one with a similar number. The station temperature you are searching for should be close to that line. Attempt to answer questions 2 and 3 again, using the isotherm map in Figure \(\PageIndex{2}\). Now that we have understood how isotherms can help us understand the temperature patterns across a region, there are a few key properties of isotherms that we need to understand first:
- Isotherms indicate that all locations beneath a given isotherm experience the same temperature.
- Isotherms divide temperatures greater than the isotherm’s value from temperatures lower than the isotherm’s value. For example, the 80°F isotherm goes through the Mississippi River Valley, which includes the area between Arkansas and Mississippi, Missouri and Tennessee, and Kentucky. Notice that station temperatures on the immediate right (East) side of the isotherm are lower than 80°F, while temperatures to the left of the isotherm are greater than 80°F.
- Isotherms that close upon themselves to form a complete circle do the same thing. They divide lower-temperature regions from higher-temperature regions. Focus on the 100°F circle over South-Eastern California, Southern Nevada, and Western Arizona. Every station outside that circle has a temperature below 100°F, while every station inside it has a temperature above 100°F. The 70°F circle over Southern Colorado also behaves similarly. Everything outside of the circle has a temperature greater than 70°F, while everything inside of it has a temperature lower than 70°F.
- Focus on the isotherm Bullseye over Central Colorado. As you approach the center of the Bullseye from Texas or Arizona, the isotherm values _____.
- increase
- decrease
- Therefore, the temperature in the center of the Bullseye over Central Colorado is ____ than the temperature of the areas surrounding the Bullseye.
- higher
- lower