
3A Strike-Slip Faults
- Page ID
- 1387
This page is a draft and is under active development.
\( \newcommand{\vecs}[1]{\overset { \scriptstyle \rightharpoonup} {\mathbf{#1}} } \)
\( \newcommand{\vecd}[1]{\overset{-\!-\!\rightharpoonup}{\vphantom{a}\smash {#1}}} \)
\( \newcommand{\dsum}{\displaystyle\sum\limits} \)
\( \newcommand{\dint}{\displaystyle\int\limits} \)
\( \newcommand{\dlim}{\displaystyle\lim\limits} \)
\( \newcommand{\id}{\mathrm{id}}\) \( \newcommand{\Span}{\mathrm{span}}\)
( \newcommand{\kernel}{\mathrm{null}\,}\) \( \newcommand{\range}{\mathrm{range}\,}\)
\( \newcommand{\RealPart}{\mathrm{Re}}\) \( \newcommand{\ImaginaryPart}{\mathrm{Im}}\)
\( \newcommand{\Argument}{\mathrm{Arg}}\) \( \newcommand{\norm}[1]{\| #1 \|}\)
\( \newcommand{\inner}[2]{\langle #1, #2 \rangle}\)
\( \newcommand{\Span}{\mathrm{span}}\)
\( \newcommand{\id}{\mathrm{id}}\)
\( \newcommand{\Span}{\mathrm{span}}\)
\( \newcommand{\kernel}{\mathrm{null}\,}\)
\( \newcommand{\range}{\mathrm{range}\,}\)
\( \newcommand{\RealPart}{\mathrm{Re}}\)
\( \newcommand{\ImaginaryPart}{\mathrm{Im}}\)
\( \newcommand{\Argument}{\mathrm{Arg}}\)
\( \newcommand{\norm}[1]{\| #1 \|}\)
\( \newcommand{\inner}[2]{\langle #1, #2 \rangle}\)
\( \newcommand{\Span}{\mathrm{span}}\) \( \newcommand{\AA}{\unicode[.8,0]{x212B}}\)
\( \newcommand{\vectorA}[1]{\vec{#1}} % arrow\)
\( \newcommand{\vectorAt}[1]{\vec{\text{#1}}} % arrow\)
\( \newcommand{\vectorB}[1]{\overset { \scriptstyle \rightharpoonup} {\mathbf{#1}} } \)
\( \newcommand{\vectorC}[1]{\textbf{#1}} \)
\( \newcommand{\vectorD}[1]{\overrightarrow{#1}} \)
\( \newcommand{\vectorDt}[1]{\overrightarrow{\text{#1}}} \)
\( \newcommand{\vectE}[1]{\overset{-\!-\!\rightharpoonup}{\vphantom{a}\smash{\mathbf {#1}}}} \)
\( \newcommand{\vecs}[1]{\overset { \scriptstyle \rightharpoonup} {\mathbf{#1}} } \)
\(\newcommand{\longvect}{\overrightarrow}\)
\( \newcommand{\vecd}[1]{\overset{-\!-\!\rightharpoonup}{\vphantom{a}\smash {#1}}} \)
\(\newcommand{\avec}{\mathbf a}\) \(\newcommand{\bvec}{\mathbf b}\) \(\newcommand{\cvec}{\mathbf c}\) \(\newcommand{\dvec}{\mathbf d}\) \(\newcommand{\dtil}{\widetilde{\mathbf d}}\) \(\newcommand{\evec}{\mathbf e}\) \(\newcommand{\fvec}{\mathbf f}\) \(\newcommand{\nvec}{\mathbf n}\) \(\newcommand{\pvec}{\mathbf p}\) \(\newcommand{\qvec}{\mathbf q}\) \(\newcommand{\svec}{\mathbf s}\) \(\newcommand{\tvec}{\mathbf t}\) \(\newcommand{\uvec}{\mathbf u}\) \(\newcommand{\vvec}{\mathbf v}\) \(\newcommand{\wvec}{\mathbf w}\) \(\newcommand{\xvec}{\mathbf x}\) \(\newcommand{\yvec}{\mathbf y}\) \(\newcommand{\zvec}{\mathbf z}\) \(\newcommand{\rvec}{\mathbf r}\) \(\newcommand{\mvec}{\mathbf m}\) \(\newcommand{\zerovec}{\mathbf 0}\) \(\newcommand{\onevec}{\mathbf 1}\) \(\newcommand{\real}{\mathbb R}\) \(\newcommand{\twovec}[2]{\left[\begin{array}{r}#1 \\ #2 \end{array}\right]}\) \(\newcommand{\ctwovec}[2]{\left[\begin{array}{c}#1 \\ #2 \end{array}\right]}\) \(\newcommand{\threevec}[3]{\left[\begin{array}{r}#1 \\ #2 \\ #3 \end{array}\right]}\) \(\newcommand{\cthreevec}[3]{\left[\begin{array}{c}#1 \\ #2 \\ #3 \end{array}\right]}\) \(\newcommand{\fourvec}[4]{\left[\begin{array}{r}#1 \\ #2 \\ #3 \\ #4 \end{array}\right]}\) \(\newcommand{\cfourvec}[4]{\left[\begin{array}{c}#1 \\ #2 \\ #3 \\ #4 \end{array}\right]}\) \(\newcommand{\fivevec}[5]{\left[\begin{array}{r}#1 \\ #2 \\ #3 \\ #4 \\ #5 \\ \end{array}\right]}\) \(\newcommand{\cfivevec}[5]{\left[\begin{array}{c}#1 \\ #2 \\ #3 \\ #4 \\ #5 \\ \end{array}\right]}\) \(\newcommand{\mattwo}[4]{\left[\begin{array}{rr}#1 \amp #2 \\ #3 \amp #4 \\ \end{array}\right]}\) \(\newcommand{\laspan}[1]{\text{Span}\{#1\}}\) \(\newcommand{\bcal}{\cal B}\) \(\newcommand{\ccal}{\cal C}\) \(\newcommand{\scal}{\cal S}\) \(\newcommand{\wcal}{\cal W}\) \(\newcommand{\ecal}{\cal E}\) \(\newcommand{\coords}[2]{\left\{#1\right\}_{#2}}\) \(\newcommand{\gray}[1]{\color{gray}{#1}}\) \(\newcommand{\lgray}[1]{\color{lightgray}{#1}}\) \(\newcommand{\rank}{\operatorname{rank}}\) \(\newcommand{\row}{\text{Row}}\) \(\newcommand{\col}{\text{Col}}\) \(\renewcommand{\row}{\text{Row}}\) \(\newcommand{\nul}{\text{Nul}}\) \(\newcommand{\var}{\text{Var}}\) \(\newcommand{\corr}{\text{corr}}\) \(\newcommand{\len}[1]{\left|#1\right|}\) \(\newcommand{\bbar}{\overline{\bvec}}\) \(\newcommand{\bhat}{\widehat{\bvec}}\) \(\newcommand{\bperp}{\bvec^\perp}\) \(\newcommand{\xhat}{\widehat{\xvec}}\) \(\newcommand{\vhat}{\widehat{\vvec}}\) \(\newcommand{\uhat}{\widehat{\uvec}}\) \(\newcommand{\what}{\widehat{\wvec}}\) \(\newcommand{\Sighat}{\widehat{\Sigma}}\) \(\newcommand{\lt}{<}\) \(\newcommand{\gt}{>}\) \(\newcommand{\amp}{&}\) \(\definecolor{fillinmathshade}{gray}{0.9}\)Strike-slip faults accomplish lateral relative motion, which may be dextral (right lateral) or sinistral (left-lateral). Terminology for strike-slip faults has evolved based on the spatial scale and context of faulting.
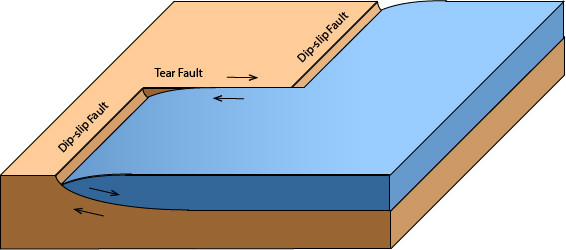
Tear faults
Tear faults are small faults with lengths on the scale of meters to a few kilometers. These faults form to accommodate the irregular shapes of dip-slip faults. A tear fault is contained within a block or bounds a block otherwise surrounded by dip-slip faults.
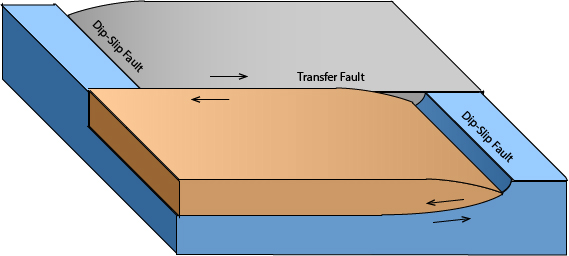
Transfer faults
Transfer faults are meters to tens of kilometers long, transferring slip between blocks bounded by dip-slip faults.
Transform faults
Transform faults are plate boundary faults, and are tens to hundreds of kilometers long.
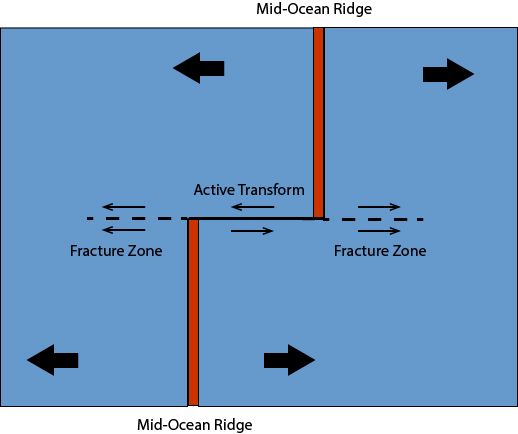
This map shows a pair of spreading centers separated by a transform fault. Fault slip is sinistral, opposite of the apparent dextral offset of the ridges. Beyond the spreading centers, the fault is not active because both sides move in the same direction. A bathymetric step remains, however, and this area is called a fracture zone.
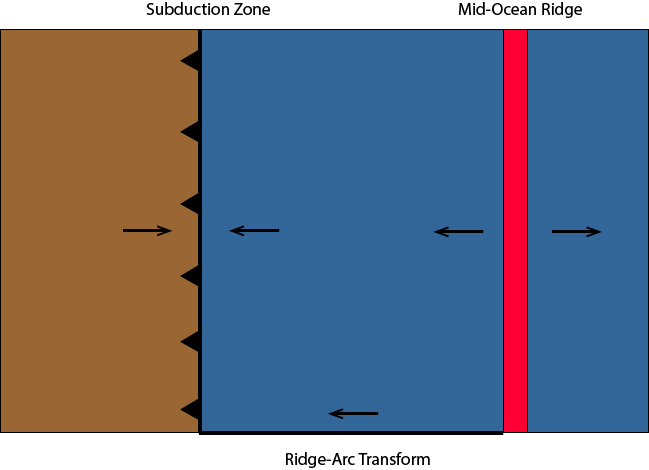
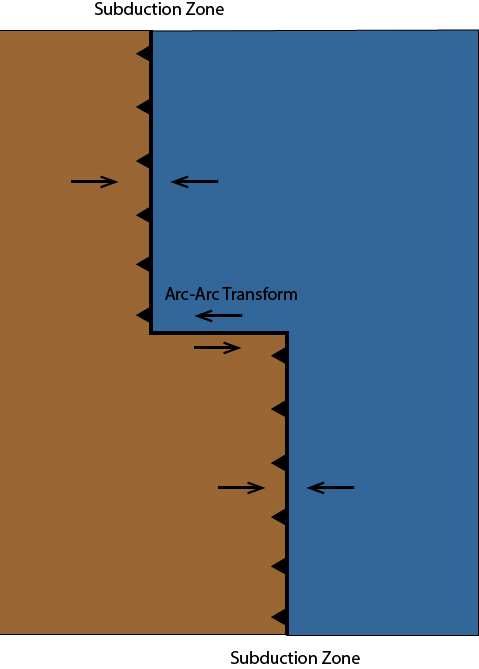
Transform faults come in three varieties, defined by the types of plate boundaries connected to them. A ridge-ridge transform, such as the one pictured above, connects two mid-ocean ridges. A ridge-arc transform is located on the side of a plate with one edge being subducted beneath an arc and the other growing at a mid-ocean ridge. An arc-arc transform joins a pair of offset subduction zones.
Continental transforms, such as the Alpine fault in New Zealand and the San Andreas in California, mimic their oceanic counterparts in connecting other types of plate boundaries.
Transcurrent faults
Also tens to hundreds of kilometers long, transcurrent faults are crustal- to lithospheric-scale faults embedded within orogens. This definition is somewhat arbitrary, as some transcurrent faults could arguably define plate boundaries.
Many major transcurrent faults are found in the India-Asia collision zone. Though most of these faults do not form plate boundaries in the strictly defined sense, they do transfer plate boundary strain well into the interior of Asia.
Strike-Slip Fault Zone Features
Riedel Shears
Riedel shears form as faults break through previously unfractured material. Though discussed here in the context of strike-slip faulting, these fracture systems can occur with any fault type. Three varieties of Riedel shear exist, defined by their orientation relative to the fault zone. R-shears are synthetic fractures, forming at acute angles of around 15° to the main fault. Due to their orientation, there is a component of tension across these fractures.
- P-shears form at angles near 10° to the main fault, but are antithetic, creating a component of compression. R and P shears can link together to form a jagged fault plane.
- R'-shears are antithetic faults forming at high angles to the main fault, typically between 70° and 80°.
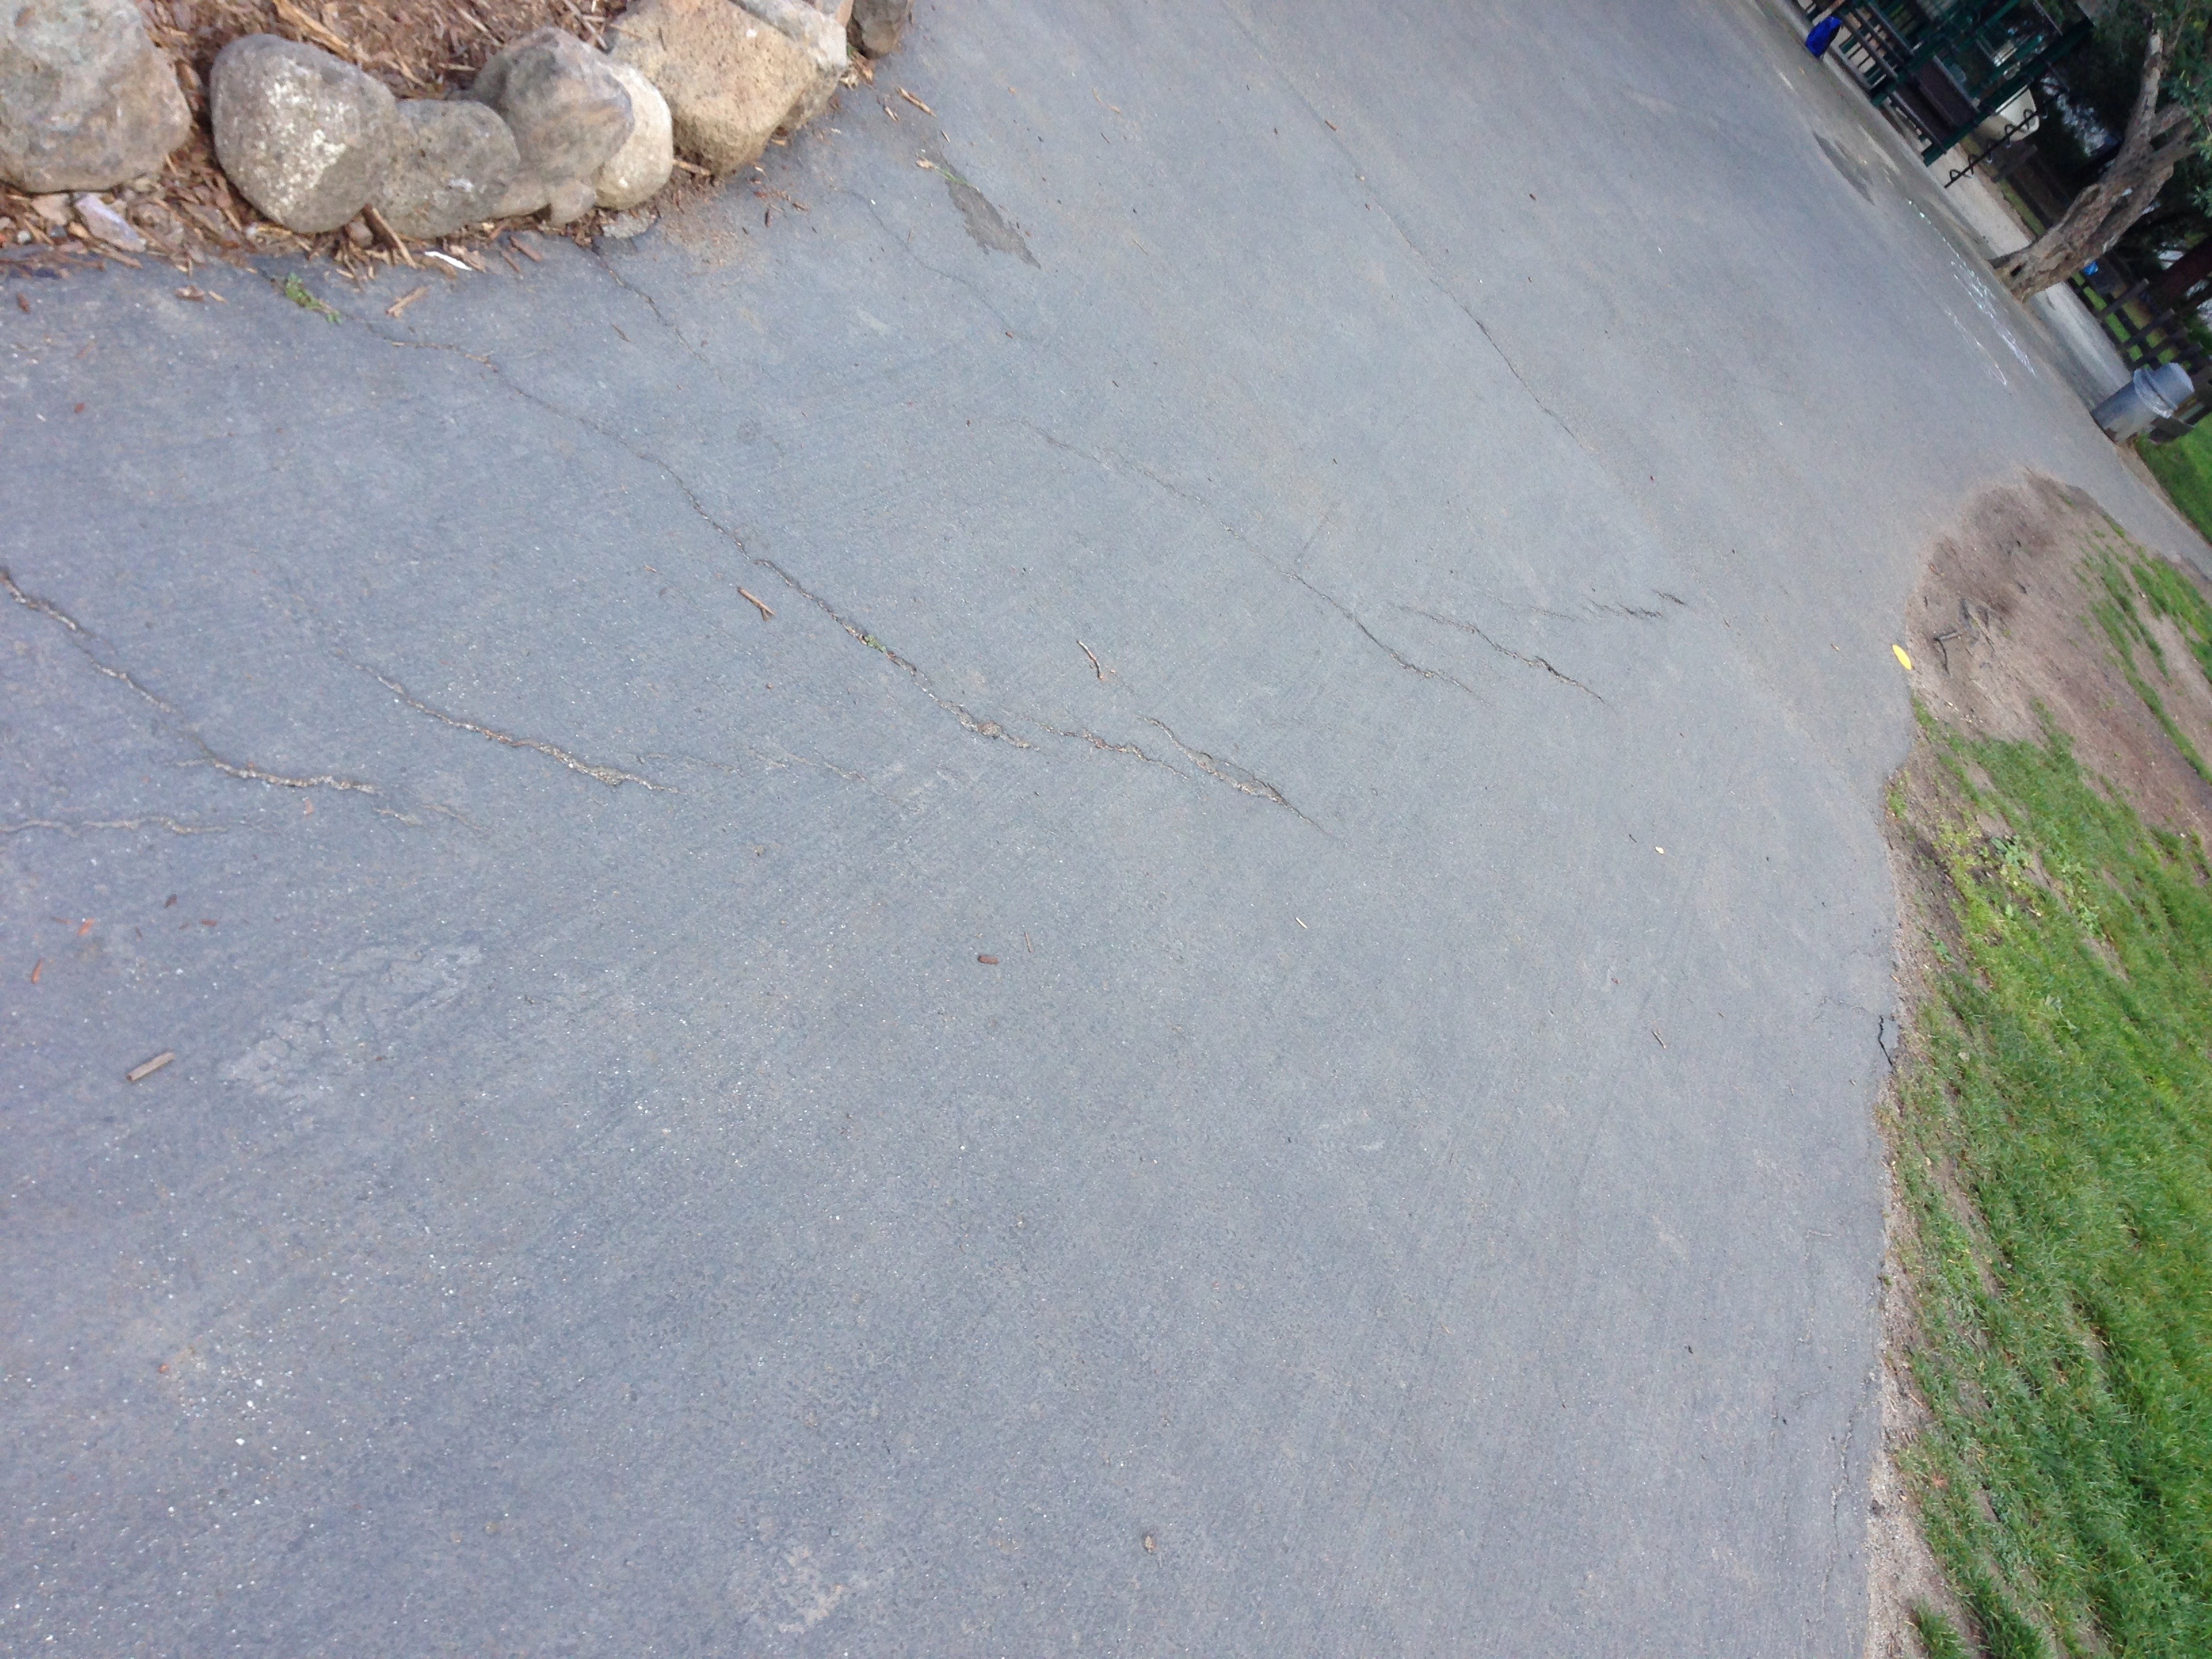
Mole Tracks
A mole track describes a linear mounded zone of disrupted material that forms during imposed strike-slip through unconsolidated surficial sediments. The mole track develops via formation and linkage of R and P shears.
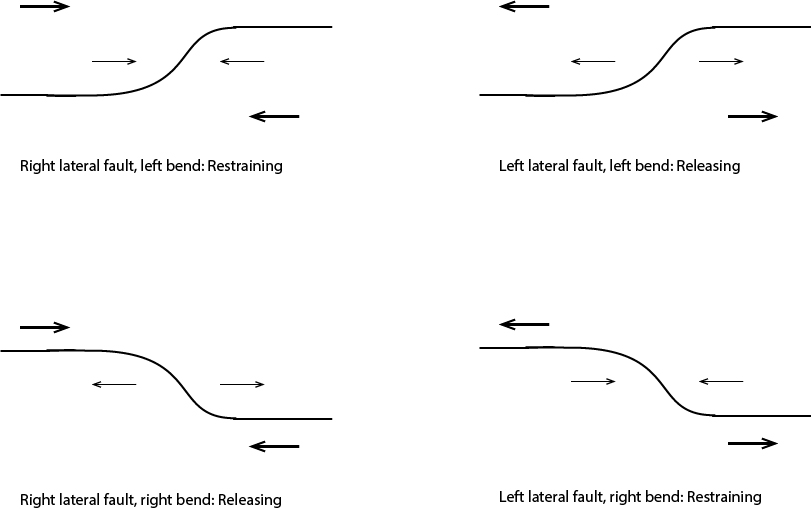
Strike-Slip Duplexes
A releasing bend or step produces a component of extension, leading to formation of a pull-apart basin. A restraining bend or step results compressional stresses, often causing uplift in that region. For a right-lateral strike-slip fault, a right bend or step is releasing; likewise, for a left-lateral fault, a left bend or step is releasing. A common shorthand way to remember this is right-right-releasing. Another is to remember that when the sense of slip and the bend direction are opposed, the bend is restraining.
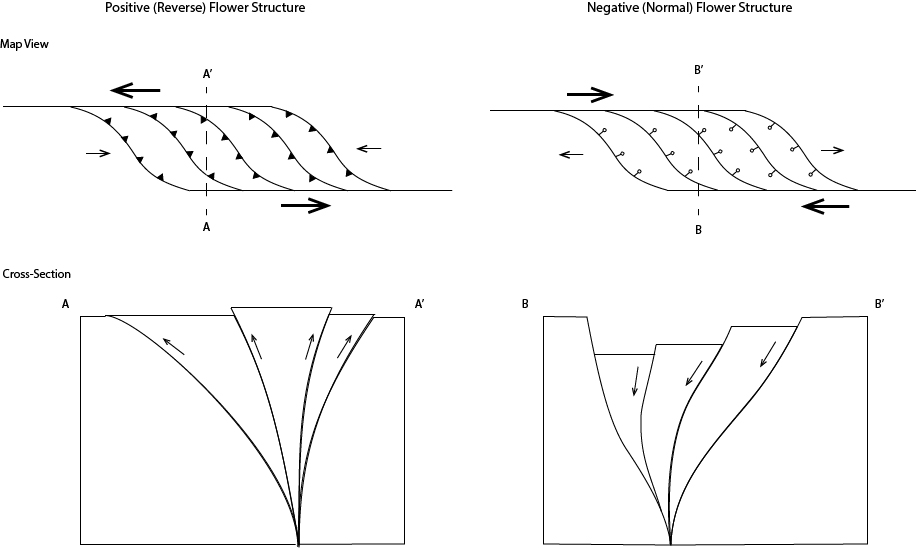
Flower Structures
A flower structure is the three-dimensional form of faulting in a strike-slip duplex. Faulting with a dip-slip component tends to become more diffuse towards the surface, making the set of faults appear similar to flower petals.
Active Strike-Slip Features
Understanding seismic hazard from strike-slip fault earthquakes requires recognition of how active strike-slip faults affect landscapes. Many distinctive features form as a result of strike-slip fault activity.
A scarp is a sharp break in topography. Note that this term simply describes the shape of the land, not the process by which that shape was created. Scarps related to strike-slip faulting generally form because the fault moves an area of higher topography up against a lower area. When such a scarp blocks off a drainage, it is called a shutter ridge.Where two topographic lows are moved next to each other, they form a tectonic furrow. When filled with water, these depressions are called sag ponds. Deflected channels may form where erosion happens fast enough relative to fault slip for a stream to turn course and flow along the fault for the distance of offset. If fault slip outpaces erosion, the part of the drainage past the fault may become entirely separated from its catchment, becoming a beheaded channel.
Oblique Deformation
When a tectonic boundary is oriented oblique relative to plate motion, a combination of strike-slip and dip-slip faulting will occur. Sometimes, a single oblique-slip fault will carry most of the deformation; an example of this is the Alpine Fault in New Zealand. More often, an array of strike-slip and dip-slip faults will operate together. This is called slip partitioning. The Great Sumatran Fault, located in the hanging wall of the Sunda Trench, is a classic example of lithosphere-scale slip partitioning. Pure dip-slip faulting occurs in the Sunda subduction zone, while the Great Sumatran Fault accomplishes right-lateral motion. The forearc prism between the two faults moves northwest relative to the rest of Sumatra.
Transtension and Transpression
A mixture of strike-slip faulting and tension is called transtension. In eastern California and western Nevada, transtensional deformation occurs as the Sierra-Great Valley block moves northwest with respect to the Basin and Range. Both strike-slip faults, such as the Furnace Creek fault, and en echelon normal faults, such as the West Tahoe Fault, accommodate relative motion.
A mixture of strike-slip faulting with compression is called transpression. Transpression occurs in southern California at the Big Bend of the San Andreas Fault, where a restraining left bend produces north-south convergence in the vicinity of Los Angeles.
Block Rotation
When a block is surrounded by a combination of strike-slip and dip-slip faults, rotation can occur.
Summary
List of Terms
- Strike-slip fault
- Dextral/right-lateral
- Sinistral/left-lateral
- Tear fault
- Transfer fault
- Transform fault
- Fracture zone
- Ridge-ridge transform
- Ridge-arc transform
- Arc-arc transform
- Transcurrent fault
- Riedel shears
- R shear
- P shear
- R' shear
- Mole track
- Shear lens
- Restraining bend/step
- Releasing bend/step
- Pull-apart basin
- Flower structure
- Scarp
- Shutter ridge
- Tectonic furrow
- Sag pond
- Deflected channel
- Beheaded channel
- Slip partitioning
- Transtension
- Transpression
- Block rotation
Contributors
Michael E. Oskin (Department of Earth and Planetary Sciences, UC Davis)