
2.1: Alfred Wegener’s Continental Drift Hypothesis
- Page ID
- 28215

\( \newcommand{\vecs}[1]{\overset { \scriptstyle \rightharpoonup} {\mathbf{#1}} } \)
\( \newcommand{\vecd}[1]{\overset{-\!-\!\rightharpoonup}{\vphantom{a}\smash {#1}}} \)
\( \newcommand{\id}{\mathrm{id}}\) \( \newcommand{\Span}{\mathrm{span}}\)
( \newcommand{\kernel}{\mathrm{null}\,}\) \( \newcommand{\range}{\mathrm{range}\,}\)
\( \newcommand{\RealPart}{\mathrm{Re}}\) \( \newcommand{\ImaginaryPart}{\mathrm{Im}}\)
\( \newcommand{\Argument}{\mathrm{Arg}}\) \( \newcommand{\norm}[1]{\| #1 \|}\)
\( \newcommand{\inner}[2]{\langle #1, #2 \rangle}\)
\( \newcommand{\Span}{\mathrm{span}}\)
\( \newcommand{\id}{\mathrm{id}}\)
\( \newcommand{\Span}{\mathrm{span}}\)
\( \newcommand{\kernel}{\mathrm{null}\,}\)
\( \newcommand{\range}{\mathrm{range}\,}\)
\( \newcommand{\RealPart}{\mathrm{Re}}\)
\( \newcommand{\ImaginaryPart}{\mathrm{Im}}\)
\( \newcommand{\Argument}{\mathrm{Arg}}\)
\( \newcommand{\norm}[1]{\| #1 \|}\)
\( \newcommand{\inner}[2]{\langle #1, #2 \rangle}\)
\( \newcommand{\Span}{\mathrm{span}}\) \( \newcommand{\AA}{\unicode[.8,0]{x212B}}\)
\( \newcommand{\vectorA}[1]{\vec{#1}} % arrow\)
\( \newcommand{\vectorAt}[1]{\vec{\text{#1}}} % arrow\)
\( \newcommand{\vectorB}[1]{\overset { \scriptstyle \rightharpoonup} {\mathbf{#1}} } \)
\( \newcommand{\vectorC}[1]{\textbf{#1}} \)
\( \newcommand{\vectorD}[1]{\overrightarrow{#1}} \)
\( \newcommand{\vectorDt}[1]{\overrightarrow{\text{#1}}} \)
\( \newcommand{\vectE}[1]{\overset{-\!-\!\rightharpoonup}{\vphantom{a}\smash{\mathbf {#1}}}} \)
\( \newcommand{\vecs}[1]{\overset { \scriptstyle \rightharpoonup} {\mathbf{#1}} } \)
\( \newcommand{\vecd}[1]{\overset{-\!-\!\rightharpoonup}{\vphantom{a}\smash {#1}}} \)
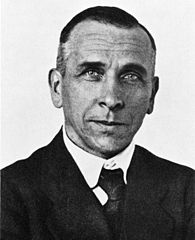
\(\newcommand{\avec}{\mathbf a}\) \(\newcommand{\bvec}{\mathbf b}\) \(\newcommand{\cvec}{\mathbf c}\) \(\newcommand{\dvec}{\mathbf d}\) \(\newcommand{\dtil}{\widetilde{\mathbf d}}\) \(\newcommand{\evec}{\mathbf e}\) \(\newcommand{\fvec}{\mathbf f}\) \(\newcommand{\nvec}{\mathbf n}\) \(\newcommand{\pvec}{\mathbf p}\) \(\newcommand{\qvec}{\mathbf q}\) \(\newcommand{\svec}{\mathbf s}\) \(\newcommand{\tvec}{\mathbf t}\) \(\newcommand{\uvec}{\mathbf u}\) \(\newcommand{\vvec}{\mathbf v}\) \(\newcommand{\wvec}{\mathbf w}\) \(\newcommand{\xvec}{\mathbf x}\) \(\newcommand{\yvec}{\mathbf y}\) \(\newcommand{\zvec}{\mathbf z}\) \(\newcommand{\rvec}{\mathbf r}\) \(\newcommand{\mvec}{\mathbf m}\) \(\newcommand{\zerovec}{\mathbf 0}\) \(\newcommand{\onevec}{\mathbf 1}\) \(\newcommand{\real}{\mathbb R}\) \(\newcommand{\twovec}[2]{\left[\begin{array}{r}#1 \\ #2 \end{array}\right]}\) \(\newcommand{\ctwovec}[2]{\left[\begin{array}{c}#1 \\ #2 \end{array}\right]}\) \(\newcommand{\threevec}[3]{\left[\begin{array}{r}#1 \\ #2 \\ #3 \end{array}\right]}\) \(\newcommand{\cthreevec}[3]{\left[\begin{array}{c}#1 \\ #2 \\ #3 \end{array}\right]}\) \(\newcommand{\fourvec}[4]{\left[\begin{array}{r}#1 \\ #2 \\ #3 \\ #4 \end{array}\right]}\) \(\newcommand{\cfourvec}[4]{\left[\begin{array}{c}#1 \\ #2 \\ #3 \\ #4 \end{array}\right]}\) \(\newcommand{\fivevec}[5]{\left[\begin{array}{r}#1 \\ #2 \\ #3 \\ #4 \\ #5 \\ \end{array}\right]}\) \(\newcommand{\cfivevec}[5]{\left[\begin{array}{c}#1 \\ #2 \\ #3 \\ #4 \\ #5 \\ \end{array}\right]}\) \(\newcommand{\mattwo}[4]{\left[\begin{array}{rr}#1 \amp #2 \\ #3 \amp #4 \\ \end{array}\right]}\) \(\newcommand{\laspan}[1]{\text{Span}\{#1\}}\) \(\newcommand{\bcal}{\cal B}\) \(\newcommand{\ccal}{\cal C}\) \(\newcommand{\scal}{\cal S}\) \(\newcommand{\wcal}{\cal W}\) \(\newcommand{\ecal}{\cal E}\) \(\newcommand{\coords}[2]{\left\{#1\right\}_{#2}}\) \(\newcommand{\gray}[1]{\color{gray}{#1}}\) \(\newcommand{\lgray}[1]{\color{lightgray}{#1}}\) \(\newcommand{\rank}{\operatorname{rank}}\) \(\newcommand{\row}{\text{Row}}\) \(\newcommand{\col}{\text{Col}}\) \(\renewcommand{\row}{\text{Row}}\) \(\newcommand{\nul}{\text{Nul}}\) \(\newcommand{\var}{\text{Var}}\) \(\newcommand{\corr}{\text{corr}}\) \(\newcommand{\len}[1]{\left|#1\right|}\) \(\newcommand{\bbar}{\overline{\bvec}}\) \(\newcommand{\bhat}{\widehat{\bvec}}\) \(\newcommand{\bperp}{\bvec^\perp}\) \(\newcommand{\xhat}{\widehat{\xvec}}\) \(\newcommand{\vhat}{\widehat{\vvec}}\) \(\newcommand{\uhat}{\widehat{\uvec}}\) \(\newcommand{\what}{\widehat{\wvec}}\) \(\newcommand{\Sighat}{\widehat{\Sigma}}\) \(\newcommand{\lt}{<}\) \(\newcommand{\gt}{>}\) \(\newcommand{\amp}{&}\) \(\definecolor{fillinmathshade}{gray}{0.9}\)Alfred Wegener (1880-1930) was a German scientist who specialized in meteorology and climatology. His knack for questioning accepted ideas started in 1910 when he disagreed with the explanation that the Bering Land Bridge that connected Asia and North America across the Pacific Ocean was formed by isostasy and that similar land bridges once connected the continents [1]. After reviewing the scientific literature, he published a hypothesis stating the continents were originally connected and then drifted apart. While he did not have the precise mechanism worked out, his hypothesis was backed up by a long list of evidence.
Early Evidence for Continental Drift Hypothesis

Wegener’s first piece of evidence was that the coastlines of some continents fit together like pieces of a jigsaw puzzle. People noticed the similarities in the coastlines of South America and Africa on the first world maps, and some suggested the continents had been ripped apart [3].

What Wegener did differently was synthesizing a large amount of data in one place. He used the true edges of the continents, based on the shapes of the continental shelves [4]. This resulted in a better fit than previous efforts that traced the existing coastlines [5].
 [Public domain], <a data-cke-saved-href=\"https://commons.wikimedia.org/wiki/File%3ASnider-Pellegrini_Wegener_fossil_map.svg\" href=\"https://commons.wikimedia.org/wiki/File%3ASnider-Pellegrini_Wegener_fossil_map.svg\"")
Wegener also compiled evidence by comparing similar rocks, mountains, fossils, and glacial formations across oceans. For example, the fossils of the primitive aquatic reptile Mesosaurus were found on the separate coastlines of Africa and South America. Fossils of another reptile, Lystrosaurus, were found in Africa, India, and Antarctica. He pointed out these were land-dwelling creatures could not have swum across an entire ocean.
Opponents of continental drift insisted trans-oceanic land bridges allowed animals and plants to move between continents [6]. The land bridges eventually eroded away, leaving the continents permanently separated. The problem with this hypothesis is the improbability of a land bridge being tall and long enough to stretch across a broad, deep ocean.
More support for continental drift came from the puzzling evidence that glaciers once existed in normally very warm areas in southern Africa, India, Australia, and Arabia. These climate anomalies could not be explained by land bridges. Wegener found similar evidence when he discovered tropical plant fossils in the frozen region of the Arctic Circle. As Wegener collected more data, he realized the explanation that best fit all the climate, rock, and fossil observations involved moving continents.
References
- 1. Fluegel, von H. W. Wegener-Ampferer-Schwinner. Ein Beitrag zur Geschichte der Geologie in Österreich. Mitt. Oesterr. Geol. Ges. 73, 237–254 (1980).
- 3. Bacon, F. & Montagu, B. The Works of Francis Bacon, Lord Chancellor of England: With a Life of the Author. (Parry & McMillan, 1848).
- 4. Drake, E. T. Alfred Wegener’s reconstruction of Pangea. Geology 4, 41–44 (1976).
- 5. Mantovani, R. Les fractures de l’écorce terrestre et la théorie de Laplace. Bull. Soc. Sc. et Arts Réunion 41–53 (1889).
- 6. Wells, H. G., Huxley, J. & Wells, G. P. The Science of Life. Philosophy 6, 506–507 (1931).