
3.1: Soil Texture and Structure
- Page ID
- 14721

\( \newcommand{\vecs}[1]{\overset { \scriptstyle \rightharpoonup} {\mathbf{#1}} } \)
\( \newcommand{\vecd}[1]{\overset{-\!-\!\rightharpoonup}{\vphantom{a}\smash {#1}}} \)
\( \newcommand{\id}{\mathrm{id}}\) \( \newcommand{\Span}{\mathrm{span}}\)
( \newcommand{\kernel}{\mathrm{null}\,}\) \( \newcommand{\range}{\mathrm{range}\,}\)
\( \newcommand{\RealPart}{\mathrm{Re}}\) \( \newcommand{\ImaginaryPart}{\mathrm{Im}}\)
\( \newcommand{\Argument}{\mathrm{Arg}}\) \( \newcommand{\norm}[1]{\| #1 \|}\)
\( \newcommand{\inner}[2]{\langle #1, #2 \rangle}\)
\( \newcommand{\Span}{\mathrm{span}}\)
\( \newcommand{\id}{\mathrm{id}}\)
\( \newcommand{\Span}{\mathrm{span}}\)
\( \newcommand{\kernel}{\mathrm{null}\,}\)
\( \newcommand{\range}{\mathrm{range}\,}\)
\( \newcommand{\RealPart}{\mathrm{Re}}\)
\( \newcommand{\ImaginaryPart}{\mathrm{Im}}\)
\( \newcommand{\Argument}{\mathrm{Arg}}\)
\( \newcommand{\norm}[1]{\| #1 \|}\)
\( \newcommand{\inner}[2]{\langle #1, #2 \rangle}\)
\( \newcommand{\Span}{\mathrm{span}}\) \( \newcommand{\AA}{\unicode[.8,0]{x212B}}\)
\( \newcommand{\vectorA}[1]{\vec{#1}} % arrow\)
\( \newcommand{\vectorAt}[1]{\vec{\text{#1}}} % arrow\)
\( \newcommand{\vectorB}[1]{\overset { \scriptstyle \rightharpoonup} {\mathbf{#1}} } \)
\( \newcommand{\vectorC}[1]{\textbf{#1}} \)
\( \newcommand{\vectorD}[1]{\overrightarrow{#1}} \)
\( \newcommand{\vectorDt}[1]{\overrightarrow{\text{#1}}} \)
\( \newcommand{\vectE}[1]{\overset{-\!-\!\rightharpoonup}{\vphantom{a}\smash{\mathbf {#1}}}} \)
\( \newcommand{\vecs}[1]{\overset { \scriptstyle \rightharpoonup} {\mathbf{#1}} } \)
\( \newcommand{\vecd}[1]{\overset{-\!-\!\rightharpoonup}{\vphantom{a}\smash {#1}}} \)
\(\newcommand{\avec}{\mathbf a}\) \(\newcommand{\bvec}{\mathbf b}\) \(\newcommand{\cvec}{\mathbf c}\) \(\newcommand{\dvec}{\mathbf d}\) \(\newcommand{\dtil}{\widetilde{\mathbf d}}\) \(\newcommand{\evec}{\mathbf e}\) \(\newcommand{\fvec}{\mathbf f}\) \(\newcommand{\nvec}{\mathbf n}\) \(\newcommand{\pvec}{\mathbf p}\) \(\newcommand{\qvec}{\mathbf q}\) \(\newcommand{\svec}{\mathbf s}\) \(\newcommand{\tvec}{\mathbf t}\) \(\newcommand{\uvec}{\mathbf u}\) \(\newcommand{\vvec}{\mathbf v}\) \(\newcommand{\wvec}{\mathbf w}\) \(\newcommand{\xvec}{\mathbf x}\) \(\newcommand{\yvec}{\mathbf y}\) \(\newcommand{\zvec}{\mathbf z}\) \(\newcommand{\rvec}{\mathbf r}\) \(\newcommand{\mvec}{\mathbf m}\) \(\newcommand{\zerovec}{\mathbf 0}\) \(\newcommand{\onevec}{\mathbf 1}\) \(\newcommand{\real}{\mathbb R}\) \(\newcommand{\twovec}[2]{\left[\begin{array}{r}#1 \\ #2 \end{array}\right]}\) \(\newcommand{\ctwovec}[2]{\left[\begin{array}{c}#1 \\ #2 \end{array}\right]}\) \(\newcommand{\threevec}[3]{\left[\begin{array}{r}#1 \\ #2 \\ #3 \end{array}\right]}\) \(\newcommand{\cthreevec}[3]{\left[\begin{array}{c}#1 \\ #2 \\ #3 \end{array}\right]}\) \(\newcommand{\fourvec}[4]{\left[\begin{array}{r}#1 \\ #2 \\ #3 \\ #4 \end{array}\right]}\) \(\newcommand{\cfourvec}[4]{\left[\begin{array}{c}#1 \\ #2 \\ #3 \\ #4 \end{array}\right]}\) \(\newcommand{\fivevec}[5]{\left[\begin{array}{r}#1 \\ #2 \\ #3 \\ #4 \\ #5 \\ \end{array}\right]}\) \(\newcommand{\cfivevec}[5]{\left[\begin{array}{c}#1 \\ #2 \\ #3 \\ #4 \\ #5 \\ \end{array}\right]}\) \(\newcommand{\mattwo}[4]{\left[\begin{array}{rr}#1 \amp #2 \\ #3 \amp #4 \\ \end{array}\right]}\) \(\newcommand{\laspan}[1]{\text{Span}\{#1\}}\) \(\newcommand{\bcal}{\cal B}\) \(\newcommand{\ccal}{\cal C}\) \(\newcommand{\scal}{\cal S}\) \(\newcommand{\wcal}{\cal W}\) \(\newcommand{\ecal}{\cal E}\) \(\newcommand{\coords}[2]{\left\{#1\right\}_{#2}}\) \(\newcommand{\gray}[1]{\color{gray}{#1}}\) \(\newcommand{\lgray}[1]{\color{lightgray}{#1}}\) \(\newcommand{\rank}{\operatorname{rank}}\) \(\newcommand{\row}{\text{Row}}\) \(\newcommand{\col}{\text{Col}}\) \(\renewcommand{\row}{\text{Row}}\) \(\newcommand{\nul}{\text{Nul}}\) \(\newcommand{\var}{\text{Var}}\) \(\newcommand{\corr}{\text{corr}}\) \(\newcommand{\len}[1]{\left|#1\right|}\) \(\newcommand{\bbar}{\overline{\bvec}}\) \(\newcommand{\bhat}{\widehat{\bvec}}\) \(\newcommand{\bperp}{\bvec^\perp}\) \(\newcommand{\xhat}{\widehat{\xvec}}\) \(\newcommand{\vhat}{\widehat{\vvec}}\) \(\newcommand{\uhat}{\widehat{\uvec}}\) \(\newcommand{\what}{\widehat{\wvec}}\) \(\newcommand{\Sighat}{\widehat{\Sigma}}\) \(\newcommand{\lt}{<}\) \(\newcommand{\gt}{>}\) \(\newcommand{\amp}{&}\) \(\definecolor{fillinmathshade}{gray}{0.9}\)Learning Objectives
- Differentiate the three soil separates (sand, silt, and clay) based on their particle size diameters.
- Determine the percentages of sand, silt, and clay in selected soil samples using data collected from the hydrometer method of particle size analysis.
- Estimate the textural class using the texture-by-feel method on selected soil samples.
- Use a textural triangle to determine the textural class of a soil.
- Understand the relationship between particle size and specific surface area.
Soil texture and structure are considered “master variables”, meaning that texture and structure directly influence a large number of other soil properties. For example, in comparing a clayey soil and a sandy soil, one would expect the clayey soil to have larger specific surface area, more cation exchange capacity, more total porosity, less macroporosity, and more organic matter than the sandy soil. Thus, by simply knowing the texture of the soil, inferences can be made in regard to many soil properties. Here, soil texture will be determined quantitatively using the hydrometer method, and estimated using the texture by feel method. Different soil structure types will also be observed. What you learn about texture and structure in these activities will be used later during the soil pit field trips to describe soil profiles in the field.
Materials
- Three soils of known textures
- Sodium hexametaphosphate
- Squirt bottles filled with tap water
- Lab balances accurate to the nearest 0.01 g
- Soil test cylinders, 1L volume (Item #200231000, Kimble ™ Kimax™ Soil Test Cylinders)
- Hydrometers calibrated in units of g/L (Item #13-202-133 Fisherbrand™ Soil Analysis ASTM Hydrometer)
- Digital thermometers accurate to the nearest 0.1°C
- Milkshake mixers and stainless steel milkshake mixer cups (Hamilton Beach HMD400 120V Triple Spindle Commercial Drink Mixer, Hamilton Beach, Glen Allen, Virginia, U.S.)
Recommended Reading
- Eye on Agriculture Today: Soil Texture by Feel (KSREVideos, 2010)
- Soil Profiling: Structure (KSREVideos, 2011c)
- Estimating Soil Texture by Feel (Presley and Thien, 2008)
Prelab Assignment
Using the recommended reading and viewing resources and the introduction to this lab, consider the questions listed below. These definitions/questions will provide a concise summary of the major concepts to be addressed in the lab. They will also serve as the basis for the post-lab quiz and are useful study notes for exams.
- Define and explain the difference between soil texture and soil structure.
- Create a table that lists the sizes for sand, silt, and clay particles using USDA criteria.
- What is a textural triangle?
- What is Stoke’s Law and how is it used in soil science?
- Define specific surface area and explain its relationship to size of soil particles.
Introduction
Soil texture refers to the proportions of sand (2.0 – 0.05 mm in diameter), silt (0.05 – 0.002 mm), and clay (less than 0.002 mm). The relative proportions determine the textural class. Soil texture influences nearly every aspect of soil use and management. Many of the physical and chemical properties of the soil depend on how fine (clayey) or coarse (sandy) a soil is. Soil texture is a permanent feature unless soils are subjected to rapid erosion, deposition, or removal.
Moreover, much of the reactivity of soils is related to the amount of surface area available. As the average particle size decreases, the surface area per unit weight increases (see Table 7.1).
| Seperate | Diameter (mm) | Particles/g | Specific surface area (cm^2/g) |
|---|---|---|---|
| Very course sand | 2.00 - 1.00 | 90 | 11 |
| Coarse sand | 1.00 - 0.50 | 720 | 23 |
| Medium sand | 0.50-0.25 | 5,700 | 45 |
| Fine sand | 0.25-0.10 | 46,000 | 91 |
| Very fine sand | 0.10-0.05 | 722,000 | 277 |
| Silt | 0.05-0.002 | 5,776,000 | 454 |
| Clay | < 0.002 | 90,260,000,000 | 8,000,000 |
Nearly any type of land management will be influenced by texture. Table 7.2 provides a summary of soil management factors related to texture.
| Water relations | Sandy soils | Loamy soils | Clayey soils |
|---|---|---|---|
| Infiltration—entry of surface water into the soil. Opposite of run-off potential |
Rapid | Medium to slow | Very rapid if cracks present; slow if no cracks |
| Percolation—internal water drainage and leaching |
Excessive | Good | Fair-Poor |
| Water Storage—available for plant use | Very low | Medium | High |
| Aeration—movement of oxygen into root zone |
Very good | Moderate | Poor |
| Tillage and Erosion Tillage power required |
Low | Medium | High |
| Tillability—ease of seed-bed preparation | Easy | Medium | Difficult |
| Erodibility Wind erosion hazard |
High | Low | Medium |
| Water erosion hazard | Low | High | Low to medium |
| Chemical Relations Fertility potential (nutrient storage) |
Low | Medium | High |
| Chemical Recommendations—rates per acre |
Low | Medium | High |
Activity 1: Textural Triangle
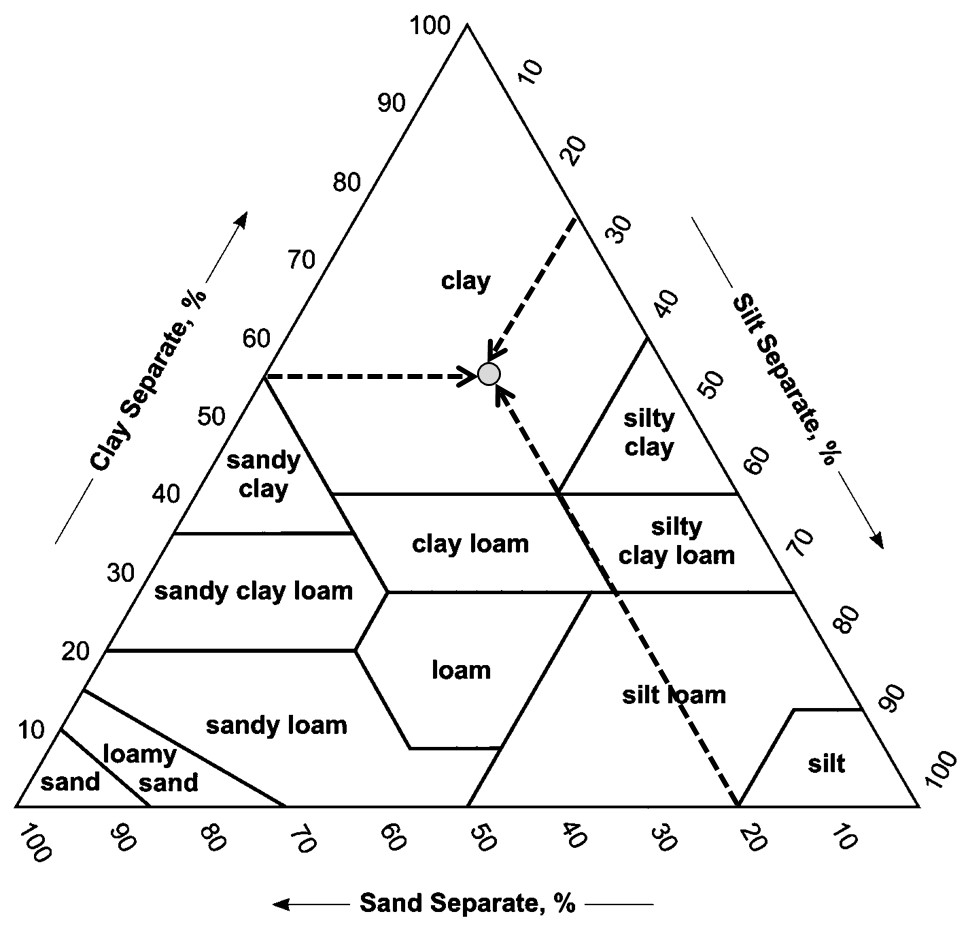
Soils with similar distributions of sand, silt, and clay have similar properties and are therefore grouped into the same soil textural class. Twelve textural classes are recognized, and their compositions are designated on a textural triangle (Figure 7.1). Study the arrangement of the triangle. Each corner represents 100% of either sand, silt, or clay, and each represents 0 to 100% of a given fraction. The proportions of sand, silt, and clay define the twelve classes. Figure 7.1 depicts a soil with 20% sand, 25% silt, and 55% clay. Those three lines intersect within the boundaries of the “Clay” textural class, so the soil is a clay soil.
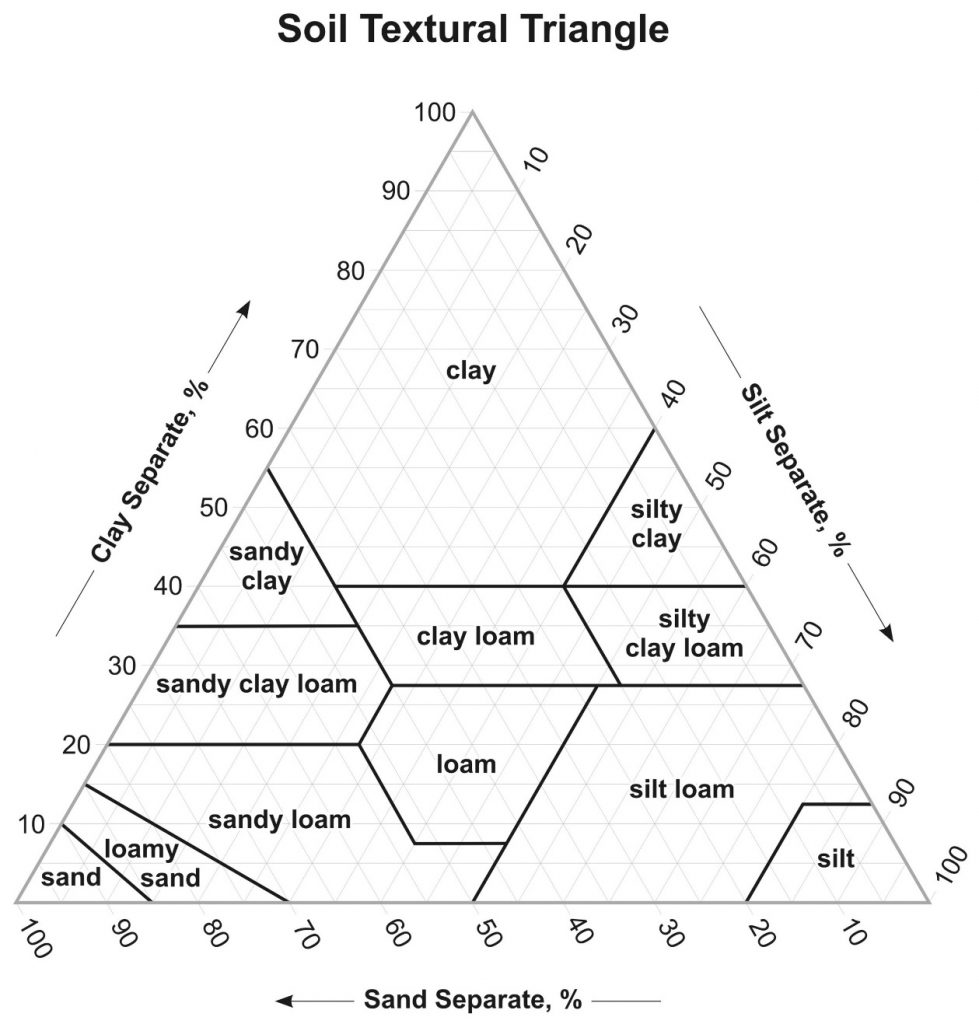
![]() Using that same procedure, determine the textural class names for the soils described in Table 7.3, and plot each result on the textural triangle in Figure 7.2.
Using that same procedure, determine the textural class names for the soils described in Table 7.3, and plot each result on the textural triangle in Figure 7.2.
| % Sand | % Silt | % Clay | Textural Class | |
|---|---|---|---|---|
| 1. | 33 | 33 | 34 | |
| 2. | 55 | 30 | 15 | |
| 3. | 80 | 5 | 15 | |
| 4. | 25 | 60 | 15 | |
| 5. | - | 20 | 50 | |
| 6. | 60 | - | 30 | |
| 7. | 40 | 40 | - |
Activity 2: Estimating Soil Texture by Feel
A soil scientist often needs to estimate soil texture while in the field or when laboratory data on the amounts of sand, silt, and clay are not available. With practice, you can learn to estimate texture by simply feeling or manipulating a moist sample.
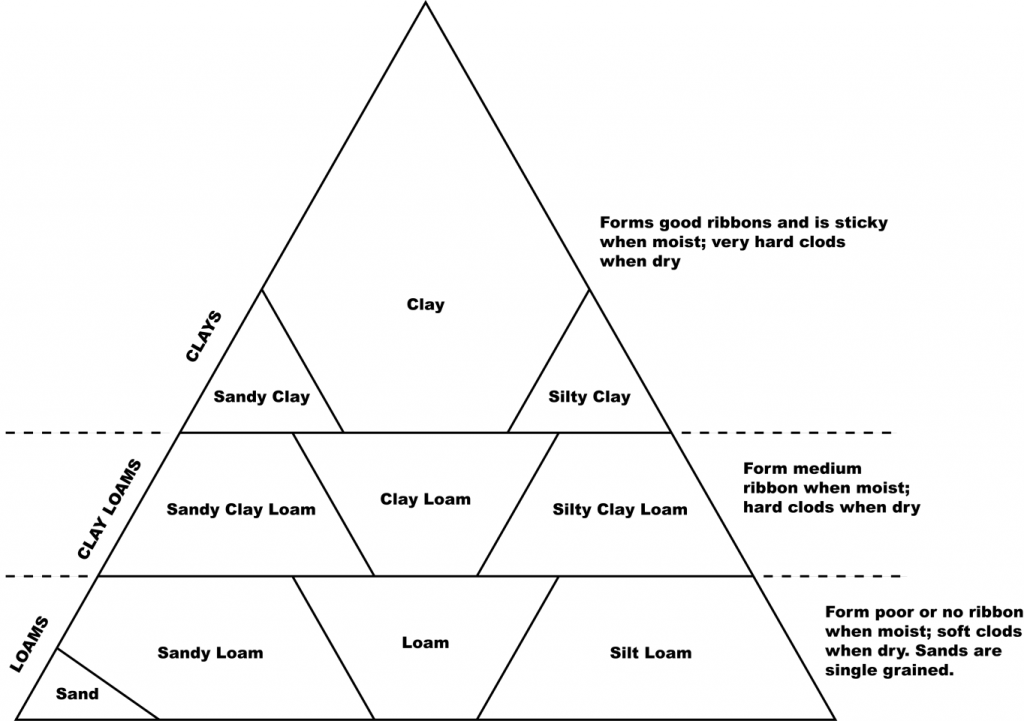
To learn this technique, consider a simplified and generalized version of the textural triangle (Fig. 5.3). This modified triangle consists of three tiers based on approximate clay content. Clays are very cohesive, plastic, and can be easily molded. Clay loams are intermediate in clay content, cohesiveness, and ease of molding. Loams are soils low enough in clay content to possess little cohesiveness and are more difficult to mold. Sands do not form stable forms when molded.
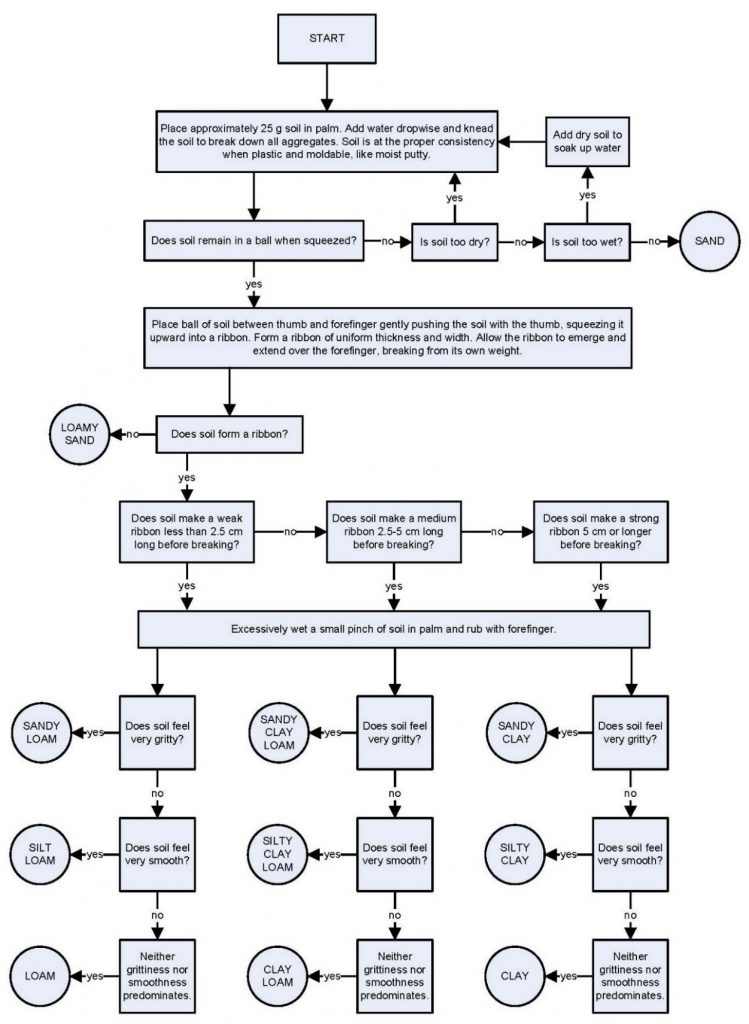
Using the procedure outlined in Figure 7.4, determine the texture on the samples provided in the laboratory. Working the sample at the proper moisture content is very important. The sample must be moistened throughout. Achieving the correct moisture condition may take several minutes. After moistening and mixing soil to the proper consistency, perform the ribbon test, the grittiness test, and the smoothness test as described in the diagram. Try to estimate the texture of the samples, then check the answers provided. After you have calibrated your fingers on the practice samples, determine the texture for the unidentified samples provided, and enter your estimate in Table 7.3.
![]() For the unidentified samples, record the ribbon length, predominant wet feel (smooth, gritty, neither), and textural class names determined by the feel method shown in Table 7.3.
For the unidentified samples, record the ribbon length, predominant wet feel (smooth, gritty, neither), and textural class names determined by the feel method shown in Table 7.3.
| Does is make a ball? | Does it make a ribbon? | Ribbon Length | Predominate Wet Feel | Textural Class | |
|---|---|---|---|---|---|
| 1. | |||||
| 2. | |||||
| 3. |
Activity 3: Particle Size Analysis by Hydrometer
Particle size analysis is based on the principle that different size particles fall through a fluid at different rates.
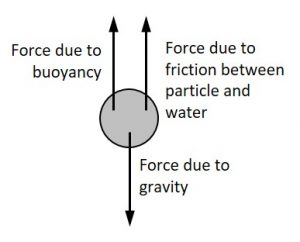
A particle falling in a fluid is subjected to 3 forces: gravity, buoyancy, and friction (Figure 7.5). The gravity and buoyancy forces are constant, but the frictional force increases as the velocity increases (like the drag force on an airplane increases as it goes faster). Because of this increasing frictional force, the particle eventually reaches a constant velocity (terminal velocity). Constant velocity occurs when the sum of the forces acting on the particle is zero, or acceleration is zero.
Stoke’s Law is derived by setting up an equation containing the three forces acting on the particle when acceleration is zero:
\[\text{Force of gravity }=\text{ force of buoyancy }+\text{ force of friction}\]These forces are determined from the following relationships:
Force of Gravity
\[\text{Force of gravity }=\text{ mass of particle }\times\text{ acceleration of gravity}\] \[\text{Mass of particle }=\text{ Volume of particle }\times\text{ density of particle}\]Therefore,
\[\text{Force of gravity }=\text{ volume of particle }\times\text{ density of particle}\times\text{ acceleration of gravity}\]Force of Buoyancy
\[\text{Force of buoyancy }=\text{ mass of water displaced by particle }\times\text{ acceleration of gravity}\] \[\text{Mass of displaced water }=\text{ volume of particle }\times\text{ density of water}\]Therefore,
\[\text{Force of buoyancy }=\text{ volume of particle }\times\text{ density of water}\times\text{ acceleration of gravity}\]Friction Force
Friction force is a function of the size of the particle, the velocity of the particle, and the viscosity of the water.
\[\text{Friction force }=6π\times\text{ viscosity }\times\text{ radius of particles}\times\text{ velocity}\]After substituting the appropriate components of the forces into the equation, it can be solved for the terminal velocity:
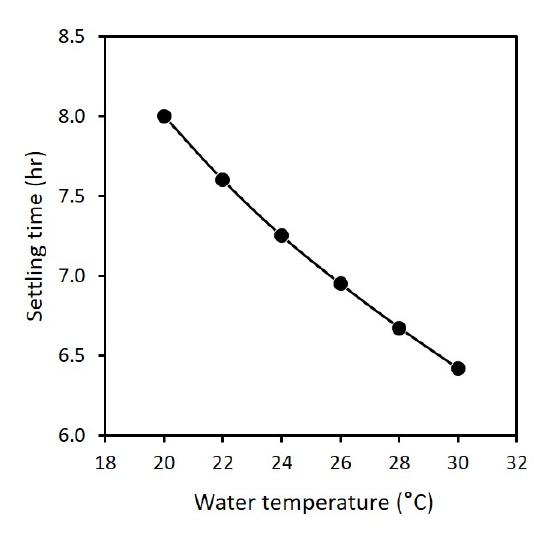
\[\text{Velocity }=\frac{\text{ particle diameter}^2\times\text{ acceleration due to gravity}\times(\text{ particle density}-\text{ liquid density})}{18\times\text{viscosity of liquid}}\]Note that the larger the diameter of the particle, the faster it settles (sand grains will settle faster than silt particles, which will settle faster than clay particles). Also, the density and viscosity of water vary with temperature, so the velocity of settling will be influenced by the temperature of the water (Figure 7.6).
Stoke’s Law can be simplified by specifying the temperature of the water:
\[\text{Velocity }(\text{cm s}^2)=\text{K}\times(\text{diameter of particle in cm})^2\]Where K (cm-1 s-1) is a constant incorporating water density and viscosity and acceleration due to gravity. Because velocity is distance/time, this equation can be solved for time required for a particle of a specified diameter to fall a given distance.
\[\text{Velocity }=\frac{\text{distance}}{\text{time}}=\text{K}\times(\text{diameter})^2\]Therefore,
\[\text{Time}=\frac{\text{distance}}{\text{K}\times(\text{diameter})^2}\]Thus, for a particle of a given diameter, the time required for the particle to fall a specified distance can be calculated.
Consider this example: How long will it take a 0.05-mm particle to fall 10 cm in water at 25°C?
At 25°C, K = 10,000 cm-1 s-1. Substituting this value and the diameter (0.005 cm) into the above equation yields:
\[\text{Time}=\frac{10\text{ cm}}{10000\text{ cm}^{-1}\text{ s}^{-1}\times(0.005\text{ cm})^2}=\frac{10}{0.25\text{ cm s}^{-1}}=40\text{s}\]Thus, after 40 seconds, the upper 10 cm of a soil-water suspension is completely free of all particles 0.05 mm or larger, so it is free of sand and contains only silt and clay.
Let’s do the same calculation for a 0.002-mm particle, which is the upper limit of the clay range.
\[\text{Time}=\frac{10\text{ cm}}{10000\text{ cm}^{-1}\text{ s}^{-1}\times(0.002\text{ cm})^2}=\frac{10}{0.0004\text{ cm s}^{-1}}=6.94\text{hr}\]Thus, after 6 hours and 56 minutes, the upper 10 cm of a soil-water suspension is free of all particles 0.002 mm or larger (sand and silt), so it contains only clay particles.
As we can see, Stokes Law can be used to determine when a volume of a soil-water suspension will be devoid of soil particles larger than a given size. Then we can measure the concentration of soil remaining in that volume. For example, after 40 seconds, we can measure the concentration of soil in suspension in the upper 10 cm of a suspension and thus determine how much clay + silt are present.
Under natural conditions, sand, silt, and clay particles are bound together in aggregates. These aggregates must be broken down so soil particles act independently of each other. For example, an aggregate of clay particles would behave as a silt particle, a phenomenon we want to avoid.
Dispersion is a 2-step, chemical/mechanical process. First, sodium hexametaphosphate (like the dishwashing detergent “Calgon®”) is added to a soil-water suspension to increase electronegativity of soil clays; it causes a repulsive force between clay particles. Then the suspension is stirred vigorously (milkshake mixer or blender) to assure complete dispersion. The repulsive forces generated by the chemical treatment tend to stabilize the dispersed condition. Dispersion thus assures that aggregated clay particles do not behave like silt-sized or sand-sized particles.
Soil organic matter is an important binding agent, so it first must be removed by oxidation (using hydrogen peroxide, for example). In soils with very low in organic matter, this step is often omitted. It will not be used in this exercise.
After proper dispersion, sand, silt, and clay can be separated and quantified by allowing the particles to settle in water. (NOTE: a sieve is commonly used to quantify sand content of a soil sample, and then a hydrometer to quantify silt and clay content of the remaining particles. We will use a hydrometer for all three particle sizes in this lab activity.)
One method of determining the concentration of soil in suspension is using a hydrometer to measure the density of the suspension. The hydrometer is commonly used in field labs. In this exercise, we’ll use a hydrometer calibrated to read directly in g/L of suspension.
Simplified Hydrometer Procedure
Chemical dispersion (performed in the previous lab)
- Weigh out 30.0 g of dry soil (assume oven-dry) into a 250-ml Erlenmeyer flask.
- Wash sides of flask with distilled water from a wash bottle.
- Add 100 ml of distilled water using a graduated cylinder, and add 10 ml of sodium hexametaphosphate solution (500 g/L) from the dispenser on the sodium hexametaphosphate bottle.
- Swirl to mix.
- Wash sides of flask with distilled water from a wash bottle.
- Cover the flask with Parafilm and label the flask with your lab section and table number as well as soil type. Store the flasks in the location specified by your instructor until next laboratory period.
After chemical dispersion
- Quantitatively transfer the dispersed sample into a metal dispersion cup (a milkshake mixer cup), fill to half full with distilled water, and mix for 5 minutes as directed by your instructor. (“Quantitatively transfer” means to transfer all the sample.)
- Quantitatively transfer the sample into a 1-liter sedimentation cylinder.
- Fill cylinder to the 1000-ml mark with distilled water.
- Suspend all soil particles in the sedimentation cylinder using one of the following methods:
- Plunger method: Carefully insert stirring plunger and move up and down the full length of the cylinder for 30 seconds, ensuring that all particles are thoroughly mixed. Hold base of cylinder firmly with other hand.
- Stopper method: Place a rubber stopper (one properly sized for the sedimentation cylinders) into the top of the cylinder, and holding both the bottom of the cylinder and the top of the stopper, mix the solution vigorously by inverting the cylinder and turning it right side up repeatedly for 30 seconds.
- Record time when stirring is stopped and plunger removed, or when the stoppered cylinder is returned (quickly but gently) right-side-up to the laboratory bench.
- Immediately insert the hydrometer slowly and carefully. Read the hydrometer (top of the meniscus) at exactly 40 seconds after stirring was stopped or the cylinder was returned to the bench. (Note: if a soil is high in organic matter that was not removed before beginning this experiment, bubbles will form at the surface. To disperse the bubbles, add three to five drops of alcohol to the surface of the solution immediately after inserting the hydrometer.
- Repeat steps 4 through 6 until readings are within 0.5 units of each other. Record the reading on the data sheet.
- Determine the temperature of the suspension and make corrections for temperature and for the blank as described in Table 7.4:
- For each degree above 20°C, add 0.36 to the hydrometer reading.
- For each degree below 20°C, subtract 0.36 from the hydrometer reading.
- Because the soil suspension also contains sodium hexametaphosphate, each hydrometer reading must be corrected to account for the effect of sodium hexametaphosphate on density. A “blank” cylinder has been set up containing only water and sodium hexametaphosphate. Record the hydrometer reading from this cylinder and subtract that value from all hydrometer readings.
- Your lab instructor has conducted measurements for the 7-hour reading and will provide the data to you to complete your soil texture determination.
- Calculations:
Remember that these hydrometer readings are in g/L. Because the volume in the cylinder is one liter, the readings gives the amount of soil in the cylinder. For example, the 7-hour reading indicates the amount of clay (g) in the cylinder. Therefore, the percent clay is
\[\text{Percent clay}=\frac{\text{corrected 7 hr reading}}{\text{mass of dry sample}}\times100%\]The 40-second reading is used to calculate percent silt + clay:
\[\text{Percent silt }+\text{ clay}=\frac{\text{corrected 40 s reading}}{\text{mass of dry sample}}\times100%\]Then the silt and sand percentages can be determined.
\[\text{Percent silt }=(\text{percent silt}+\text{percent clay})-\text{percent clay}\] \[\text{Percent sand }=100-(\text{percent silt}+\text{percent clay})\]![]() Use Table 7.4 to help determine the textural class of your samples. Label all results in the proper units.
Use Table 7.4 to help determine the textural class of your samples. Label all results in the proper units.
Table 7.5. Soil Texture by Hydrometer Method Data.
| Row | Formula | Soil A | Soil B | Soil C | |
|---|---|---|---|---|---|
| a | Dry weight of soil, g | ||||
| b | Average of 40-second hydrometer readings | ||||
| c | Hydrometer reading from blank | ||||
| d | b-c | Hydrometer reading corrected for blank | |||
| e | Temperature of suspension, first readings | ||||
| f | d + [(e - 20) x 0.36] | 40-second hydrometer reading corrected for temperature |
|||
| g | 7-hour hydrometer reading | ||||
| h | Hydrometer reading from blank | ||||
| i | g-h | Hydrometer reading corrected for blank | |||
| j | Temperature of suspension, second reading | ||||
| k | i + [(j - 20) x 0.36] | 7-hr hydrometer reading corrected for temperature |
|||
| l | f ÷ a x 100 | Percent silt + clay | |||
| m | k ÷ a x 100 | Percent clay | |||
| n | l-m | Percent silt | |||
| o | 100 - m - n | Percent sand | |||
| Textural class (from triangle) |
Table adapted from King et al. (2003)
Soil Texture by Hydrometer Method Calculations
Activity 4: Soil Structure
Table 7.6. Summary of soil structure types described in mineral soils.
| Structure Type | Aggregate Description | Usual Location |
|---|---|---|
| Granular | Relatively nonporous, small and spheroidal peds; not fitted to adjoining aggregates |
A horizon |
| Platy | Aggregates are plate-like. Plates often overlap and impair permeability. |
E horizon |
| Angular blocky | Block-like peds bounded by other aggregates whose sharp angular faces form the cast for the ped. The aggregates often break into smaller blocky peds. |
B horizon |
| Subangular blocky | Block-like peds bounded by other aggregates whose rounded subangular faces form the cast for the ped. |
B horizon |
| Prismatic | Column-like peds without rounded caps. Other prismatic aggregates form the cast for the ped. Some prismatic aggregates break into smaller blocky peds. |
B horizon |
| Columnar | Column-like peds with rounded caps bounded laterally by other columnar aggregates that form the cast for the peds. |
B horizon in alkali soils |
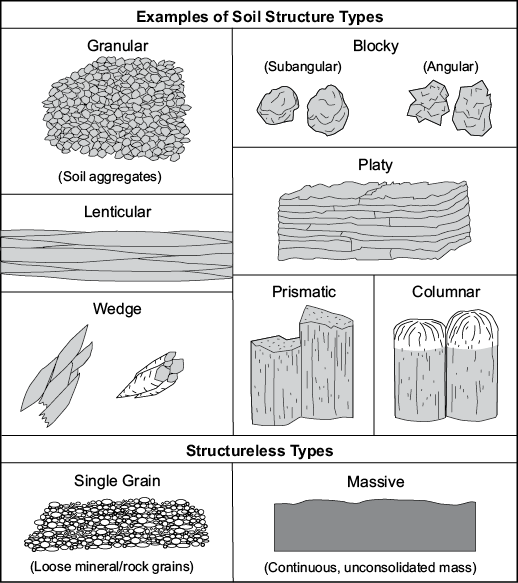
Carefully examine the different structure types listed in Table 7.6 and shown in Figure 7.7, then answer the following questions.
![]() How does blocky structure affect permeability of clayey soils?
How does blocky structure affect permeability of clayey soils?
![]() How would a structureless massive condition affect permeability?
How would a structureless massive condition affect permeability?
![]() How would manipulation (such as tillage) of a wet clayey soil affect structure?
How would manipulation (such as tillage) of a wet clayey soil affect structure?
Assignment: Online Quiz
A quiz will be available online. Please access it as directed by your instructor.