5.1: Introduction to Mineral Optics
- Page ID
- 17536

\( \newcommand{\vecs}[1]{\overset { \scriptstyle \rightharpoonup} {\mathbf{#1}} } \)
\( \newcommand{\vecd}[1]{\overset{-\!-\!\rightharpoonup}{\vphantom{a}\smash {#1}}} \)
\( \newcommand{\dsum}{\displaystyle\sum\limits} \)
\( \newcommand{\dint}{\displaystyle\int\limits} \)
\( \newcommand{\dlim}{\displaystyle\lim\limits} \)
\( \newcommand{\id}{\mathrm{id}}\) \( \newcommand{\Span}{\mathrm{span}}\)
( \newcommand{\kernel}{\mathrm{null}\,}\) \( \newcommand{\range}{\mathrm{range}\,}\)
\( \newcommand{\RealPart}{\mathrm{Re}}\) \( \newcommand{\ImaginaryPart}{\mathrm{Im}}\)
\( \newcommand{\Argument}{\mathrm{Arg}}\) \( \newcommand{\norm}[1]{\| #1 \|}\)
\( \newcommand{\inner}[2]{\langle #1, #2 \rangle}\)
\( \newcommand{\Span}{\mathrm{span}}\)
\( \newcommand{\id}{\mathrm{id}}\)
\( \newcommand{\Span}{\mathrm{span}}\)
\( \newcommand{\kernel}{\mathrm{null}\,}\)
\( \newcommand{\range}{\mathrm{range}\,}\)
\( \newcommand{\RealPart}{\mathrm{Re}}\)
\( \newcommand{\ImaginaryPart}{\mathrm{Im}}\)
\( \newcommand{\Argument}{\mathrm{Arg}}\)
\( \newcommand{\norm}[1]{\| #1 \|}\)
\( \newcommand{\inner}[2]{\langle #1, #2 \rangle}\)
\( \newcommand{\Span}{\mathrm{span}}\) \( \newcommand{\AA}{\unicode[.8,0]{x212B}}\)
\( \newcommand{\vectorA}[1]{\vec{#1}} % arrow\)
\( \newcommand{\vectorAt}[1]{\vec{\text{#1}}} % arrow\)
\( \newcommand{\vectorB}[1]{\overset { \scriptstyle \rightharpoonup} {\mathbf{#1}} } \)
\( \newcommand{\vectorC}[1]{\textbf{#1}} \)
\( \newcommand{\vectorD}[1]{\overrightarrow{#1}} \)
\( \newcommand{\vectorDt}[1]{\overrightarrow{\text{#1}}} \)
\( \newcommand{\vectE}[1]{\overset{-\!-\!\rightharpoonup}{\vphantom{a}\smash{\mathbf {#1}}}} \)
\( \newcommand{\vecs}[1]{\overset { \scriptstyle \rightharpoonup} {\mathbf{#1}} } \)
\(\newcommand{\longvect}{\overrightarrow}\)
\( \newcommand{\vecd}[1]{\overset{-\!-\!\rightharpoonup}{\vphantom{a}\smash {#1}}} \)
\(\newcommand{\avec}{\mathbf a}\) \(\newcommand{\bvec}{\mathbf b}\) \(\newcommand{\cvec}{\mathbf c}\) \(\newcommand{\dvec}{\mathbf d}\) \(\newcommand{\dtil}{\widetilde{\mathbf d}}\) \(\newcommand{\evec}{\mathbf e}\) \(\newcommand{\fvec}{\mathbf f}\) \(\newcommand{\nvec}{\mathbf n}\) \(\newcommand{\pvec}{\mathbf p}\) \(\newcommand{\qvec}{\mathbf q}\) \(\newcommand{\svec}{\mathbf s}\) \(\newcommand{\tvec}{\mathbf t}\) \(\newcommand{\uvec}{\mathbf u}\) \(\newcommand{\vvec}{\mathbf v}\) \(\newcommand{\wvec}{\mathbf w}\) \(\newcommand{\xvec}{\mathbf x}\) \(\newcommand{\yvec}{\mathbf y}\) \(\newcommand{\zvec}{\mathbf z}\) \(\newcommand{\rvec}{\mathbf r}\) \(\newcommand{\mvec}{\mathbf m}\) \(\newcommand{\zerovec}{\mathbf 0}\) \(\newcommand{\onevec}{\mathbf 1}\) \(\newcommand{\real}{\mathbb R}\) \(\newcommand{\twovec}[2]{\left[\begin{array}{r}#1 \\ #2 \end{array}\right]}\) \(\newcommand{\ctwovec}[2]{\left[\begin{array}{c}#1 \\ #2 \end{array}\right]}\) \(\newcommand{\threevec}[3]{\left[\begin{array}{r}#1 \\ #2 \\ #3 \end{array}\right]}\) \(\newcommand{\cthreevec}[3]{\left[\begin{array}{c}#1 \\ #2 \\ #3 \end{array}\right]}\) \(\newcommand{\fourvec}[4]{\left[\begin{array}{r}#1 \\ #2 \\ #3 \\ #4 \end{array}\right]}\) \(\newcommand{\cfourvec}[4]{\left[\begin{array}{c}#1 \\ #2 \\ #3 \\ #4 \end{array}\right]}\) \(\newcommand{\fivevec}[5]{\left[\begin{array}{r}#1 \\ #2 \\ #3 \\ #4 \\ #5 \\ \end{array}\right]}\) \(\newcommand{\cfivevec}[5]{\left[\begin{array}{c}#1 \\ #2 \\ #3 \\ #4 \\ #5 \\ \end{array}\right]}\) \(\newcommand{\mattwo}[4]{\left[\begin{array}{rr}#1 \amp #2 \\ #3 \amp #4 \\ \end{array}\right]}\) \(\newcommand{\laspan}[1]{\text{Span}\{#1\}}\) \(\newcommand{\bcal}{\cal B}\) \(\newcommand{\ccal}{\cal C}\) \(\newcommand{\scal}{\cal S}\) \(\newcommand{\wcal}{\cal W}\) \(\newcommand{\ecal}{\cal E}\) \(\newcommand{\coords}[2]{\left\{#1\right\}_{#2}}\) \(\newcommand{\gray}[1]{\color{gray}{#1}}\) \(\newcommand{\lgray}[1]{\color{lightgray}{#1}}\) \(\newcommand{\rank}{\operatorname{rank}}\) \(\newcommand{\row}{\text{Row}}\) \(\newcommand{\col}{\text{Col}}\) \(\renewcommand{\row}{\text{Row}}\) \(\newcommand{\nul}{\text{Nul}}\) \(\newcommand{\var}{\text{Var}}\) \(\newcommand{\corr}{\text{corr}}\) \(\newcommand{\len}[1]{\left|#1\right|}\) \(\newcommand{\bbar}{\overline{\bvec}}\) \(\newcommand{\bhat}{\widehat{\bvec}}\) \(\newcommand{\bperp}{\bvec^\perp}\) \(\newcommand{\xhat}{\widehat{\xvec}}\) \(\newcommand{\vhat}{\widehat{\vvec}}\) \(\newcommand{\uhat}{\widehat{\uvec}}\) \(\newcommand{\what}{\widehat{\wvec}}\) \(\newcommand{\Sighat}{\widehat{\Sigma}}\) \(\newcommand{\lt}{<}\) \(\newcommand{\gt}{>}\) \(\newcommand{\amp}{&}\) \(\definecolor{fillinmathshade}{gray}{0.9}\)
Optical mineralogy involves studying rocks and minerals by studying their optical properties. Some of these properties are macroscopic and we can see them in mineral hand specimens. But generally we use a petrographic microscope, also called a polarizing microscope (Figures 5.1 and 5.2 show examples), and the technique is called transmitted light microscopy or polarized light microscopy (PLM). A fundamental principle of PLM is that most minerals – even dark-colored minerals and others that appear opaque in hand specimens – transmit light if they are thin enough. In standard petrographic microscopes, polarized light from a source beneath the microscope stage passes through samples on the stage and then to your eye(s).
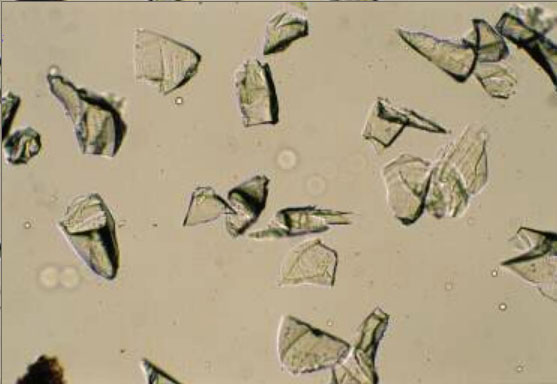
One approach to PLM involves examining grain mounts, which are ground-up mineral crystals on a glass slide. The grains must be thin enough so that light can pass through them without a significant loss of intensity, usually 0.10 to 0.15 mm thick. We surround a small number of grains with a liquid called refractive index oil, and then place a thin piece of glass, called a cover slip, over the grains and liquid. The photo in Figure 5.3, below, shows garnet grains in a grain mount.
Grain mounts and refractive index oils are necessary for making some types of measurements, but are not the focus of this chapter. They were extensively used in the past, but are not much used today. For more detailed information about studying minerals in grain mounts consult an optical mineralogy textbook.
|
|
|
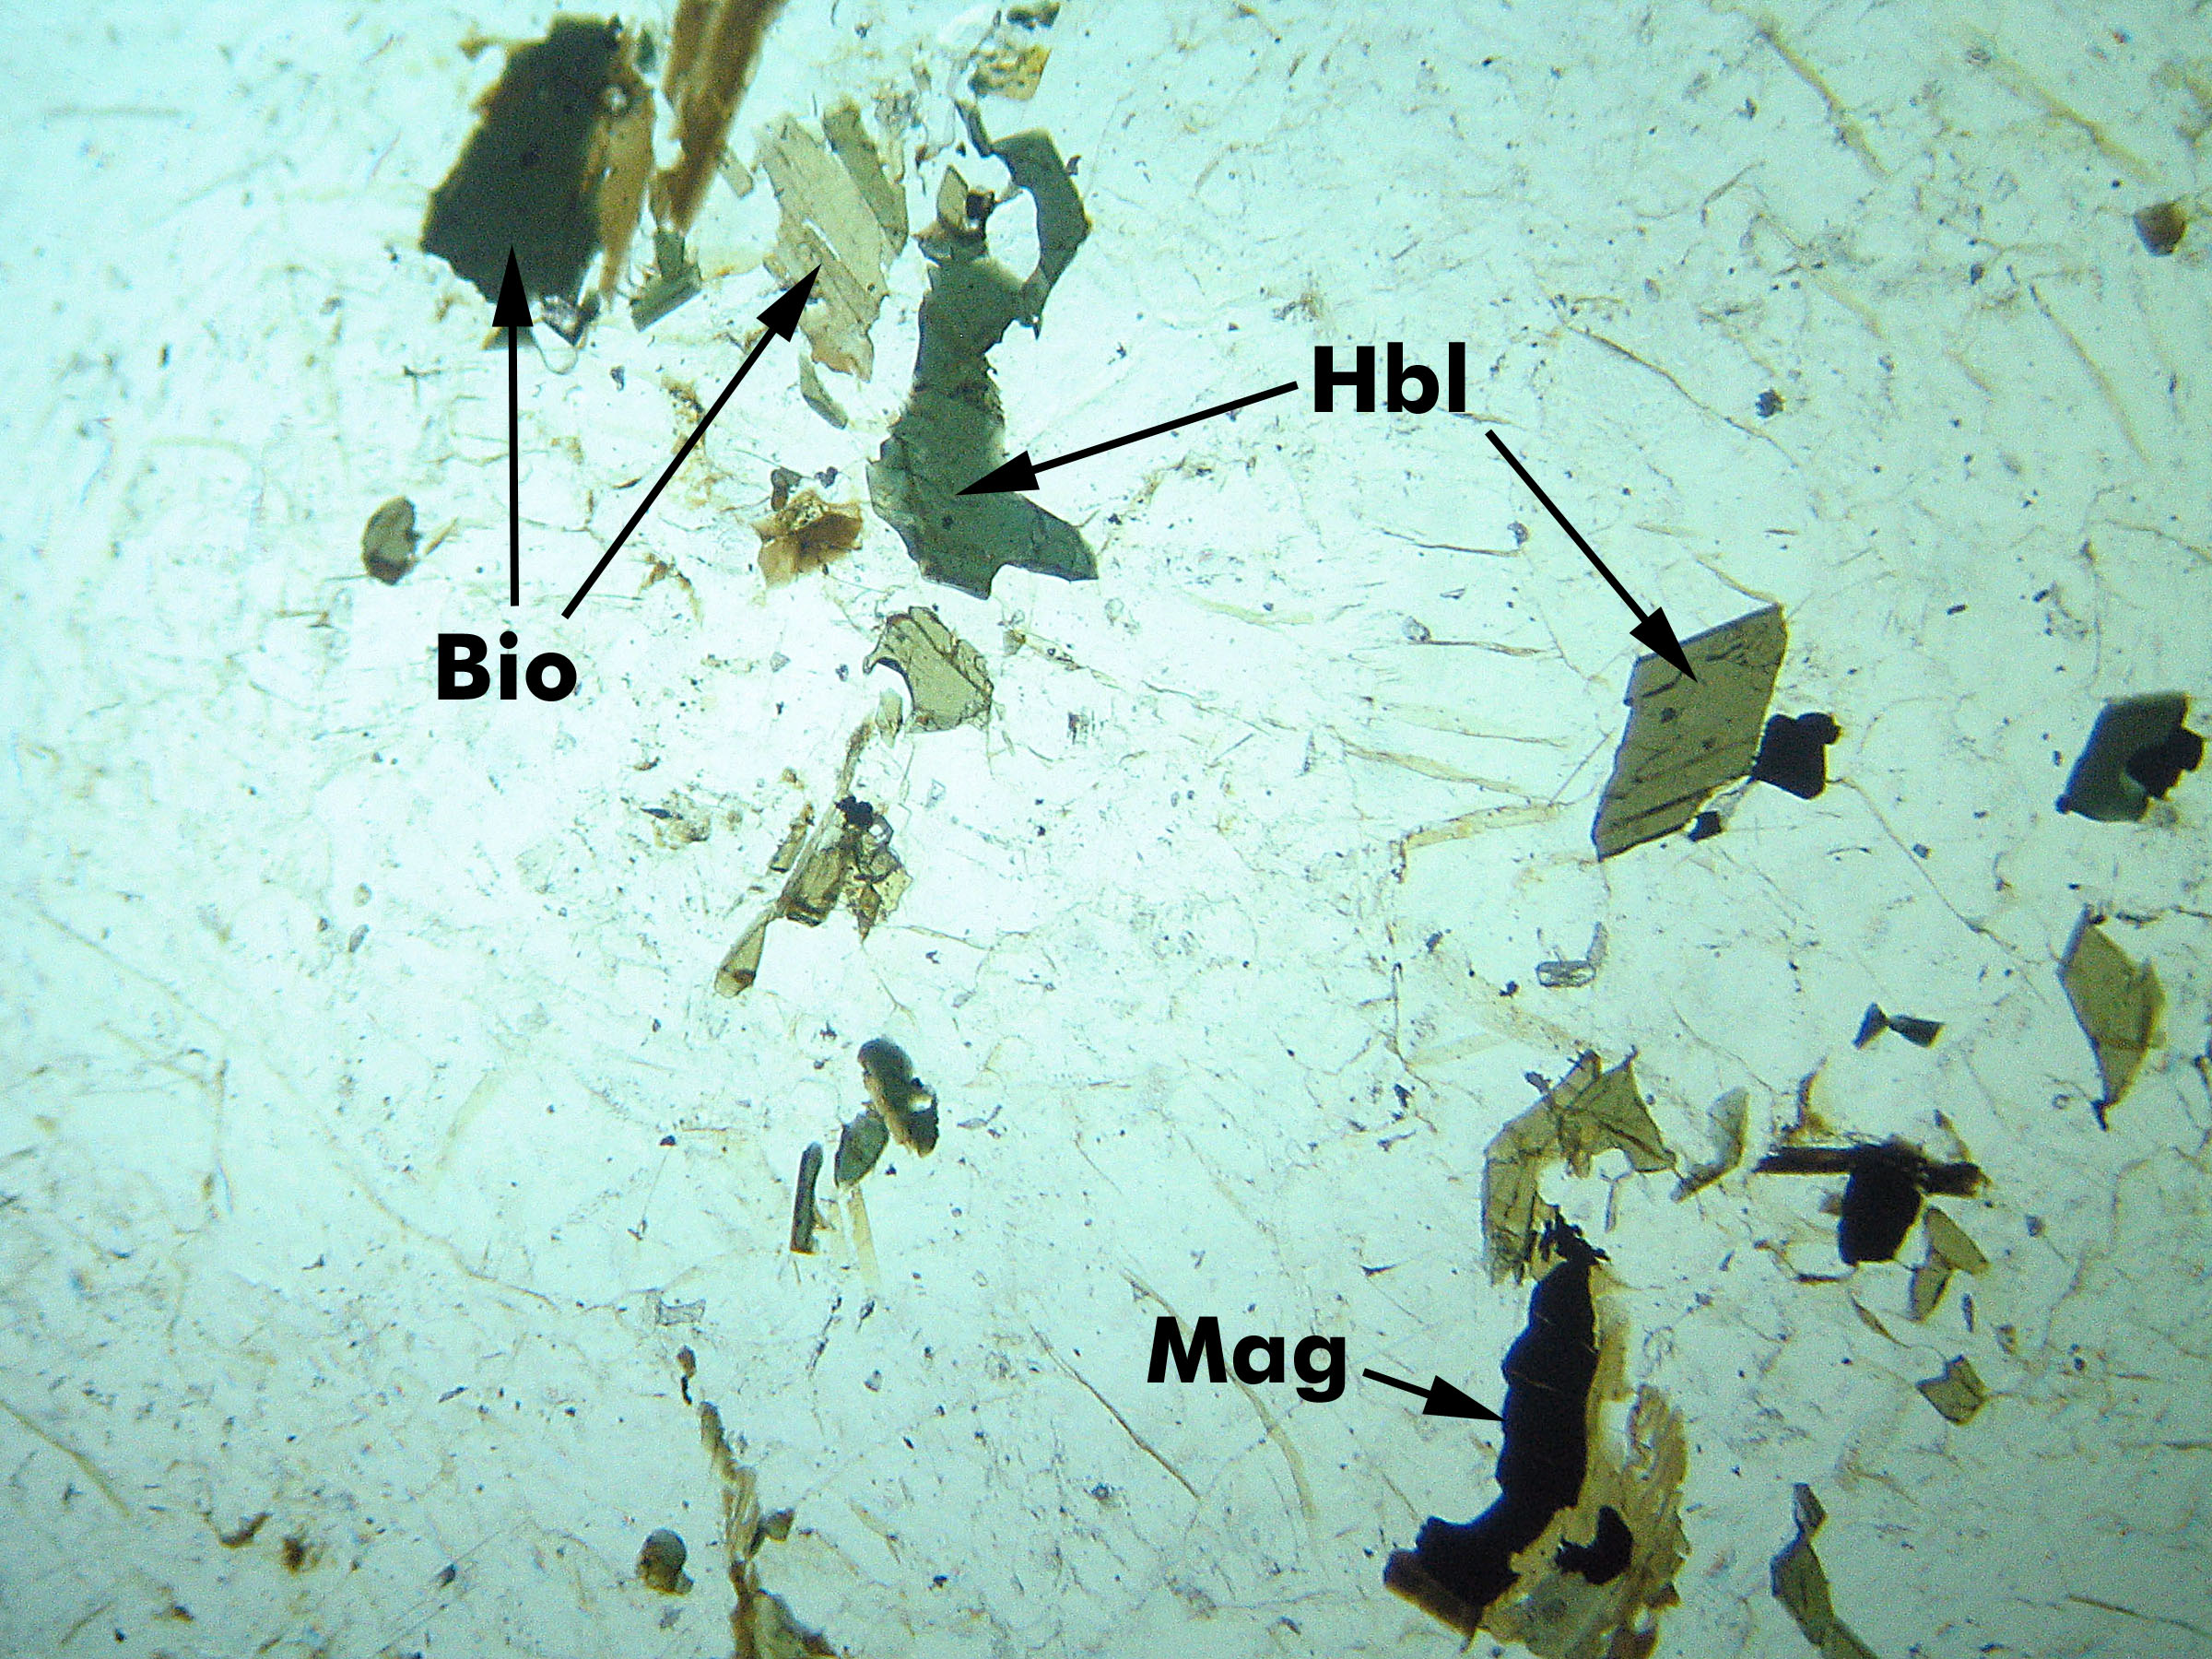
Most optical mineralogy today involves specially prepared thin sections (0.03-mm-thick specimens of minerals or rocks mounted on glass slides). Video 1 (linked in Box 5-2) explains how we make thin sections, and Figure 5.1, the opening figure in this chapter, shows an example. Figure 5.4 above shows a microscope view of a thin section that contains several minerals (biotite, hornblende, and magnetite are labeled, and the clear grains around them are mostly quartz and plagioclase). Whether looking at grain mounts or thin sections, transmitted light microscopy allows us to determine and measure properties that are otherwise not discernible. We can identify minerals, sometimes their compositions, and we can observe mineral relationships that allow us to learn about mineral origins.
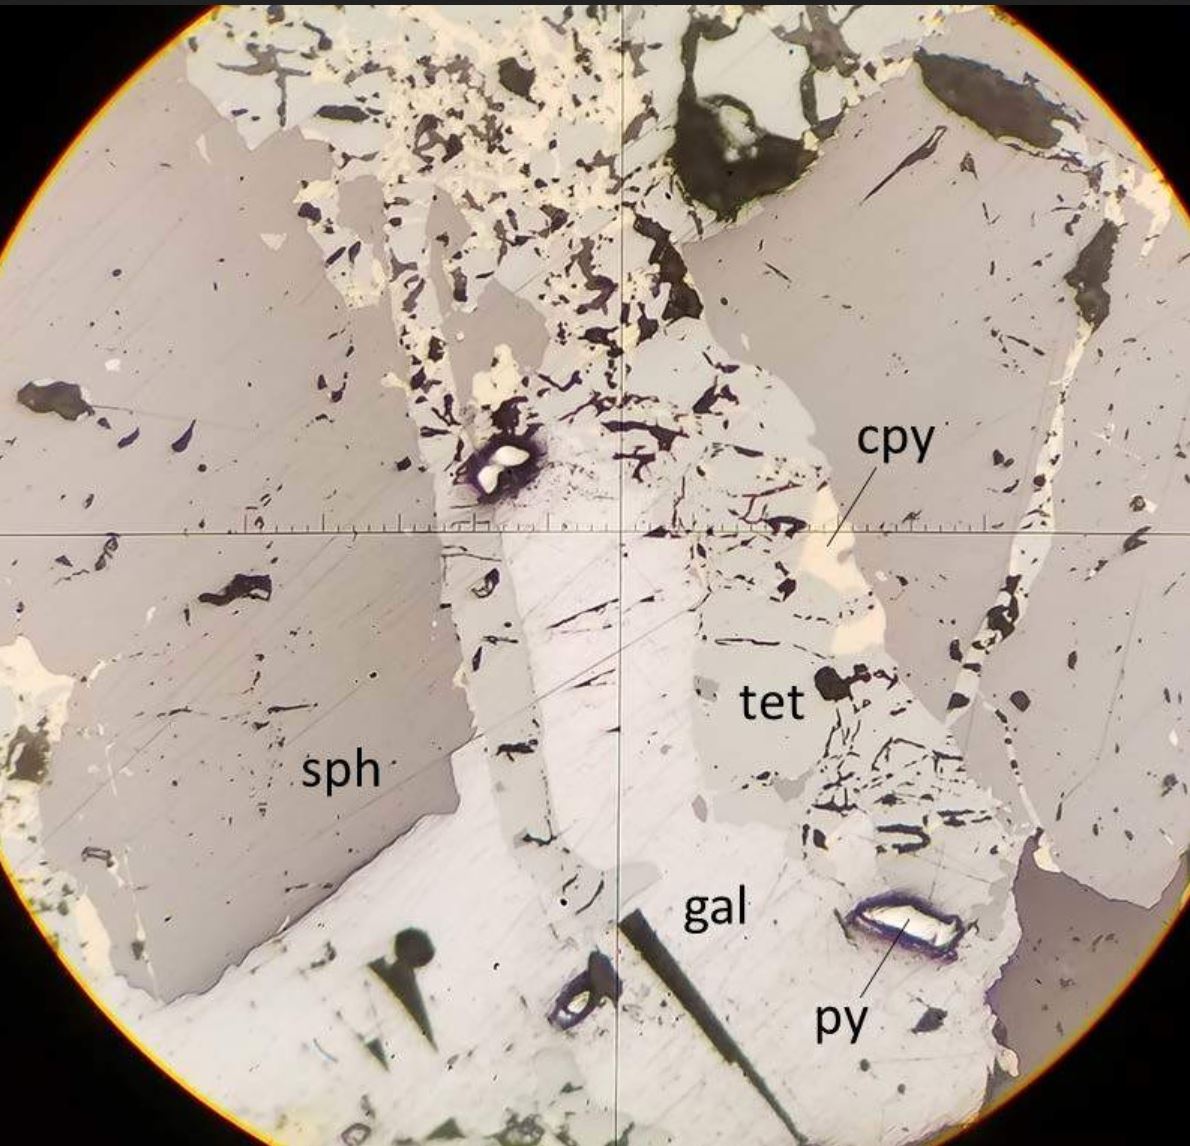
Minerals with metallic luster and a few others are termed opaque minerals. They will not transmit light even if they are thin-section thickness. So they always appear black when viewed with a microscope. Magnetite is an opaque mineral; the photo in Figure 5.4 contains several small black magnetite grains. For studying opaque minerals, transmitted light microscopy is of little use. Reflected light microscopy (RLM), a related technique, can reveal some of the same properties. As the name implies, when using RLM, the light source is above the sample and light reflects from the sample to our eye. RLM, although an important technique for economic geologists who deal with metallic ores, is not used by most mineralogists or petrologists. So we discuss it only briefly in this book. Figure 5.5 shows a view of ore from Butte, Montana, seen with a reflecting light microscope. It contains several opaque minerals: galena, sphalerite, pyrite, and chalcopyrite. They appear in various shades of black, gray, and light yellow.
Most minerals can be identified when examined with a petrographic microscope, even if unidentifiable in hand specimen. Optical properties also allow a mineralogist to estimate the composition of some minerals. For example, we can learn the magnesium-to-iron ratio of olivine, (Mg,Fe)2SiO4, based on optical properties. And we can also determine the albite and anorthite content of plagioclase feldspar.
Box 5-3 (below) summarizes the optical properties used for mineral identification and gives the properties of some common minerals. At the largest level, we divide minerals into opaque minerals and nonopaque minerals. Opaque minerals will not transmit light unless the mineral grains are much thinner than normal thin sections. We further divide nonopaque minerals into those that are isotropic (having the same properties in all directions) and those that are anisotropic (having different optical properties in different directions). We discussed these terms, isotropic and anisotropic, previously in Section 4.1, Chapter 4. Finally, we divide the anisotropic minerals into those that are uniaxial and those that are biaxial, and according to whether they have a positive or negative optic sign. We look at the details of these and other diagnostic properties below.
Besides mineral identification, the polarizing microscope reveals important information about rock-forming processes (petrogenesis). When we examine thin sections, distinguishing igneous, sedimentary, and metamorphic rocks is often easier than when we look at hand specimens. More significantly, we can identify minerals and distinguish among different types of igneous, sedimentary, and metamorphic rocks. The microscope allows us to see textural relationships in a specimen that give clues about when and how different minerals in an igneous rock formed. Microscopic relationships between mineral grains allow us to determine the order in which minerals crystallized from a magma, and we can identify minerals produced by alteration or weathering long after the crystals first formed. Similar observations are possible for sedimentary or metamorphic rocks. Only the microscope can give us such information, information that is essential if rocks are to be used to interpret geological processes and environments.
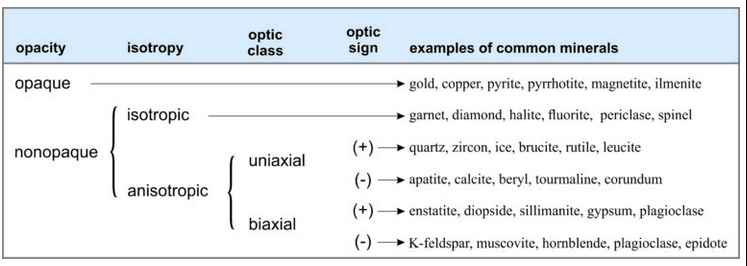
Optical Classification of Minerals
Mineralogists often classify minerals according to the mineral’s optical properties. The table below shows the basic classification scheme and gives examples of minerals belonging to each of six categories. At the highest level, we divide minerals into two groups: opaque minerals and nonopaque minerals. We further divide the nonopaque minerals into those that are isotropic and anisotropic, and then we divide the anisotropic minerals by other properties discussed later in this book. We measure these properties using a polarizing microscope such as the one in Figure 5.2 (above) and Figure 5.22 (later in this chapter).