
7.3: Other forces acting on the wind
- Page ID
- 42621

\( \newcommand{\vecs}[1]{\overset { \scriptstyle \rightharpoonup} {\mathbf{#1}} } \)
\( \newcommand{\vecd}[1]{\overset{-\!-\!\rightharpoonup}{\vphantom{a}\smash {#1}}} \)
\( \newcommand{\dsum}{\displaystyle\sum\limits} \)
\( \newcommand{\dint}{\displaystyle\int\limits} \)
\( \newcommand{\dlim}{\displaystyle\lim\limits} \)
\( \newcommand{\id}{\mathrm{id}}\) \( \newcommand{\Span}{\mathrm{span}}\)
( \newcommand{\kernel}{\mathrm{null}\,}\) \( \newcommand{\range}{\mathrm{range}\,}\)
\( \newcommand{\RealPart}{\mathrm{Re}}\) \( \newcommand{\ImaginaryPart}{\mathrm{Im}}\)
\( \newcommand{\Argument}{\mathrm{Arg}}\) \( \newcommand{\norm}[1]{\| #1 \|}\)
\( \newcommand{\inner}[2]{\langle #1, #2 \rangle}\)
\( \newcommand{\Span}{\mathrm{span}}\)
\( \newcommand{\id}{\mathrm{id}}\)
\( \newcommand{\Span}{\mathrm{span}}\)
\( \newcommand{\kernel}{\mathrm{null}\,}\)
\( \newcommand{\range}{\mathrm{range}\,}\)
\( \newcommand{\RealPart}{\mathrm{Re}}\)
\( \newcommand{\ImaginaryPart}{\mathrm{Im}}\)
\( \newcommand{\Argument}{\mathrm{Arg}}\)
\( \newcommand{\norm}[1]{\| #1 \|}\)
\( \newcommand{\inner}[2]{\langle #1, #2 \rangle}\)
\( \newcommand{\Span}{\mathrm{span}}\) \( \newcommand{\AA}{\unicode[.8,0]{x212B}}\)
\( \newcommand{\vectorA}[1]{\vec{#1}} % arrow\)
\( \newcommand{\vectorAt}[1]{\vec{\text{#1}}} % arrow\)
\( \newcommand{\vectorB}[1]{\overset { \scriptstyle \rightharpoonup} {\mathbf{#1}} } \)
\( \newcommand{\vectorC}[1]{\textbf{#1}} \)
\( \newcommand{\vectorD}[1]{\overrightarrow{#1}} \)
\( \newcommand{\vectorDt}[1]{\overrightarrow{\text{#1}}} \)
\( \newcommand{\vectE}[1]{\overset{-\!-\!\rightharpoonup}{\vphantom{a}\smash{\mathbf {#1}}}} \)
\( \newcommand{\vecs}[1]{\overset { \scriptstyle \rightharpoonup} {\mathbf{#1}} } \)
\(\newcommand{\longvect}{\overrightarrow}\)
\( \newcommand{\vecd}[1]{\overset{-\!-\!\rightharpoonup}{\vphantom{a}\smash {#1}}} \)
\(\newcommand{\avec}{\mathbf a}\) \(\newcommand{\bvec}{\mathbf b}\) \(\newcommand{\cvec}{\mathbf c}\) \(\newcommand{\dvec}{\mathbf d}\) \(\newcommand{\dtil}{\widetilde{\mathbf d}}\) \(\newcommand{\evec}{\mathbf e}\) \(\newcommand{\fvec}{\mathbf f}\) \(\newcommand{\nvec}{\mathbf n}\) \(\newcommand{\pvec}{\mathbf p}\) \(\newcommand{\qvec}{\mathbf q}\) \(\newcommand{\svec}{\mathbf s}\) \(\newcommand{\tvec}{\mathbf t}\) \(\newcommand{\uvec}{\mathbf u}\) \(\newcommand{\vvec}{\mathbf v}\) \(\newcommand{\wvec}{\mathbf w}\) \(\newcommand{\xvec}{\mathbf x}\) \(\newcommand{\yvec}{\mathbf y}\) \(\newcommand{\zvec}{\mathbf z}\) \(\newcommand{\rvec}{\mathbf r}\) \(\newcommand{\mvec}{\mathbf m}\) \(\newcommand{\zerovec}{\mathbf 0}\) \(\newcommand{\onevec}{\mathbf 1}\) \(\newcommand{\real}{\mathbb R}\) \(\newcommand{\twovec}[2]{\left[\begin{array}{r}#1 \\ #2 \end{array}\right]}\) \(\newcommand{\ctwovec}[2]{\left[\begin{array}{c}#1 \\ #2 \end{array}\right]}\) \(\newcommand{\threevec}[3]{\left[\begin{array}{r}#1 \\ #2 \\ #3 \end{array}\right]}\) \(\newcommand{\cthreevec}[3]{\left[\begin{array}{c}#1 \\ #2 \\ #3 \end{array}\right]}\) \(\newcommand{\fourvec}[4]{\left[\begin{array}{r}#1 \\ #2 \\ #3 \\ #4 \end{array}\right]}\) \(\newcommand{\cfourvec}[4]{\left[\begin{array}{c}#1 \\ #2 \\ #3 \\ #4 \end{array}\right]}\) \(\newcommand{\fivevec}[5]{\left[\begin{array}{r}#1 \\ #2 \\ #3 \\ #4 \\ #5 \\ \end{array}\right]}\) \(\newcommand{\cfivevec}[5]{\left[\begin{array}{c}#1 \\ #2 \\ #3 \\ #4 \\ #5 \\ \end{array}\right]}\) \(\newcommand{\mattwo}[4]{\left[\begin{array}{rr}#1 \amp #2 \\ #3 \amp #4 \\ \end{array}\right]}\) \(\newcommand{\laspan}[1]{\text{Span}\{#1\}}\) \(\newcommand{\bcal}{\cal B}\) \(\newcommand{\ccal}{\cal C}\) \(\newcommand{\scal}{\cal S}\) \(\newcommand{\wcal}{\cal W}\) \(\newcommand{\ecal}{\cal E}\) \(\newcommand{\coords}[2]{\left\{#1\right\}_{#2}}\) \(\newcommand{\gray}[1]{\color{gray}{#1}}\) \(\newcommand{\lgray}[1]{\color{lightgray}{#1}}\) \(\newcommand{\rank}{\operatorname{rank}}\) \(\newcommand{\row}{\text{Row}}\) \(\newcommand{\col}{\text{Col}}\) \(\renewcommand{\row}{\text{Row}}\) \(\newcommand{\nul}{\text{Nul}}\) \(\newcommand{\var}{\text{Var}}\) \(\newcommand{\corr}{\text{corr}}\) \(\newcommand{\len}[1]{\left|#1\right|}\) \(\newcommand{\bbar}{\overline{\bvec}}\) \(\newcommand{\bhat}{\widehat{\bvec}}\) \(\newcommand{\bperp}{\bvec^\perp}\) \(\newcommand{\xhat}{\widehat{\xvec}}\) \(\newcommand{\vhat}{\widehat{\vvec}}\) \(\newcommand{\uhat}{\widehat{\uvec}}\) \(\newcommand{\what}{\widehat{\wvec}}\) \(\newcommand{\Sighat}{\widehat{\Sigma}}\) \(\newcommand{\lt}{<}\) \(\newcommand{\gt}{>}\) \(\newcommand{\amp}{&}\) \(\definecolor{fillinmathshade}{gray}{0.9}\)The Coriolis Force
As a parcel of air accelerates due to the Pressure Gradient Force, it will begin to experience a new force caused by atmospheric rotation. This force is called the Coriolis Force (Figure \(\PageIndex{1}\)). It is an apparent force that appears to change the direction of a moving object due to Earth's rotation. The apparent deflection of a moving object due to the Coriolis Force is called the Coriolis Effect.
A simple demonstration of the Coriolis Effect can be conducted using two index cards. Using a pair of scissors, cut slits into each of the cards such that the two cards can fit into each other. The two fitted cards serve as our frame of reference for observing the direction of a moving object. We can draw a line from the center of the two cards, along the slit, to represent wind. By rotating one of the cards, we can simulate how wind moving in a straight line appears when the Earth's surface is rotating. The following video provides a nice demonstration of the Coriolis Effect.
Duration of video: 2:54
Video introduction: Coriolis Effect demonstrates how the rotation of an index card can alter the path of an otherwise straight-moving particle of air. You can also try the experiment at home with a couple of index cards, a pen, two pieces of tape, and a pair of scissors.
- From the video, the wind path was _____ when the index card was not being rotated.
- curved
- straight
- On the other hand, when the index card was rotating, the path of the wind became:
- curved
- straight
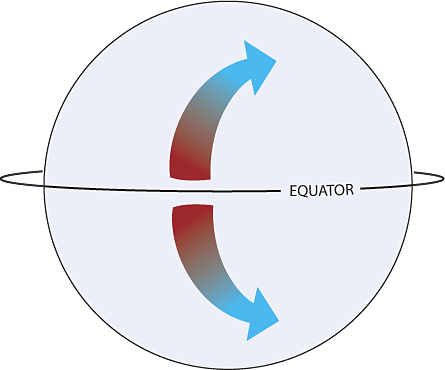
The direction of rotation plays an important role. The Earth rotates from west to east. When viewed from the North Pole, the Earth appears to spin counterclockwise, while from the South Pole it appears to spin clockwise. Changing the index card's rotation from counterclockwise to clockwise reverses the direction the wind is deflected. Thus, the Coriolis force causes an apparent change in the wind’s direction:
- To the right of its direction in the Northern Hemisphere
- To the left of its direction in the Southern Hemisphere

- Returning to the simplified weather map in Figure \(\PageIndex{2}\), assuming we’re in the Northern Hemisphere and North is at the top, West is on the left, and East is on the right. As the air particle accelerates, the Coriolis force would turn the wind:
- to the East
- to the West
Let's put into practice what we learned about the Coriolis force. Returning our attention to Boston and the printout of Figure 7.2.5. The Coriolis force would be directed at a 90° angle, to the right of the net wind force arrow or the direction of wind flow. Draw an arrow on your map that points out of Boston’s station circle, and is 90° to the right of Boston’s net wind arrow.
- In Boston, the Coriolis Force would be directing the wind to the:
- North-Northeast
- North-Northwest
- South-Southeast
- South-Southwest
The magnitude of the Coriolis force is based on three key factors: size, speed, and latitude
- Size: Only large enough motions will feel a Coriolis tug. So contrary to popular belief, the water in your toilet bowl doesn’t rotate due to the Coriolis force.
- Speed: The faster the wind, the stronger the Coriolis Force.
- Latitude: The further you are away from the equator, the stronger the Coriolis force. This is why cyclones or hurricanes don’t form over the equator.
As the air parcel in Figure \(\PageIndex{2}\) accelerates, it will be tugged further and further to the right of its path (Figure \(\PageIndex{3}\) and Figure \(\PageIndex{4}\)). Eventually, the direction and magnitude of the Coriolis force will become equal and opposite to the direction of the Pressure Gradient Force (PGF), causing the wind to flow parallel to adjacent isobars (Figure \(\PageIndex{5}\)). This phenomenon is known as the Geostrophic (Earth-turning) Balance and will be investigated further later.


- At this point (Figure \(\PageIndex{5}\)), the Pressure Gradient and Coriolis Forces ______ causing the wind to continue in a straight path due to inertia (Newton's first law).
- cancel each other out,
- amplify each other
Friction
The Pressure Gradient and Coriolis forces are the only forces we need to worry about in the upper atmosphere. However, near Earth's surface, trees, buildings, terrain, and other objects slow the wind. Combined, the drag caused by these objects exerts a force known as friction. Friction is always directed opposite the net wind direction. Before we jump into the effects of friction, let’s do a brief review of the factors that affect the Pressure Gradient and Coriolis Forces:
- The Pressure Gradient Force is affected by differences in pressure and distance between isobars.
- The Coriolis Force is affected by Latitude, size, and speed.
- Considering the setup in Figure \(\PageIndex{5}\), Friction would slow the wind down. Which force would be affected by the slowing down of the wind?
- Pressure Gradient Force
- Coriolis Force
- As a result, which force will become stronger?
- Pressure Gradient Force
- Coriolis Force
- This would throw the wind off from Geostrophic Balance, causing the parcel from Figure \(\PageIndex{5}\) to turn:
- Towards lower pressure
- Away from pressure
- This is _______ with the Hand Twist Model we studies in Investigation 6, which suggests that winds spiral into low-pressure regions.
- consistent
- inconsistent
- Finally, let's return to the Boston surface map. Draw an arrow pointing in the exact opposite direction of the Net Wind Force, representing Friction. In Boston, Friction is directed to the:
- East-Northeast
- West-Southwest
- North-Northeast
- South-Southeast
- Label each of the arrows that you drew on Figure 7.2.5, and submit the figure.