
1.1: Lab 1 - Earth's Geographic Grid
- Page ID
- 25325
This lab contains potentially inaccessible interactive resources. Please work with your instructor and local campus resources to identify accommodations (such as alternative formatted maps) for these resources.
- Use latitude and longitude to identify locations on Earth.
- Calculate lengths of a degree of longitude at different latitudes.
- Convert between degrees, minutes, and seconds and decimal latitudes and longitudes.
- Identify the special lines of latitude.
- Calculate solar time.
- Explain the Public Land Survey system.
The Earth is spherical but not quite a perfect circle. In fact, it is a little wider in the middle due to its rotation and the resulting centrifugal forces. By understanding that the Earth is round, geographers can easily distinguish a specific location by utilizing a grid system, similar to using graph paper.
Geography is about spatial understanding, which requires an accurate grid system to determine absolute and relative location. Absolute location is the exact x- and y- coordinates on the Earth. Relative location is the location of something relative to other entities. For example, when you use Google Maps, you put in an absolute location. But as you start driving, the device tells you to turn right or left relative to objects on the ground: "Turn left on exit Valencia Blvd" is relative to the other exit points. Or if you give directions to your house, you often use relative locations to help them understand how to get to your house.[2] These lines that allow us to understand a location are called latitudes and longitudes.
Lines of latitude, also known as parallels, are measured from the center of the Earth. These lines are angles measured at the equator (0°) to the North Pole at 90°N, or to the South Pole at 90°S. The angles are measured as though a protractor was placed in the center of the Earth, and we are measuring an angle from the center of the Earth to the Earth’s crust.
Lines of longitude, otherwise known as meridians, are measured going east or west of the Prime Meridian, which passes through the Royal Observatory in Greenwich, England. The reason the Prime Meridian passes through the Observatory in England is due to an international agreement of 25 countries in 1884, as technically the meridian is arbitrary and could have been anywhere in the world. Two longitudes (or meridians), connected on opposite sides of the globe, create a great circle. A single line of longitude does not make a circle on the globe—it is an arc of a great circle. The word meridian also implies that these lines are not parallel but instead intersect at both the north and south poles. The Prime Meridian is the dividing longitude of the eastern and western hemispheres. The farthest one can travel either east or west is 180°: (180°W + 180°E = 360°).
Figure 1.1 provides an illustration of how we can pinpoint a location on Earth using latitude and longitude. The location marked with a dot is 40° north of the equator and is 60° degrees east of the Prime Meridian. So this location is at 40°N, 60°E.

Both latitudes and longitudes can be identified as circles. This brings up the topic of great and small circles (Figure 1.2). A great circle is any circle that divides the Earth into a circumference of two equal halves. It's also the largest circle that can be drawn on a sphere. The line connecting any points along a great circle is also the shortest distance between those two points. Examples of great circles include the Equator; all lines of longitude; the line that divides the Earth into day and night, called the circle of illumination; and the plane of the ecliptic, which divides the Earth into equal halves. Small circles are circles that cut the Earth in two, but not into two equal halves.[4]

In this lab, you will investigate a variety of ways to understand the Earth’s grid system, determine the importance of distance and differences in time, and utilize the Public Land Survey.
Part A. Latitude and Longitude
The Earth’s geographic grid is based on the division of a circle, which can be observed as lines of latitude or longitude (Figure 1.3).

- Refer to Figure 1.3.
- Latitude is measured to the north or south of the:
- Longitude is measured to the east or west of the:
- Lines that are drawn from north to south (from the North Pole to the South Pole) are called:
- Lines that are drawn from east to west are called (from the Prime Meridian to the Antimeridian (180th Meridian):
- The highest degree possible for a line of latitude is:
- The highest degree possible for a line of longitude is:
- In one to two sentences, describe the differences between great and small circles.
- On Figure 1.3, label an example of a great circle and an example of a small circle.
Distance: The Length of a Degree
Because lines of latitude are parallel to one another, the measurable distance between them, from north to south, remains relatively constant. Due to Earth’s curvature, one degree of latitude is approximately 68.7 miles at the equator, while at the poles one degree of latitude is approximately 69.4 miles.
As the angular distance changes between the lines of longitude, the distance along a line of latitude will either increase or decrease. To better understand this concept, use Table 1.1 shown below to answer the following questions about the length of a degree of longitude along specific latitudes. (Hint: a statute mile is the linear measurement of a mile, which is equal to 5,280 feet).
| Latitude North or South | Length of One Degree of Longitude at this Latitude in Statute Miles |
|---|---|
| 0° | 69.171 |
| 10° | 69.128 |
| 20° | 65.026 |
| 30° | 59.956 |
| 40° | 53.063 |
| 50° | 44.552 |
| 60° | 34.674 |
| 70° | 23.729 |
| 80° | 12.051 |
| 90° | 0.000 |
- Refer to Table 1.1.
- How does the length of longitudes change as latitude is increased?
- Calculate the distance of the Earth along the equator. Show your work.
- Calculate the distance of the Earth along 30°N. Show your work.
- Calculate the distance of the Earth along 60°S. Show your work.
How would you calculate the distance in miles between two people on the same line of latitude? Here are the steps to follow:
Step 1
First, find the sum of the total longitudinal distance between the points in degrees.
Step 2
Multiply that sum by the statute miles per degree at the shared line of latitude (refer to Table 1.1).
Sometimes it is easier to complete Step 1 by visualizing the degree distance between two points on the same latitude by plotting the two points on a number line with 180 degrees West on the far-left, 0 degrees in the middle and 180 degrees East on the far-right. Figure 1.4 provides an example: if you want to calculate the distance between 90°W and 30°E, you can mark these on the number line. Once you plot the two locations, you are able to calculate the total longitudinal distance between the locations. In this example, 90 degrees West + 30 degrees East = 120 degrees total distance.
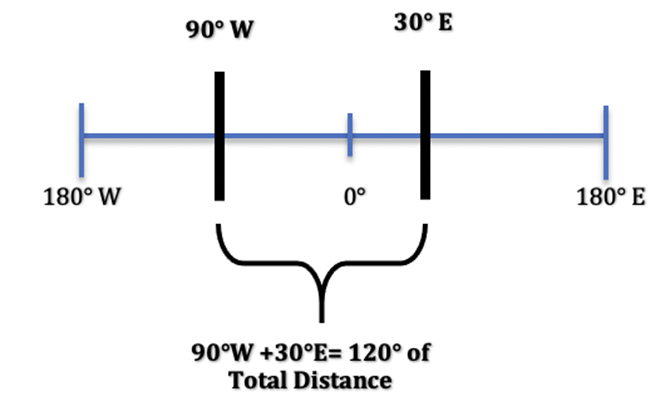
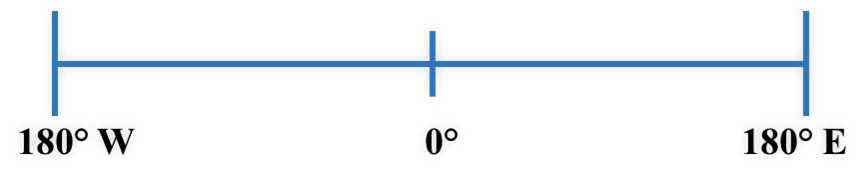
Figure 1.5 provides a graph that you can use for the following two questions (Hint: this is great practice as you will be using this number line again later in the lab).

- How many miles are between 60°N, 30°W and 60°N, 50°E? Show your work.
- First, determine the number of degrees of longitude between these two locations (use Figure 1.5):
- Second, refer to Table 1.1 and multiply your answer for 5a by the longitudinal distance at 60°N:
- How many miles are between 30°S, 60°W and 30°S, 90°E? Show your work.
- First, determine the number of degrees of longitude between these two locations (use Figure 1.5):
- Second, refer to Table 1.1 and multiply your answer for 6a by the longitudinal distance at 30°S:
Degrees, Minutes, and Seconds
The primary unit in which latitude and longitude are observed is degrees. As learned earlier, the distance of these degrees can be quite large, which is why it is important that the subdivision of a degree be understood. There are two formats for subdividing a degree: decimal degrees and degrees-minutes-seconds (DMS).
In order to understand the DMS format, you should know that ° is the abbreviation for degrees, ’ is the abbreviation for minutes, and ” is the abbreviation for seconds. Each degree can be divided into 60 equal parts called a minute. Each minute can also be divided into 60 equal parts called seconds. This can be noted as 1° = 60’ = 3600”. To review:
➢ there are 60 minutes in 1 degree.
➢ there are 60 seconds in 1 minute.
Also note that for DMS, degrees are shown first, then minutes, then seconds.
- Write the following latitude and longitudes in DMS and use the correct abbreviations. Hint: 15 degrees, 32 minutes, and 11 seconds S would be written as 15° 32’ 11” S. Because it has the S designation, it is a latitude.
- 5 degrees, 20 minutes, 30 seconds N:
- Is this a latitude or longitude?
- 122 degrees, 40 seconds, and 55 minutes W:
- Is this a latitude or longitude?
- 88 degrees, 55 minutes, and 12 seconds S:
- Is this a latitude or longitude?
- 5 degrees, 20 minutes, 30 seconds N:
- Apply What You Learned: Correct the errors on the following latitudes and longitudes. Hint: just like with time, minutes and seconds cannot exceed 60. For example, if there are 65’ shown, you should turn 60’ into 1° and keep 5’ remaining. So, 20° 65’ 00” N would be corrected as 21° 5’ 00” N.
- 89° 47’ 65” N
- 62° 59’ 61” S
- 118° 67’ 51” E
Decimal degrees are just that, the decimal version of latitude and longitude. For example, you know that there are 60 minutes in one degree. So, 30 minutes would be one-half of one degree. One-half is the same as 0.5. Therefore, you could identify a latitude as 60°30’ N or as 60.5° N.
Let’s say you would like to convert the following location into decimal degrees: 60° 30’ 45” N. Only the conversion of the minutes and seconds needs to occur, and this can be done by taking the minutes and dividing them by 60, and taking the seconds and dividing them by 3600, then adding them together. (Hint: 1° = 60’ and 60’ = 3600”). Let’s look at this DMS to decimal conversion step-by-step:
Step 1
Using the location 60° 30’ 45” N, let’s first convert minutes into a decimal by dividing it by 60. For this problem, it would be 30/60 = 0.5.
Step 2
We need to convert seconds into a decimal as well, so divide the seconds by 3600. For this problem it would be 45/3600 = 0.0125.
Step 3
Let’s put it together. Since there was no conversion to the degrees, that number stands alone, followed by a decimal point. The decimal portion is the sum of the conversions from steps 1 and 2. The answer is 60.5125° N (60 + 0.5 + 0.0125 = 60.5125).
 Guided Practice: DMS to Decimal Degrees
See examples of how to convert DMS to decimal degrees with this video from Scott’s Geography Notebook, Degrees, Minutes, Seconds to Decimal Degrees. (Video length is 4:57).
- Convert the following latitudes and longitudes from DMS to decimal degrees.
- 20° 58’ 33” N
- 04° 22’ 52” S
- 118° 35’ 51” E
 Think About It…Why Is This Important?
This information is helpful in understanding locations on both digital and paper mediums. Most paper maps use DMS, while most digital interfaces like Google Maps use decimal degrees.
There are many ways to look up locations to find their latitude and longitude. In the Pin It! box below you will find an interactive website sponsored by the United States Geological Survey (USGS) that provides a global interactive map that can help identify the latitude and longitude of a certain location. Use the QR code or link below to answer the following questions. (Hint: all three locations for this activity are in California). Note that negative (-) latitudes are in the southern hemisphere and negative (-) longitudes are in the western hemisphere. For example, -118° is the same as 118° W.
To convert decimal degrees to DMS, multiple the decimal by 60 to find the minutes. Multiply the remaining decimal by 60 to get the seconds.
 Pin It! Finding a Latitude and Longitude
Use this interactive Latitude and Longitude Finder to help complete the following questions. Note: your instructor may provide hard-copy atlases or another website.
- What are the latitude and longitude of Point Dume at Point Dume State Beach...
- ...in Decimal Degrees?
- ...in Degrees, Minutes, and Seconds? Show your work.
- What are the latitude and longitude of Mt. Whitney in the Sierra Nevada?
- ...in Decimal Degrees?
- ...in Degrees, Minutes, and Seconds? Show your work.
Special Lines of Latitude
There are some special lines of latitude (Figure 1.6), which will be discussed in another lab. You should memorize these special lines of latitude. And, notice that the word “Arctic” has two letter “c”s in it. Too many students misspell “Arctic” as “Artic”—don’t let that happen to you. (Also notice, there are two letter “c”s in the word Antarctic). At the far north lies the North Pole at 90° North (90°N). Moving southward is the Arctic Circle at 66.5° North (66.5°N) and the Tropic of Cancer at 23.5° North (23.5°N). The Equator circles the center of the Earth at 0° latitude. Continuing to move southward is the Tropic of Capricorn at 23.5° South (23.5°S) and the Antarctic Circle at 66.5° South (66.5°S). The most southward latitude is the South Pole at 90° South (90°S).

- Refer to Figure 1.6 to complete Table 1.2. Be sure to include if the latitude is north or south of the equator.
| Latitude Name | Degrees of Latitude |
|---|---|
| The Equator | |
| The Tropic of Cancer | |
| The Tropic of Capricorn | |
| The Arctic Circle | |
| The Antarctic Circle | |
| The North Pole | |
| The South Pole |
- Using Figure 1.6 and Table 1.2, sketch and label each of these latitudes on the map below (Figure 1.7). Be sure to include the latitude name and degrees on your labels.

The Geographic Grid
In this portion of the lab you will be applying previously learned content together on a map.
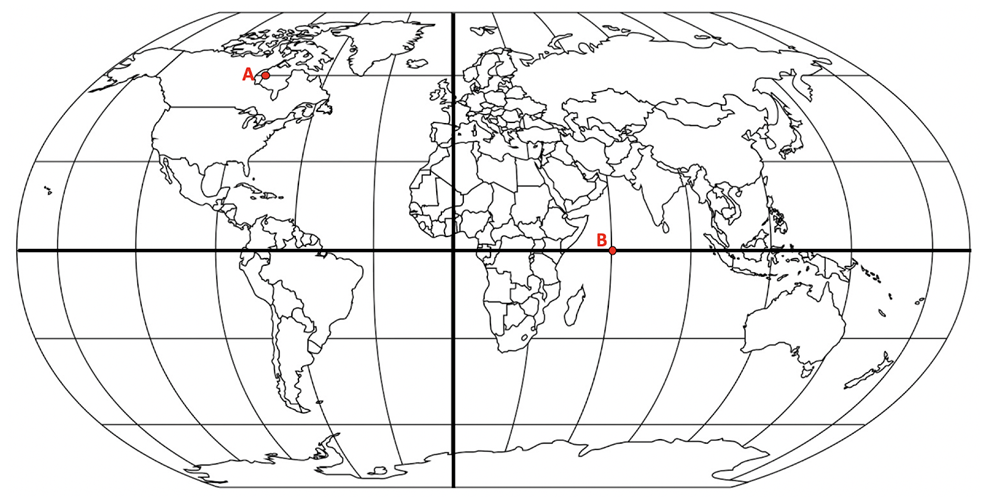
- Refer to Figure 1.8.
- Label the lines of latitude and longitude along the edges of the map. Note that they are in 30° increments.
- What are the coordinates for the location labeled A (in North America)?
- What are the coordinates for the location labeled B (in the Indian Ocean)?
- Draw a dot at 20°S, 45°W and label it with a C.
- Draw a dot at 60°N, 120°E and label it with a D.
- Draw a dot at 45°S, 15°E and label it with a E.
- Draw a dot at 35°N, 120°W and label it with a F.
- Draw a dot at 70°S, 160°E and label it with a G.
- Draw a dot at 10°N, 30°W and label it with a H.
- Use Figure 1.9 to calculate the total distance in degrees between points A and D. Then, refer to Table 1.1 to determine the total distance in miles. Be sure to show your work.

Part B. Earth’s Time Zones
Time on Earth can be observed in two different ways: either using the Sun or utilizing standard time. Solar time uses the noon sun angles to calculate the apparent solar time (like the sundial shown in Figure 1.10). Standard time is the time you are most accustomed to, as it is the local agreed-upon time in a region when Daylight Savings is not in use. Standard time prevents cities and towns from being divided by solar time zones. Standard time is best observed as time zones.
The Earth rotates eastward, in a prograde or counterclockwise motion when viewed from the North Star. The result of this rotation makes meridians eastward of the noon meridian later in time, while locations westward of the noon meridian are earlier in time. Here is a way to think of it: as your home rotates into the morning sunlight, you see the sun rise (in the east). You then experience the noon meridian, when the sun is at the highest point of the celestial sky. When your home finally rotates out of the sunlight, you see the sun set (in the west). This means that longitudes east of your location have already experienced your present solar time, which is why people in Los Angeles are able to watch the New York ball drop on New Year’s Eve 3 hours before the west coast experiences midnight!

 Check It Out! Interactive Sundial
Visit this Sundial for an interactive presentation of how sundials work!
For this section of the lab, you will investigate standard time and solar time. Each mean solar day is 24 hours, and the Earth rotates 360° in one day. This means that each hour, the Earth rotates 15° of longitude. This is the equivalent of 1° of longitude every 4 minutes). To recap:
➢ 360° rotation divided by 24 hours in a day equals 15° of longitude per hour.
➢ 15° of longitude per hour divided by 60 minutes equals 0.25 degrees of longitude per minute.
➢ 0.25 degrees of longitude per minute is equivalent to 1° of longitude every 4 minutes.
 Pin It! Time and Earth’s Rotation
Be sure to remember that a rotation of 1 degree of longitude is worth 4 minutes of solar time.
Figure 1.11 is a global time zone map, which represents standard time. A map of the world split into several vertical sections.
- On the far left, the first section is labeled 11. It includes part of Alaska. Moving left-to-right, the numbers decrease to 10, 9, 8, etc., until 0 towards the center of the map.
- The section labeled 0 includes England, parts of Europe south of England, and parts of Africa.
- Continuing to the right, the section numbering increases beginning at 1, then 2, 3, 4, etc., up to 12.
- The section labeled 12 includes the eastern part of Russia.
- The right edge of the section labeled 12 is labeled the International Date Line.
- To the right of this line is another section labeled 12 and another section labeled 11.
- The section labeled 11 on the far right of the map is a continuation of the section labeled 11 on the far left of the map.
- Each section is also labeled with times.
- From left to right, the section labeled 11 is labeled 01:00 SUN, the section labeled 10 is labeled 02:00. This labeling continues, section 9 is labeled 03:00, section 8 is labeled 04:00, until section 0, which is labeled 12:00.
- Then section 1 to the right of section 0 is labeled 13:00, section 2 to the right of section 0 is labeled 14, etc., until section 12 to the left of the International Date Line, which is labeled 24:00 SUN.
- The section 12 to the right of the International Date Line is labeled 0:00 SUN. The section 11 at the far right edge of the map is labeled 01:00.
Note that eastward locations are later. For example, when it is 1 p.m. in Los Angeles it is 4 p.m. in New York because New York is three time zones from Los Angeles.

- Refer to Figure 1.11.
- How many time zones are shown across the map? Use Your Critical Thinking Skills: Why would there be this number of time zones?
- Use Your Critical Thinking Skills: The Earth rotates 15° per hour so it would make sense that each time zone spans a distance of 15°. But the time zone boundaries are not vertical lines representing exactly 15° segments of the planet. Why do you think time zone boundaries are irregular? Explain your response in one to two sentences.
 Check It Out! Time Zones
Visit this interactive Time Zone Map for more information on time zones.
An important variable related to solar time is the noon meridian, which is the meridian (line of longitude) that is experiencing the subsolar point where the Sun is at its highest point in the sky. Figure 1.12 provides a diagram showing the location of the subsolar point, which is the location where the Sun’s rays reach the surface of the Earth at a 90° angle. A 90° angle is also known as a perpendicular angle. So, the latitude that has the Sun’s rays directly overhead is the subsolar point.

Let’s say that you are located at the noon meridian and your friend is located 1° longitude east of your location. What is the solar time at your friend’s location? Recall that 1° is worth four minutes of solar time. Also recall that locations to the east are later in time. So, your friend’s location would be 12:04 p.m.
- What would be the solar time of someone 1° longitude west of the noon meridian? Show your work.
- What would be the solar time of someone 8° longitude east of the noon meridian? Show your work.
- Let’s take greater distances into consideration. Assuming that you lived along 40°W longitude, and it was solar noon (subsolar point), what would be the solar time at each of the following different locations at the same moment in time? (Hint: first calculate the total distance in degrees, then decide if the location is either westward or eastward of your location. Lastly, convert the degrees into minutes and hours, then solve). Be sure to use Figure 1.13 to help you calculate the total distance in degrees and show your work.
- 60°W:
- 55°E:
- 80°W:
- 140°E:

- Assuming that you lived along 50°E longitude, and it was solar noon (subsolar point), what would be the solar time at each of the following different locations at the same moment in time? Be sure to use Figure 1.14 to help you calculate the total distance in degrees and show your work.
- 60°W:
- 55°E:
- 80°W:
- 140°E:
- Lastly, let’s assume that you are lost at sea on an old ship. It is possible to determine your longitude if you know your solar time and the time and longitude of another location. As an example, assume the last port you were in was near Greenwich, England (the Prime Meridian), and you set your pocket watch before departure. Assuming that it is solar noon at your location on the lost ship, what is your longitude if the time at the Prime Meridian is the following? (Hint: first decide if your ship is either westward or eastward of the known location, then calculate the total difference in time between the two locations, lastly convert the time into degrees and solve). Be sure to use Figure 1.15 to help you calculate the total distance in degrees and show your work.
- 3:00 p.m. at Prime Meridian:
- 6:00 p.m. at Prime Meridian:
- 1:00 a.m. at Prime Meridian:
- 2:30 p.m. at Prime Meridian:

- In your own words, explain the difference between solar time and standard time in one to two sentences.
Part C. The Public Land Survey
Another way to divide up regions is by using the Public Land Survey (PLS). The combination of a topographical map and this system can be used to locate features within a few acres and is a primary means of subdividing tracts of land for sale. The organization of the township-section system is based on the definition of baselines and principal meridians. The position of a baseline and meridian within a region may or may not coincide with latitude and longitude. This system is still used today in some variation in most states except for the original thirteen colonies as they predate this system. Although antiquated, it is still observed in the urban designs of our landscapes, and is crucial for identifying large acreage parcels of land in undeveloped areas.
 Check It Out! Baselines and Meridians
Visit this link of Baselines and Meridians to see a map of Public Land Survey across the United States.
Townships are square areas of 6 miles on a side (36 square miles), bordered on the east and west by range lines and on the north and south by township lines. Each township is subdivided into 36 sections of 1 square mile (Figure 1.16).
Sections are broken down even smaller into quadrants. These quadrants can be divided into four parts, which results in ¼ mile increments, otherwise known as 40 acres.
Hint: another way to explain this system would be similar to explaining to someone where you live. As an example, you could be specific with an address (quadrants) or you can provide the City (sections) or you can provide the region of the state (Township and Range).
 Guided Practice: The Public Land Survey
Learn how to understand township and range with this video, Township & Range (PLS) Public Land Survey, from Professor Jeremy Patrich. (Video length is 10:08).

Observing this three-part map below, it is important to note that you can follow each letter across all three parts. This is done so cartographers do not have to keep making new maps. Using the map below (Figure 1.17), use the Public Land Survey to identify the location of each letter on Table 1.3. (Hint: Letter J has been completed for you as an example).

| Location | __ ¼, | of the __ ¼, | Section #__, | Township __, | Range __ |
|---|---|---|---|---|---|
| J | NW ¼, | of the SW ¼, | Section # 8, | Township T4N, | Range R3W |
| A | |||||
| B | |||||
| C | |||||
| D |
Part D. Wrap-Up
Consult with your geography lab instructor to find out which of the following wrap-up questions you should complete. Attach additional pages to answer the questions as needed.
- What is the most important idea that you learned in this lab? In two to three sentences, explain the concept and why it is important to know.
- What was the most challenging part of this lab? In two to three sentences, explain why it was challenging. If nothing challenged you in the lab, write about what you think challenged your classmates.
- What is one question that you have about what you learned in this lab? Write your question along with one to two sentences explaining why you think your question is important to ask.
- Review the learning objectives on page 1 of this lab. How would you rate your understanding or ability for each learning objective? Write one sentence that addresses each learning objective.
- Sketch a concept map that includes the key ideas from this lab. Include at least five of the terms shown in bold-faced type.
- Create an advertisement to educate your peers on the important information that you learned in this lab. Include at least three key terms in your advertisement. The advertisement should be about half a page in size (about 4 inches by 6 inches).
- One way to think of physical geography is that it is the study of the relationships among variables that impact the Earth's surface. Select two variables discussed in this lab and describe how they are related.
- How does what you learned in this lab relate to your everyday life? In two to three sentences, explain a concept that you learned in this lab and how it relates to your day-to-day actions.
- How does what you learned in this lab relate to current events?
- Write the title, source, and date of a news item that relates to this lab.
- In two to three sentences, discuss how the news item relates to what you have learned in this lab.
- In one to two sentences, discuss whether or not the news item accurately represents the science that you learned. Tip: consider whether or not the news item includes the complexity of the topic.
- Search O*NET OnLine to find an occupation that is relevant to the topics presented in today's lab. Your lab instructor may provide you with possible keywords to type in the Occupation Quick Search field on the O*NET website.
- What is the name of the occupation that you found?
- Write two to three sentences that summarize the most important information that you learned about this occupation.
- What is one question that you would want to ask a person with this occupation?
[2] Text by R. Adam Dastrup (Open Geography Education) is licensed under CC BY 4.0
[4] Text by R. Adam Dastrup (Open Geography Education) is licensed under CC BY 4.0