
2.4: Gravity Mass Movements
- Page ID
- 20379
\( \newcommand{\vecs}[1]{\overset { \scriptstyle \rightharpoonup} {\mathbf{#1}} } \)
\( \newcommand{\vecd}[1]{\overset{-\!-\!\rightharpoonup}{\vphantom{a}\smash {#1}}} \)
\( \newcommand{\id}{\mathrm{id}}\) \( \newcommand{\Span}{\mathrm{span}}\)
( \newcommand{\kernel}{\mathrm{null}\,}\) \( \newcommand{\range}{\mathrm{range}\,}\)
\( \newcommand{\RealPart}{\mathrm{Re}}\) \( \newcommand{\ImaginaryPart}{\mathrm{Im}}\)
\( \newcommand{\Argument}{\mathrm{Arg}}\) \( \newcommand{\norm}[1]{\| #1 \|}\)
\( \newcommand{\inner}[2]{\langle #1, #2 \rangle}\)
\( \newcommand{\Span}{\mathrm{span}}\)
\( \newcommand{\id}{\mathrm{id}}\)
\( \newcommand{\Span}{\mathrm{span}}\)
\( \newcommand{\kernel}{\mathrm{null}\,}\)
\( \newcommand{\range}{\mathrm{range}\,}\)
\( \newcommand{\RealPart}{\mathrm{Re}}\)
\( \newcommand{\ImaginaryPart}{\mathrm{Im}}\)
\( \newcommand{\Argument}{\mathrm{Arg}}\)
\( \newcommand{\norm}[1]{\| #1 \|}\)
\( \newcommand{\inner}[2]{\langle #1, #2 \rangle}\)
\( \newcommand{\Span}{\mathrm{span}}\) \( \newcommand{\AA}{\unicode[.8,0]{x212B}}\)
\( \newcommand{\vectorA}[1]{\vec{#1}} % arrow\)
\( \newcommand{\vectorAt}[1]{\vec{\text{#1}}} % arrow\)
\( \newcommand{\vectorB}[1]{\overset { \scriptstyle \rightharpoonup} {\mathbf{#1}} } \)
\( \newcommand{\vectorC}[1]{\textbf{#1}} \)
\( \newcommand{\vectorD}[1]{\overrightarrow{#1}} \)
\( \newcommand{\vectorDt}[1]{\overrightarrow{\text{#1}}} \)
\( \newcommand{\vectE}[1]{\overset{-\!-\!\rightharpoonup}{\vphantom{a}\smash{\mathbf {#1}}}} \)
\( \newcommand{\vecs}[1]{\overset { \scriptstyle \rightharpoonup} {\mathbf{#1}} } \)
\( \newcommand{\vecd}[1]{\overset{-\!-\!\rightharpoonup}{\vphantom{a}\smash {#1}}} \)
It does not always take moving water to get sediment transport to happen. Sometimes materials move under the direct influence of gravity … this is the process of gravity mass movement. Fluid may play a role by reducing internal friction and supporting grains, but its not what’s driving movement. We will consider the three main types of gravity mass movements described below.
Rockfall
Rockfalls happen when gravity causes rocks to free fall or roll down steep slopes without and fluid needed to lubricate the clasts.
Video \(\PageIndex{1}\): Rockfall in the Swiss Alps
.jpg?revision=1&size=bestfit&width=791&height=445)
Figure \(\PageIndex{1}\): Rockfall closed a portion of Oregon 138E in March, 2017 (Rock blocks OR 138E by Oregon Department of Transportation, CC BY 2.0).
Slides, Glides, and Slumps
Although it might be important to tease them apart if you were doing surficial mapping, we will consider slides, glides, and slumps together. All of them represent movement of material that happens when there is shear deformation along discrete planes with little internal deformation.

Figure \(\PageIndex{2}\): Slide and debris flow at LaConchita, CA (La Conchita by R.L. Schuster (U.S. Geological Survey), public domain).
Sediment Gravity Flows
Sediment gravity flows are the final category of gravity mass movements and because they are often preserved in the sedimentary record we will explore them in more detail and talk about the different types. In all cases, they requires massive internal deformation and separation of the parent mass into discrete particles to form a mixture of particles and the fluid. Generally speaking, this is a very fluid type of motion where grains supported by collision with each other and by the fluid. The main distinguishing factor between the different types is the mechanism by which the particles are supported.

Figure \(\PageIndex{3}\): Types of sediment gravity flows, sediment support mechanisms, and resulting deposits (Page Quinton via Wikimedia Commons; CC BY-SA 4.0). Diagram after Middleton, G.V. and Hampton, M.A., 1976, Subaqueous sediment transport and deposition by sediment gravity flows in Stanley, D.H. and Swift, D.J.P. (eds.), Marine sediment transport and environmental management, Wiley, New York, p. 197-218.
Mud flows and debris flows
Mudflows and debris flows (we will treat them as synonymous) happen when a dense muddy matrix (slurry of sediment and water) is capable of moving and supporting large clasts. They can be subaerial or subaqueous. Although I cannot embed it in this page, there is a great video of an active debris flow available on Youtube via Storyful at https://youtu.be/Fsh5E9m3PrM?si=DSFONNDTEzY305d7.
Debris flow deposits are typically poorly sorted, have a sandy/muddy matrix, show little internal organization, and often have large “floating” clasts.

Figure \(\PageIndex{4}\): Debris flow deposits. A) Breccia formed in an alluvial fan with floating angular clasts encased within a fine-grained muddy matrix (Michael C. Rygel via Wikimedia Commons, CC BY-SA 3.0 ). B) Deep water debris flow deposits with blocks of carbonate floating within siltstone matrix (Michael C. Rygel via Wikimedia Commons, CC BY-SA 3.0 ).
Grain flows
Grain flows happen when cohesionless (dry) sediment is supported in the air by grain-to-grain collisions. Grain flow deposits are generally thin (a few cm thick), lobe-shaped in 3D, and are typically sandy with massive or inverse grading.
Video \(\PageIndex{3}\): Grainflow in dry desert sand.

Figure \(\PageIndex{5}\): A) Lobe-shaped grainflow deposits on the lee side of an eolian dune, White Sands National Park, NM (Michael C. Rygel via Wikimedia Commons, CC BY-SA 3.0). B) Reverse grading in eolian strata of the Jurassic Carmel Formation. Up is to the top of the image; a typical package of reverse graded sediment consists of a light color dusty zone that passes upward into increasing coarse sand (dark; Michael C. Rygel via Wikimedia Commons, CC BY-SA 4.0).
Liquefied flows
Disturbances like earthquakes or crashing storm waves can cause saturated sediments to compact in the subsurface. When this happens, the upward movement of intergranular water can temporarily supports sediment grains to create liquifed flows. The resulting deposits typically have massive soft-sediment deformation (flame structures, load structures, convolute lamination) and possibly sand volcanoes at the surface.
Video \(\PageIndex{4}\): Liquidized/fluidized flows interacting with large particles and layered sediment.
Video \(\PageIndex{5}\): Eruption of sand vocanoes after an earthquake in New Zealand.

Figure \(\PageIndex{6}\): Liquefied flows. A) Modern sand volcano caused by soil liquefaction following an earthquake in New Zealand (Martin Luffvia Wikimedia Commons, CC BY-SA 3.0). B) Soft sediment deformation caused by dewatering in the Permian Booti Booti Sandstone (Michael C. Rygel via Wikimedia Commons, CC BY-SA 3.0).
Turbidity currents
Turbidity currents happen where sediment is held aloft by turbidity within the fluid. The result is that you have a relatively dense fluid with sediment and water that flows in response to gravity, typically downslope through less dense clean water. The resulting deposits show normal grading (coarsest grains at the bottom) and an overall fining upwards trend. These coarse-fine successions are commonly referred to as Bouma sequences. Remember from earlier in this chapter that Stoke's Law tells us that the biggest particles settle out first.
Video \(\PageIndex{6}\): Turbidity currents in a flume
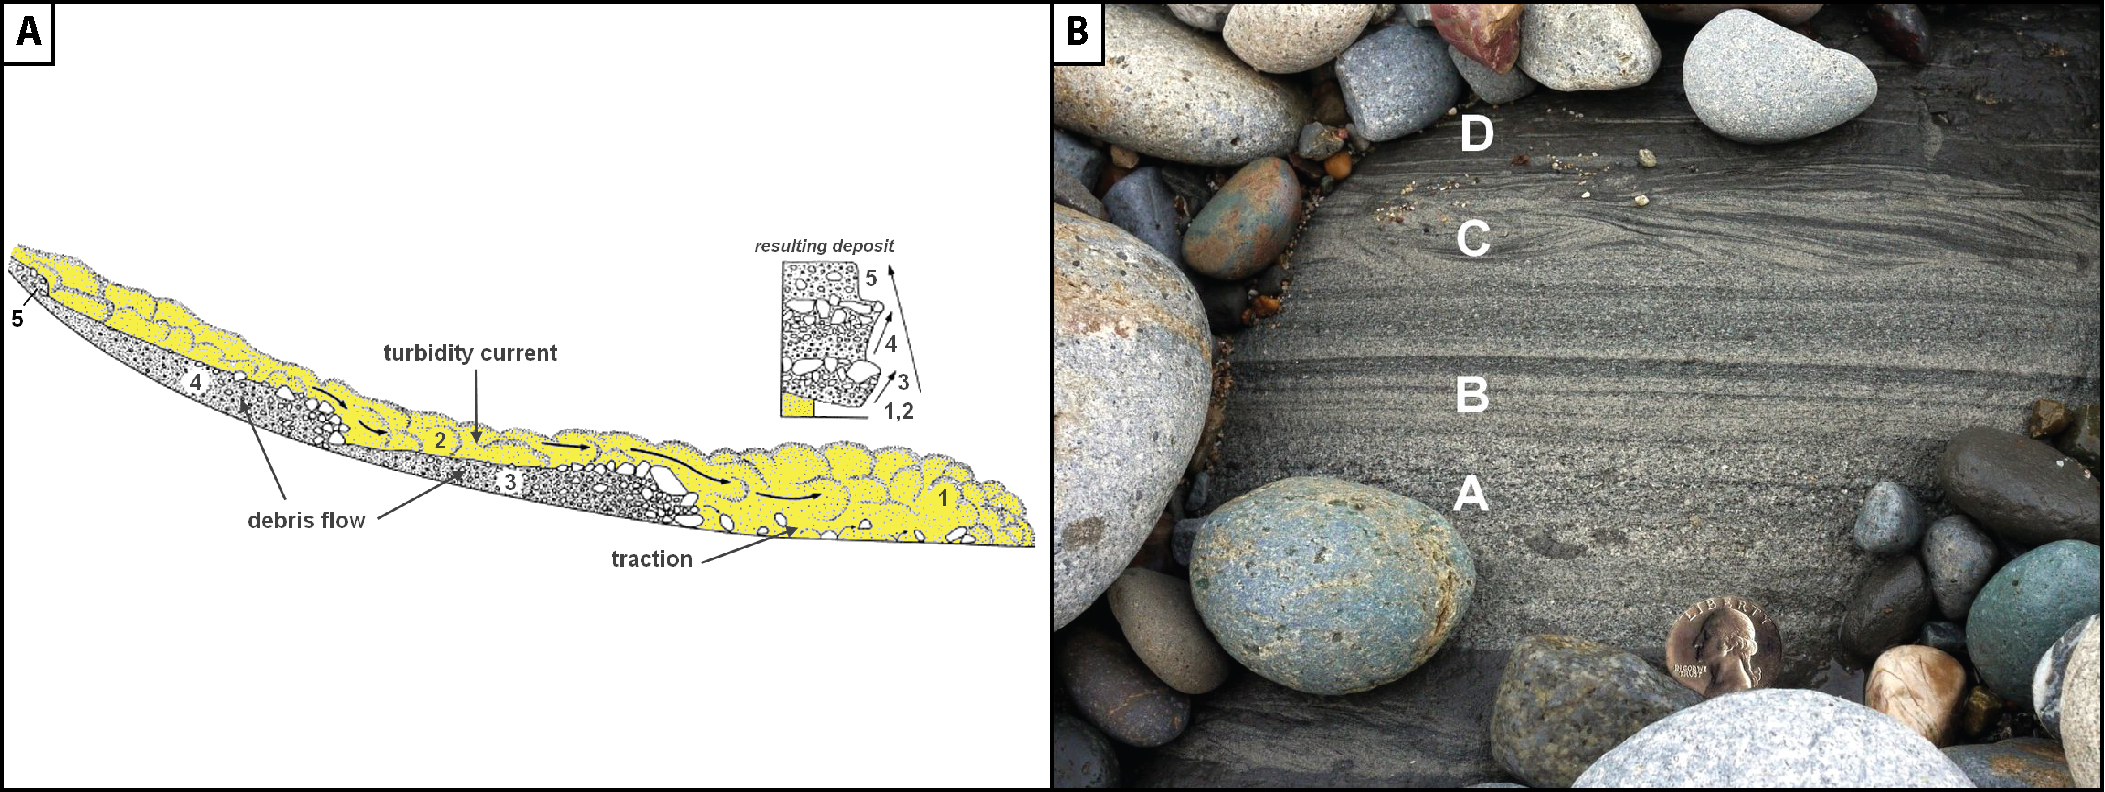
Figure \(\PageIndex{7}\): Turbidity currents. A) Turbidity current (yellow) flowing atop debris flow deposits. Although the debris flow deposits (3-5) are poorly sorted, the deposits of the turbidty current will show normal grading (1-2 and Figure 7; Mikesclark via Wikimedia Commons, CC BY-SA 3.0). B) A typical Bouma sequence formed by a turbidity current has coarse grained sediment progressively overlain by fine sediment (Mikesclark via Wikimedia Commons, CC BY-SA 3.0).
Additional Readings and Resources
- Dasgupta, P. and Manna, P., 2011, Geometrical mechanism of inverse grading in grain-flow deposits: An experimental revelation, Earth-Science Reviews, v. 104, no. 1-3, p. 186-198. https://www.sciencedirect.com/science/article/pii/S0012825210001376#f0025
- Geological Digressions, Sedimentary structures: Turbidites - https://www.geological-digressions.com/2020/04/09/sedimentary-structures-turbidites/
- USGS, Landslide Types and Processes - https://pubs.usgs.gov/fs/2004/3072/fs-2004-3072.html