
6.2.7: Subaqueous Bedforms and Cross Stratification
- Page ID
- 4141

\( \newcommand{\vecs}[1]{\overset { \scriptstyle \rightharpoonup} {\mathbf{#1}} } \)
\( \newcommand{\vecd}[1]{\overset{-\!-\!\rightharpoonup}{\vphantom{a}\smash {#1}}} \)
\( \newcommand{\id}{\mathrm{id}}\) \( \newcommand{\Span}{\mathrm{span}}\)
( \newcommand{\kernel}{\mathrm{null}\,}\) \( \newcommand{\range}{\mathrm{range}\,}\)
\( \newcommand{\RealPart}{\mathrm{Re}}\) \( \newcommand{\ImaginaryPart}{\mathrm{Im}}\)
\( \newcommand{\Argument}{\mathrm{Arg}}\) \( \newcommand{\norm}[1]{\| #1 \|}\)
\( \newcommand{\inner}[2]{\langle #1, #2 \rangle}\)
\( \newcommand{\Span}{\mathrm{span}}\)
\( \newcommand{\id}{\mathrm{id}}\)
\( \newcommand{\Span}{\mathrm{span}}\)
\( \newcommand{\kernel}{\mathrm{null}\,}\)
\( \newcommand{\range}{\mathrm{range}\,}\)
\( \newcommand{\RealPart}{\mathrm{Re}}\)
\( \newcommand{\ImaginaryPart}{\mathrm{Im}}\)
\( \newcommand{\Argument}{\mathrm{Arg}}\)
\( \newcommand{\norm}[1]{\| #1 \|}\)
\( \newcommand{\inner}[2]{\langle #1, #2 \rangle}\)
\( \newcommand{\Span}{\mathrm{span}}\) \( \newcommand{\AA}{\unicode[.8,0]{x212B}}\)
\( \newcommand{\vectorA}[1]{\vec{#1}} % arrow\)
\( \newcommand{\vectorAt}[1]{\vec{\text{#1}}} % arrow\)
\( \newcommand{\vectorB}[1]{\overset { \scriptstyle \rightharpoonup} {\mathbf{#1}} } \)
\( \newcommand{\vectorC}[1]{\textbf{#1}} \)
\( \newcommand{\vectorD}[1]{\overrightarrow{#1}} \)
\( \newcommand{\vectorDt}[1]{\overrightarrow{\text{#1}}} \)
\( \newcommand{\vectE}[1]{\overset{-\!-\!\rightharpoonup}{\vphantom{a}\smash{\mathbf {#1}}}} \)
\( \newcommand{\vecs}[1]{\overset { \scriptstyle \rightharpoonup} {\mathbf{#1}} } \)
\( \newcommand{\vecd}[1]{\overset{-\!-\!\rightharpoonup}{\vphantom{a}\smash {#1}}} \)
\(\newcommand{\avec}{\mathbf a}\) \(\newcommand{\bvec}{\mathbf b}\) \(\newcommand{\cvec}{\mathbf c}\) \(\newcommand{\dvec}{\mathbf d}\) \(\newcommand{\dtil}{\widetilde{\mathbf d}}\) \(\newcommand{\evec}{\mathbf e}\) \(\newcommand{\fvec}{\mathbf f}\) \(\newcommand{\nvec}{\mathbf n}\) \(\newcommand{\pvec}{\mathbf p}\) \(\newcommand{\qvec}{\mathbf q}\) \(\newcommand{\svec}{\mathbf s}\) \(\newcommand{\tvec}{\mathbf t}\) \(\newcommand{\uvec}{\mathbf u}\) \(\newcommand{\vvec}{\mathbf v}\) \(\newcommand{\wvec}{\mathbf w}\) \(\newcommand{\xvec}{\mathbf x}\) \(\newcommand{\yvec}{\mathbf y}\) \(\newcommand{\zvec}{\mathbf z}\) \(\newcommand{\rvec}{\mathbf r}\) \(\newcommand{\mvec}{\mathbf m}\) \(\newcommand{\zerovec}{\mathbf 0}\) \(\newcommand{\onevec}{\mathbf 1}\) \(\newcommand{\real}{\mathbb R}\) \(\newcommand{\twovec}[2]{\left[\begin{array}{r}#1 \\ #2 \end{array}\right]}\) \(\newcommand{\ctwovec}[2]{\left[\begin{array}{c}#1 \\ #2 \end{array}\right]}\) \(\newcommand{\threevec}[3]{\left[\begin{array}{r}#1 \\ #2 \\ #3 \end{array}\right]}\) \(\newcommand{\cthreevec}[3]{\left[\begin{array}{c}#1 \\ #2 \\ #3 \end{array}\right]}\) \(\newcommand{\fourvec}[4]{\left[\begin{array}{r}#1 \\ #2 \\ #3 \\ #4 \end{array}\right]}\) \(\newcommand{\cfourvec}[4]{\left[\begin{array}{c}#1 \\ #2 \\ #3 \\ #4 \end{array}\right]}\) \(\newcommand{\fivevec}[5]{\left[\begin{array}{r}#1 \\ #2 \\ #3 \\ #4 \\ #5 \\ \end{array}\right]}\) \(\newcommand{\cfivevec}[5]{\left[\begin{array}{c}#1 \\ #2 \\ #3 \\ #4 \\ #5 \\ \end{array}\right]}\) \(\newcommand{\mattwo}[4]{\left[\begin{array}{rr}#1 \amp #2 \\ #3 \amp #4 \\ \end{array}\right]}\) \(\newcommand{\laspan}[1]{\text{Span}\{#1\}}\) \(\newcommand{\bcal}{\cal B}\) \(\newcommand{\ccal}{\cal C}\) \(\newcommand{\scal}{\cal S}\) \(\newcommand{\wcal}{\cal W}\) \(\newcommand{\ecal}{\cal E}\) \(\newcommand{\coords}[2]{\left\{#1\right\}_{#2}}\) \(\newcommand{\gray}[1]{\color{gray}{#1}}\) \(\newcommand{\lgray}[1]{\color{lightgray}{#1}}\) \(\newcommand{\rank}{\operatorname{rank}}\) \(\newcommand{\row}{\text{Row}}\) \(\newcommand{\col}{\text{Col}}\) \(\renewcommand{\row}{\text{Row}}\) \(\newcommand{\nul}{\text{Nul}}\) \(\newcommand{\var}{\text{Var}}\) \(\newcommand{\corr}{\text{corr}}\) \(\newcommand{\len}[1]{\left|#1\right|}\) \(\newcommand{\bbar}{\overline{\bvec}}\) \(\newcommand{\bhat}{\widehat{\bvec}}\) \(\newcommand{\bperp}{\bvec^\perp}\) \(\newcommand{\xhat}{\widehat{\xvec}}\) \(\newcommand{\vhat}{\widehat{\vvec}}\) \(\newcommand{\uhat}{\widehat{\uvec}}\) \(\newcommand{\what}{\widehat{\wvec}}\) \(\newcommand{\Sighat}{\widehat{\Sigma}}\) \(\newcommand{\lt}{<}\) \(\newcommand{\gt}{>}\) \(\newcommand{\amp}{&}\) \(\definecolor{fillinmathshade}{gray}{0.9}\)I have divided these by type of bedform and cross stratification. The examples are both fluvial and marine.
Planar Cross Stratification
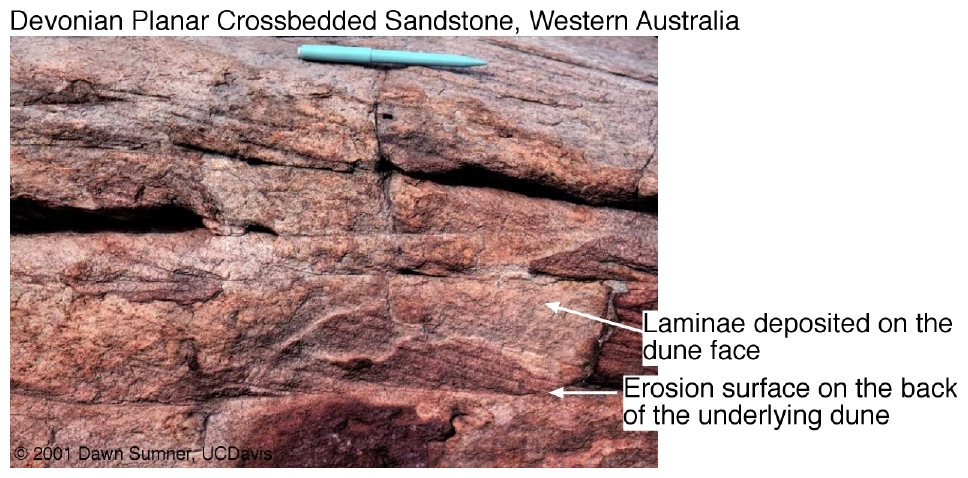
Figure \(\PageIndex{1}\): Ancient Planar Cross Stratification
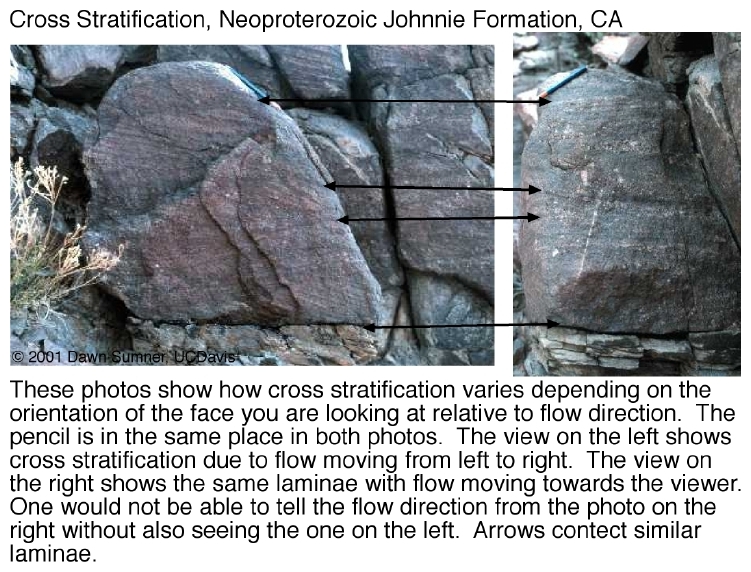
Figure \(\PageIndex{2}\): Ancient Planar Cross Stratification
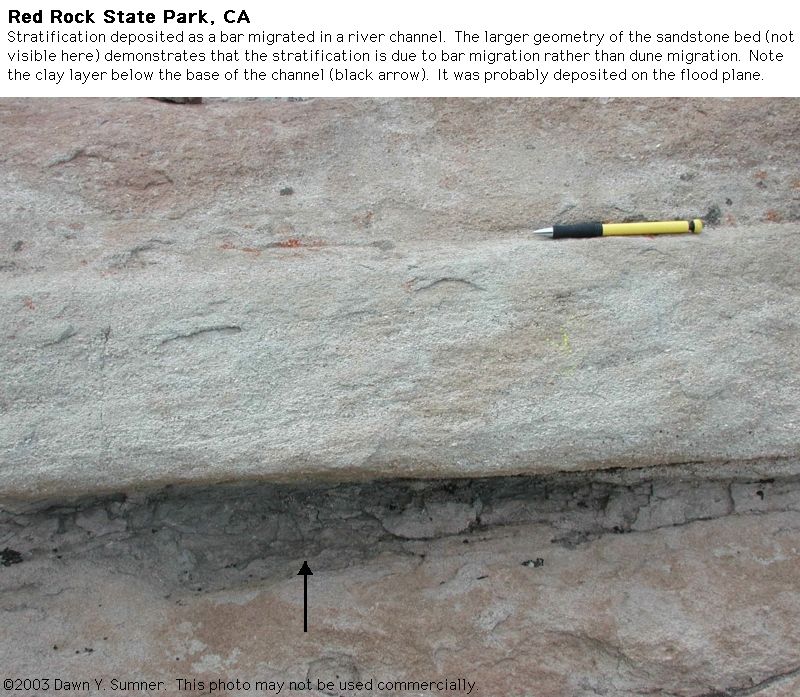
Figure \(\PageIndex{3}\): Single set of cross strata in a planar bed
Return to Sedimentary Structures
Trough Cross Stratification
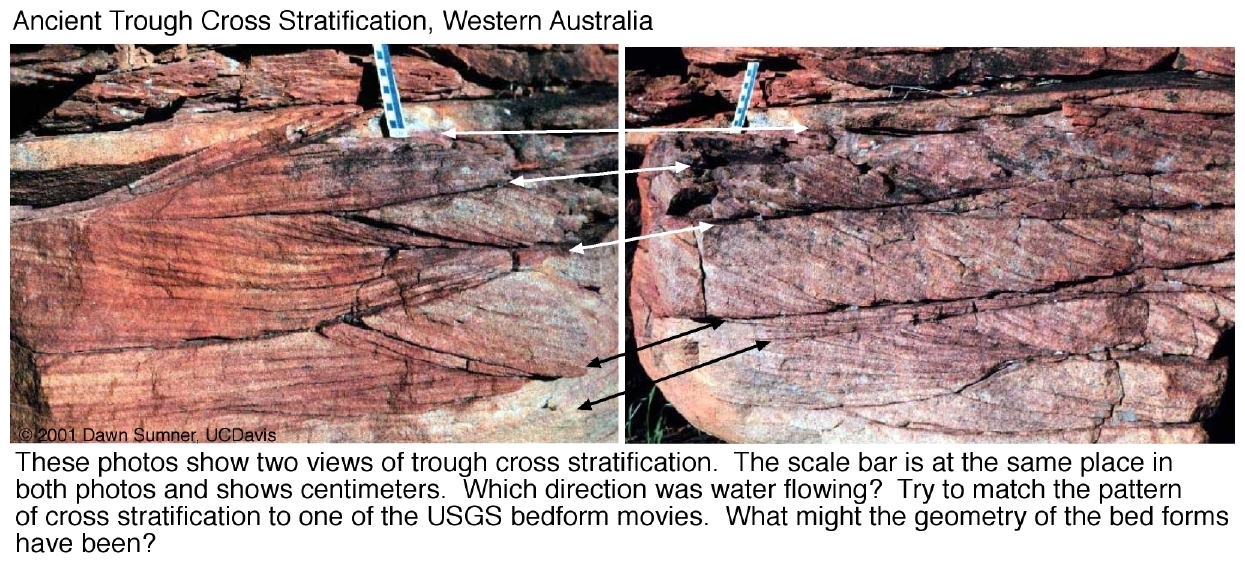
Figure \(\PageIndex{4}\): Ancient Trough Cross Stratification
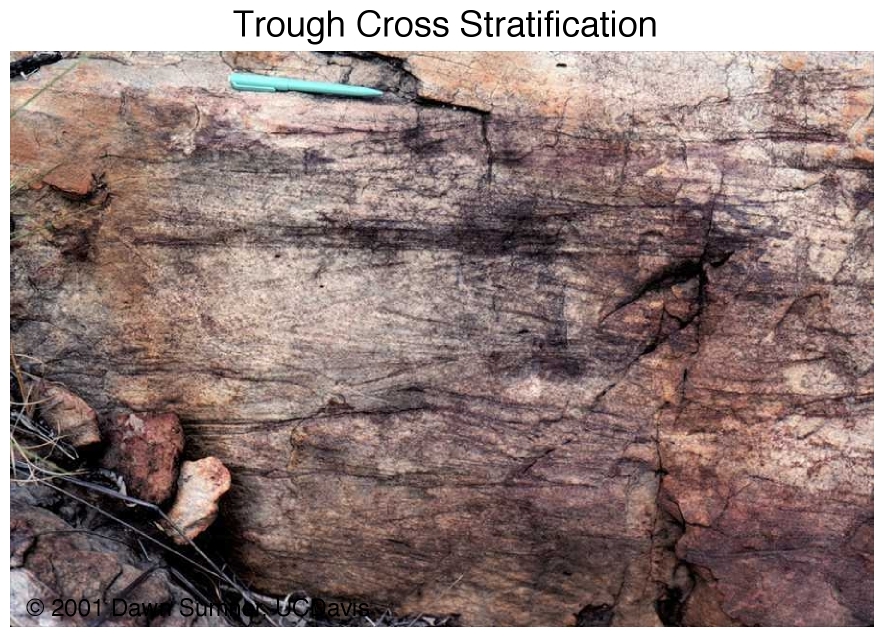
Figure \(\PageIndex{5}\): Ancient Trough Cross Stratification
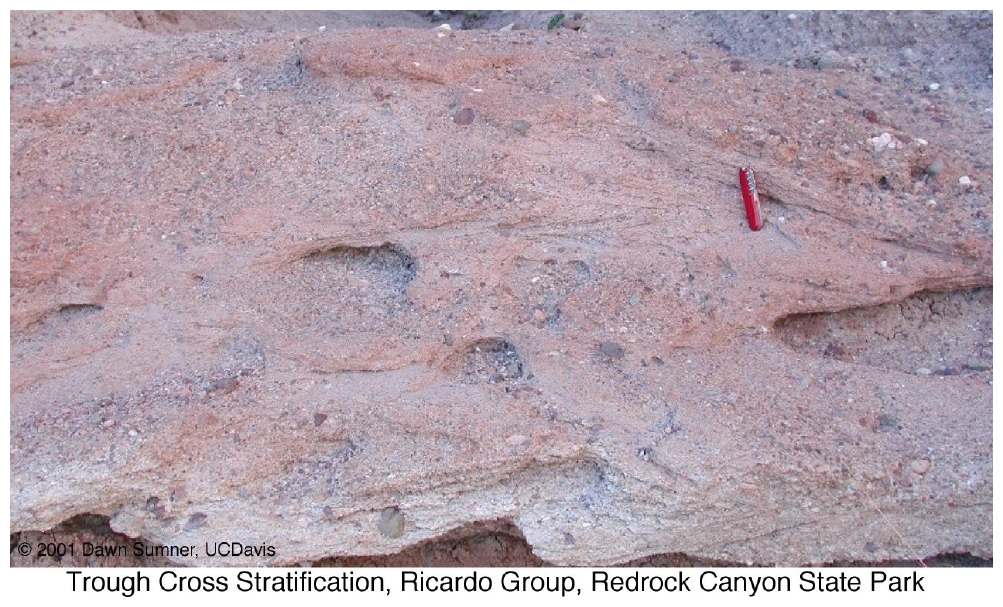
Figure \(\PageIndex{6}\): Ancient Trough Cross Stratification

Figure \(\PageIndex{7}\): Plan or Map View of Ancient Trough Cross Stratification
Return to Sedimentary Structures
Herringbone Cross Stratification
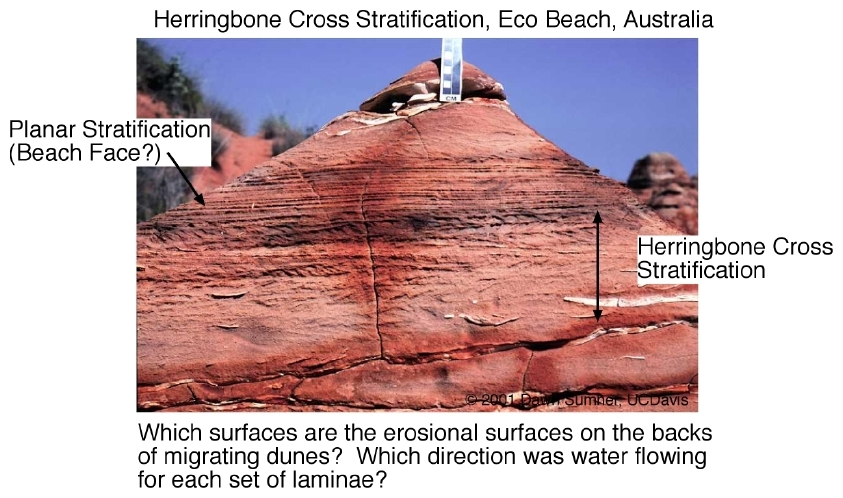
Figure \(\PageIndex{8}\): Herringbone cross stratification
Return to Sedimentary Structures
Hummocky Cross Stratification
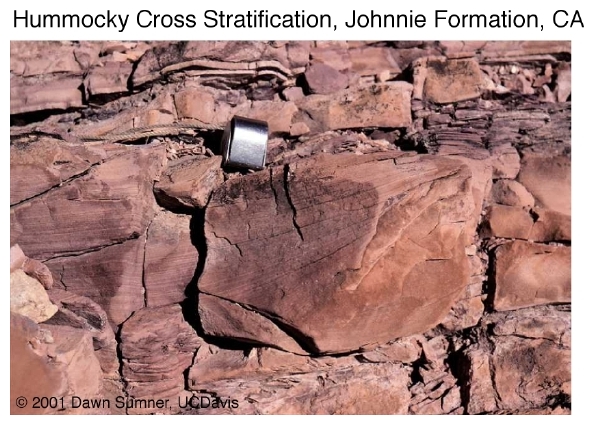
Figure \(\PageIndex{9}\): Hummocky cross stratification
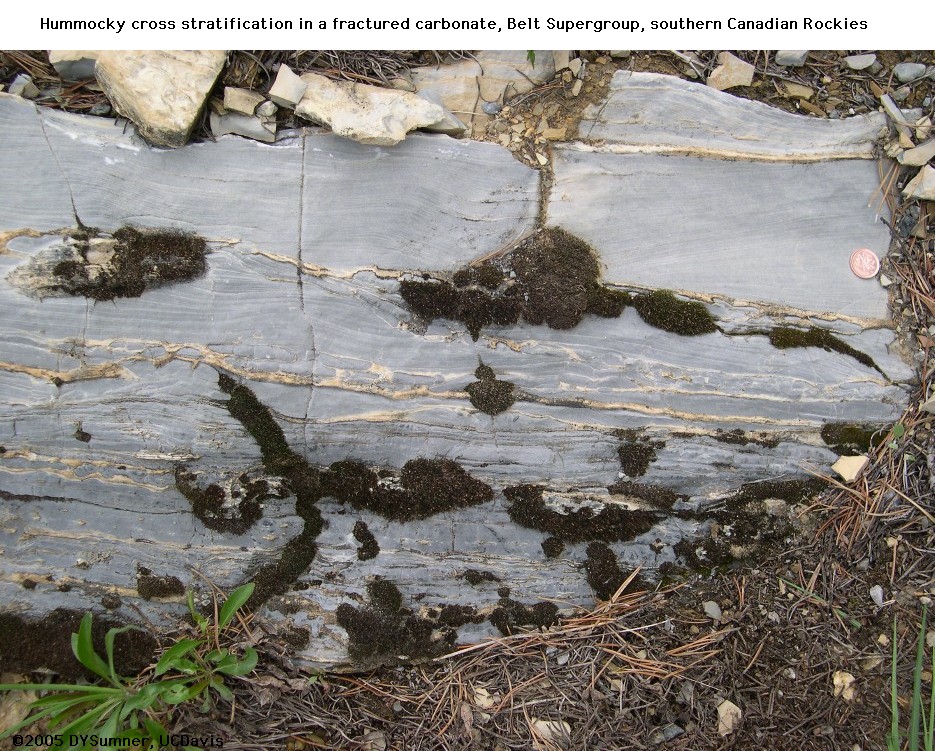
Figure \(\PageIndex{10}\): Hummocky cross stratification
Return to Sedimentary Structures
Cross Stratification from Bar Migration
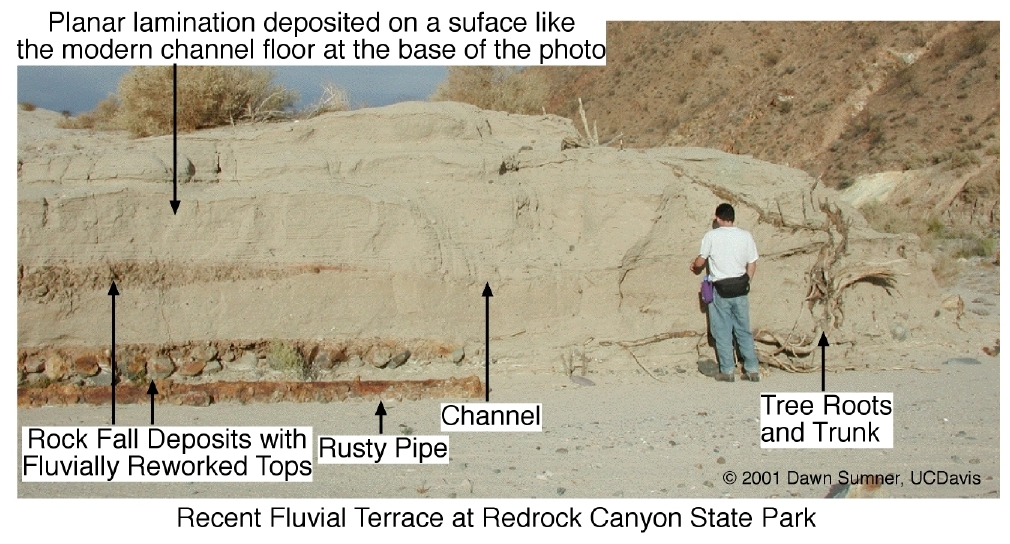
Figure \(\PageIndex{11}\): Recent Alluvial Deposits (Terrace at Redrock State Park, CA)
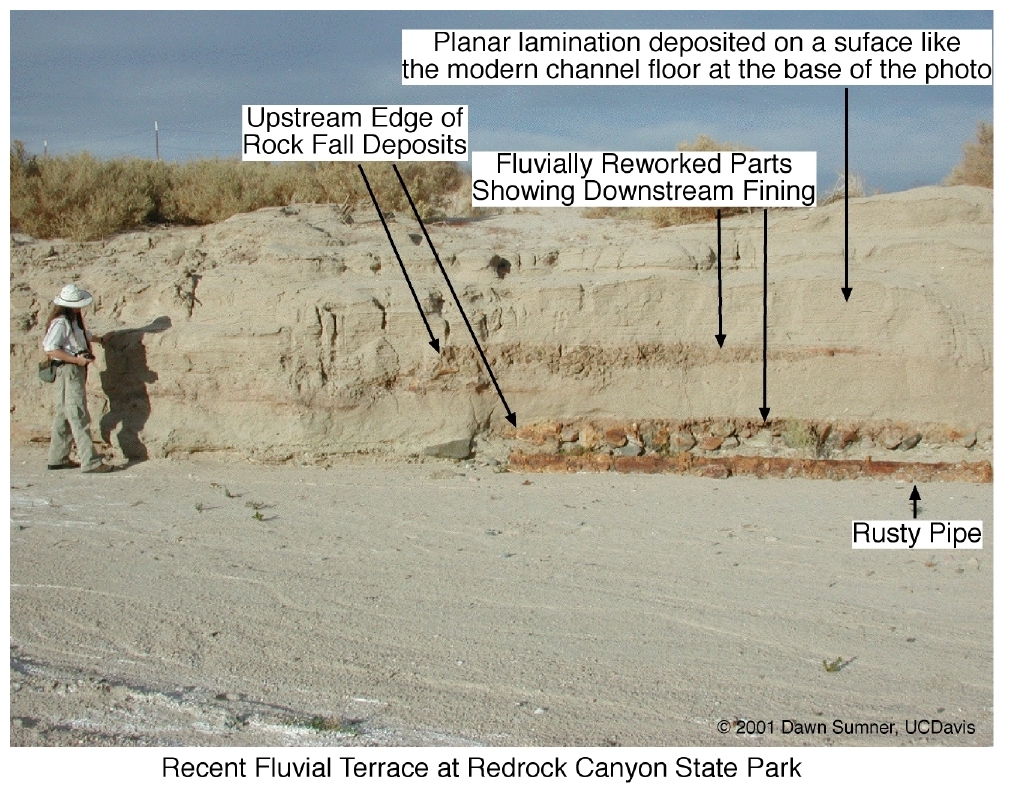
Figure \(\PageIndex{12}\): Recent Alluvial Deposits (Terrace at Redrock State Park, CA)
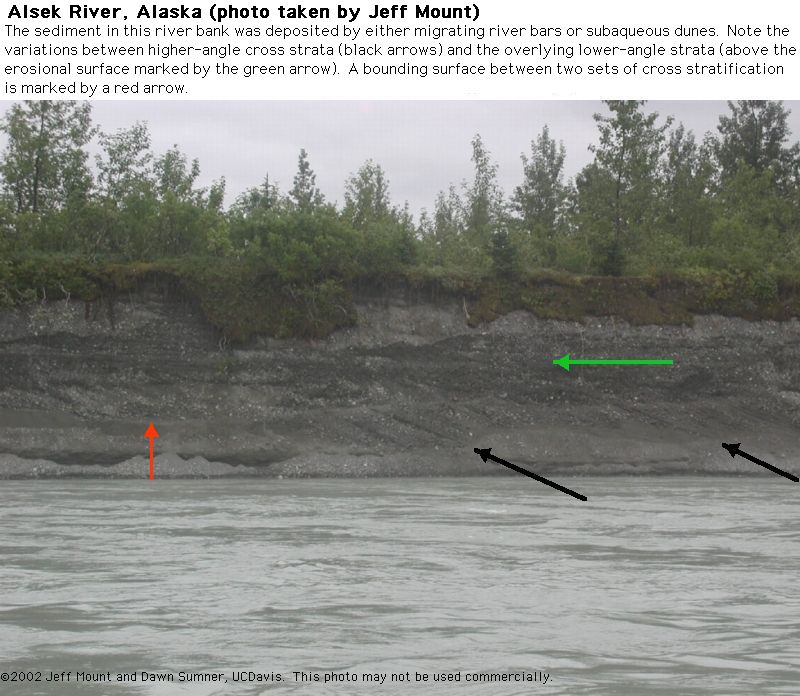
Figure \(\PageIndex{13}\): Recent Fluvial Deposits (Alsek River, Alaska)
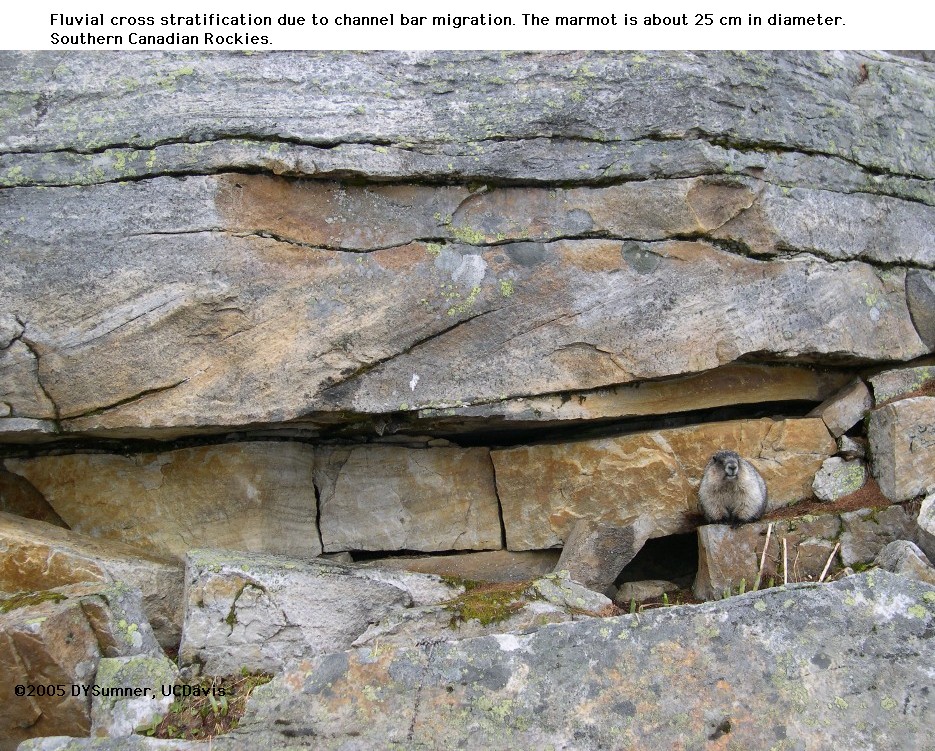
Figure \(\PageIndex{14}\): Stratification Due to Bar Migration
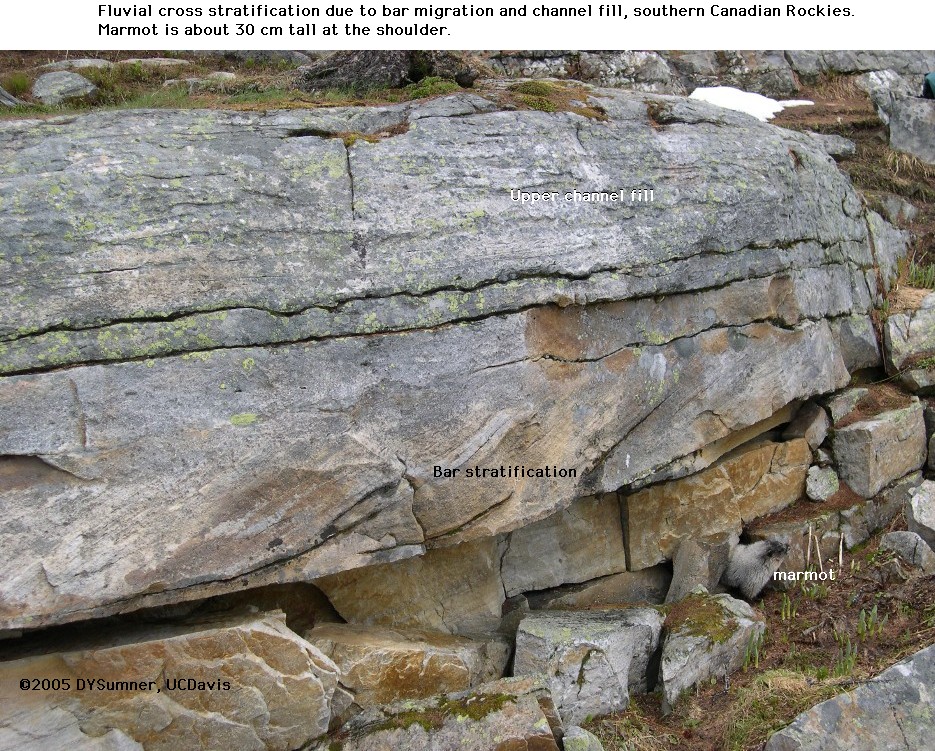
Figure \(\PageIndex{15}\): Same outcrop as above, but also showing channel fill deposits above the sandstones deposited by the bar.
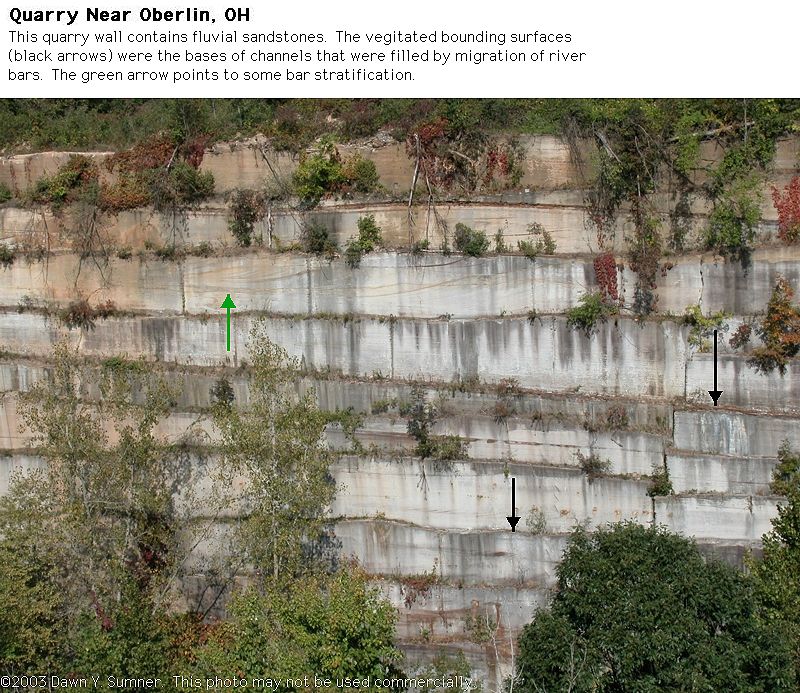
Figure \(\PageIndex{16}\): Quarry wall showing fluvial cross stratification, probably due to channel migration and bar accretion.
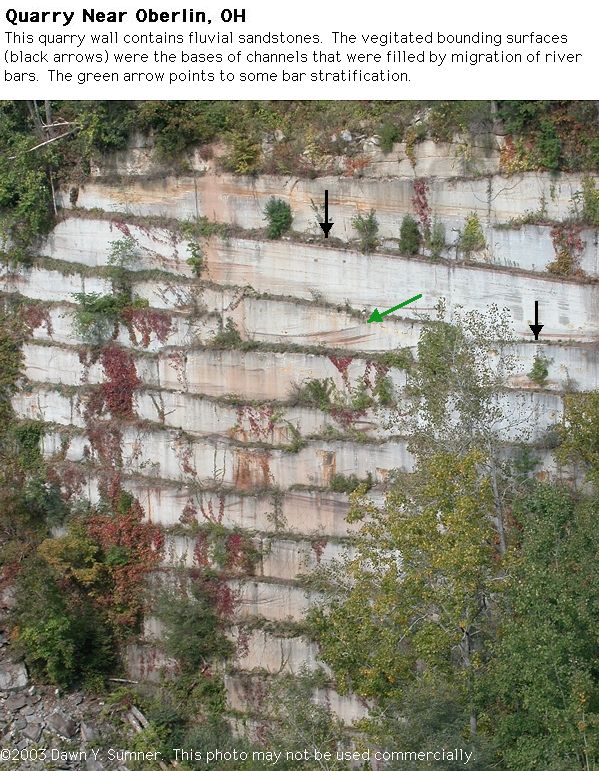
Figure \(\PageIndex{17}\): Extension of the same quarry wall as above
Return to Sedimentary Structures
Dune Cross Stratification
(that does not fit nicely into a specific category)
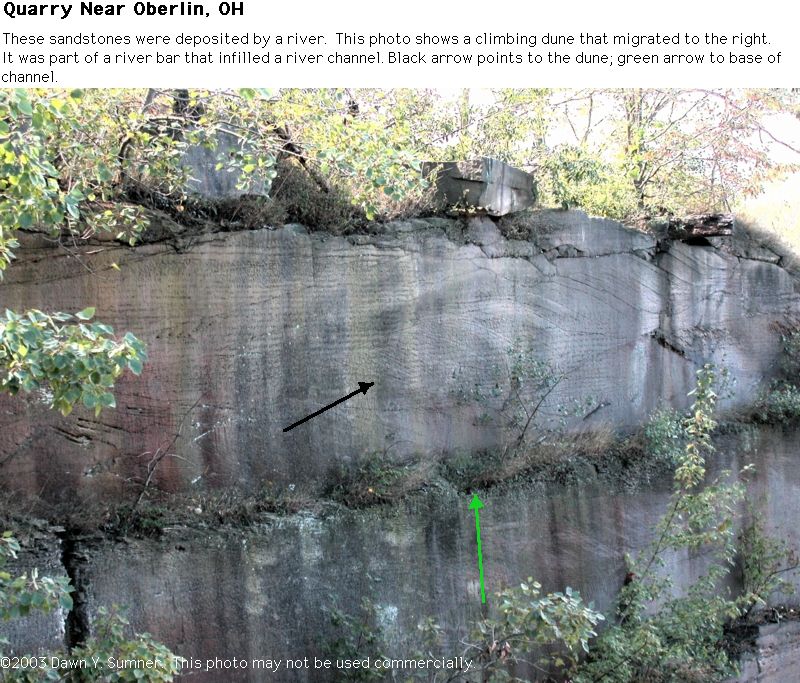
Figure \(\PageIndex{18}\): Climbing Dunes
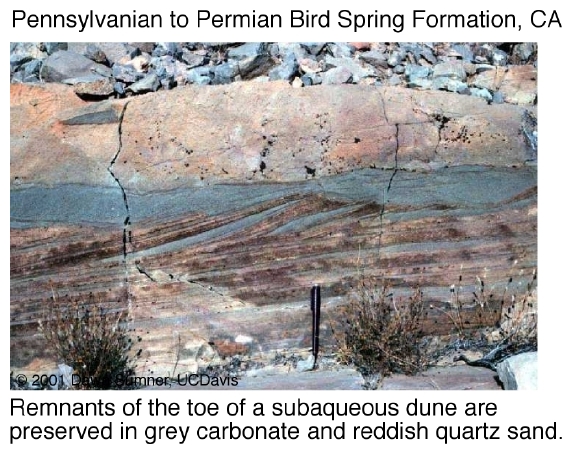
Figure \(\PageIndex{19}\): Ancient Dune Cross Stratification
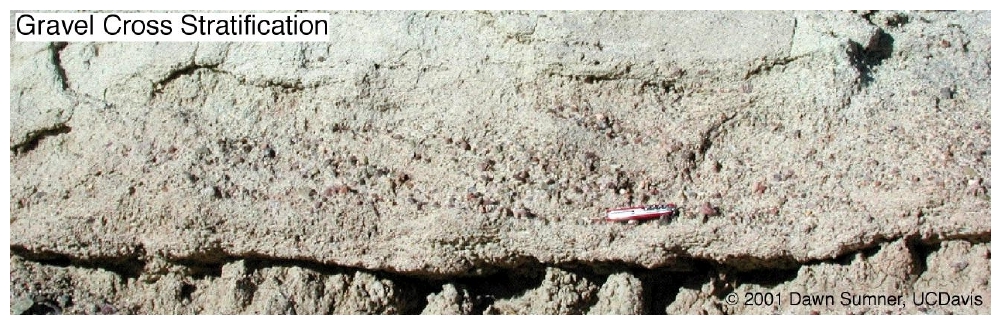
Figure \(\PageIndex{20}\): Cross Stratified Gravel
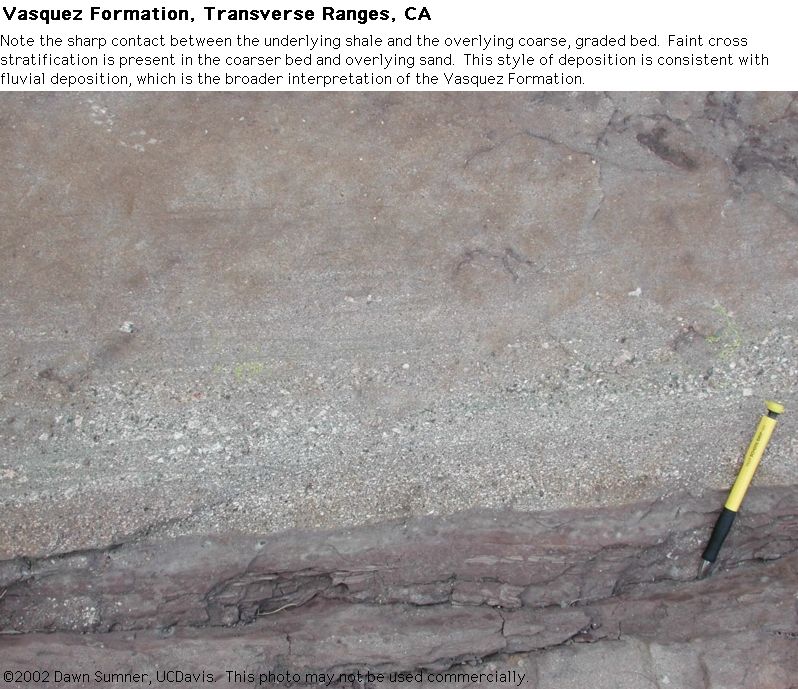
Figure \(\PageIndex{21}\): Graded bedding with faint cross stratification deposited in a fluvial channel
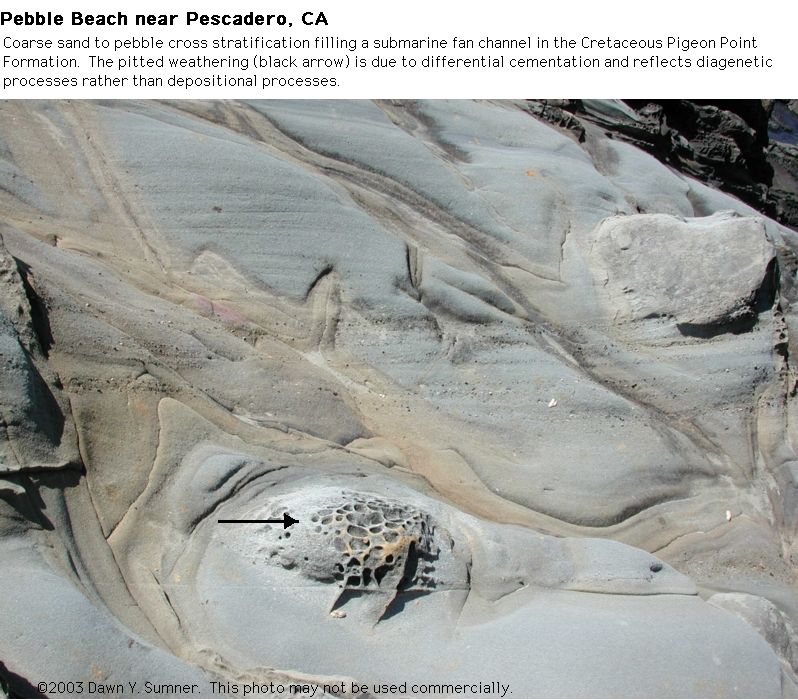
Figure \(\PageIndex{22}\): Cross stratification in a channel fill in a subaqueous turbidite fan
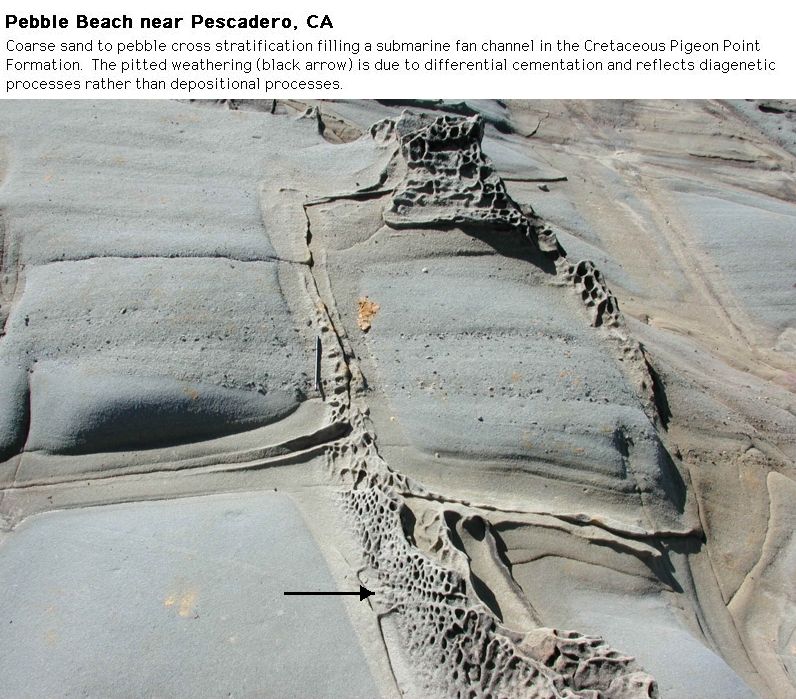
Figure \(\PageIndex{23}\): Cross stratification in a channel fill in a subaqueous turbidite fan
Return to Sedimentary Structures
The following photographs are of large-scale cross stratification that was deposited by the migration of giant dunes and/or large fluvial bars. Detailed analysis of the regional characteristics of these deposits would be required to distinguish between dune and bar deposition in many cases, and both might be present.
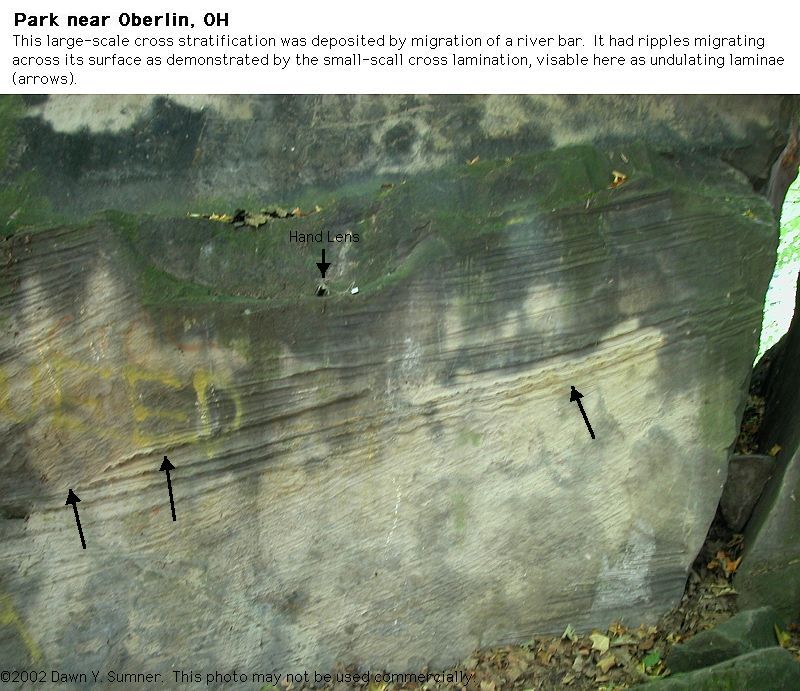
Figure \(\PageIndex{24}\): Large Cross Stratification
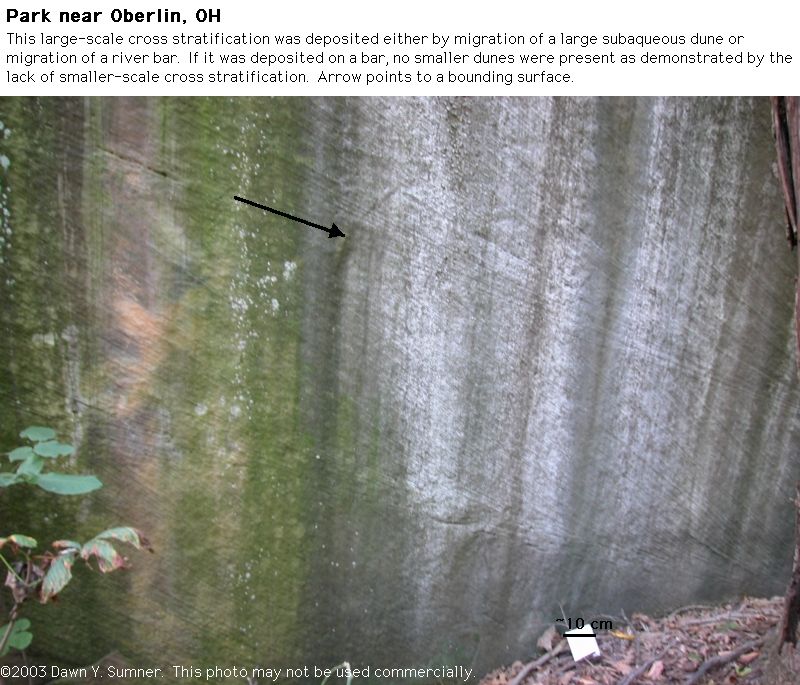
Figure \(\PageIndex{25}\): Large Cross Stratification
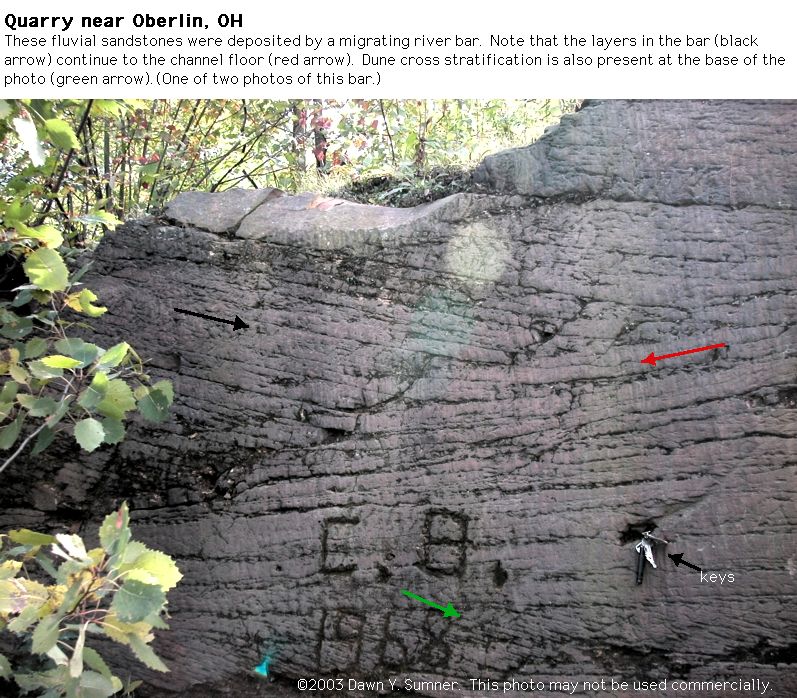
Figure \(\PageIndex{26}\): Cross stratified sediment deposited by a migrating bar based on the abundance of more planar laminae that would be characteristic of a channel bottom.
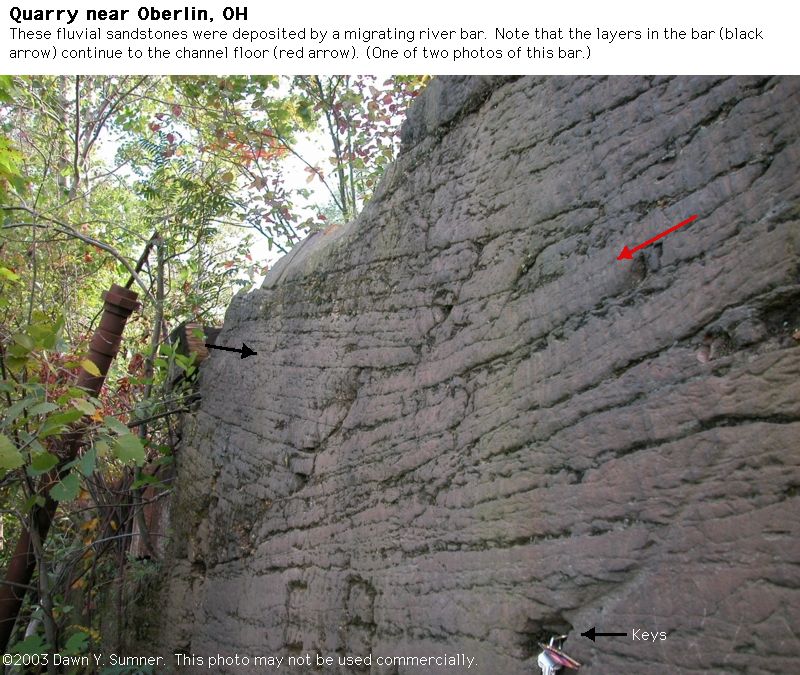
Figure \(\PageIndex{27}\): Different view of the bedform in the previous photo
Return to Sedimentary Structures
The following photographs were taken by Jeff Mount during his Roy Shlemon Course in Applied Watershed Science class trip down the Copper River, Alaska and Yukon (see the Shlemon class web page). The river shown below was dammed by ice from the toe of a glacier, which created a very large lake. The ice dam broke catastrophically, producing a huge flood. The flood waters transported very large volumes of sediment in huge dunes. After normal river processes resumed, the river eroded into the flood deposits, exposing the cross stratification in these impressive dunes.
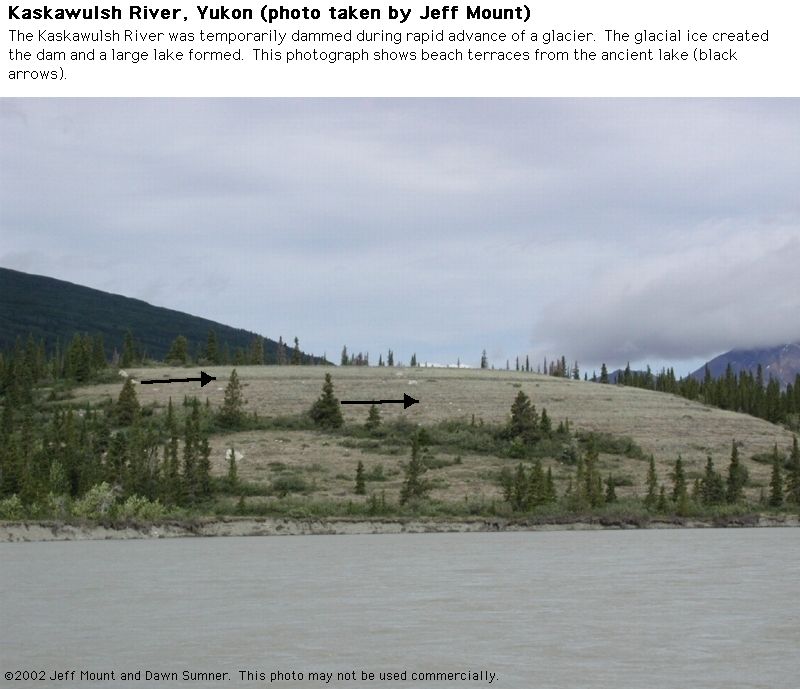
Figure \(\PageIndex{28}\): Lake shoreline terraces from the lake
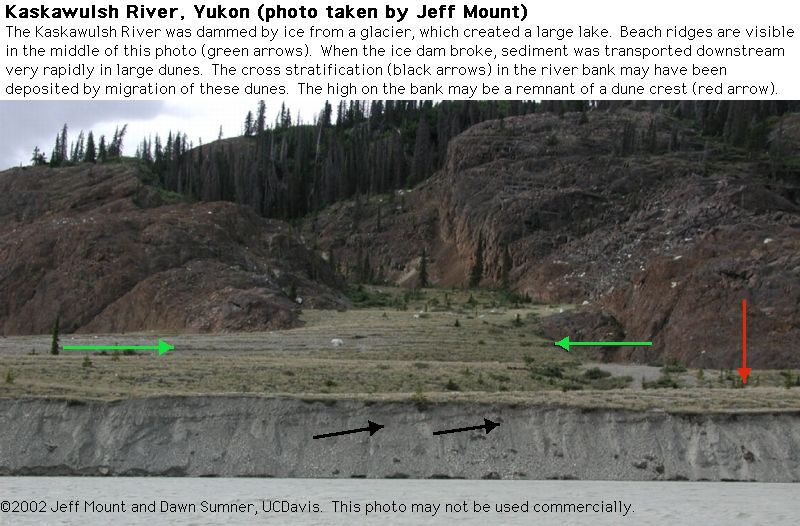
Figure \(\PageIndex{29}\): Lake shoreline terraces from the lake and cross stratification in the river bank. This cross stratification may have been deposited by the flood waters.
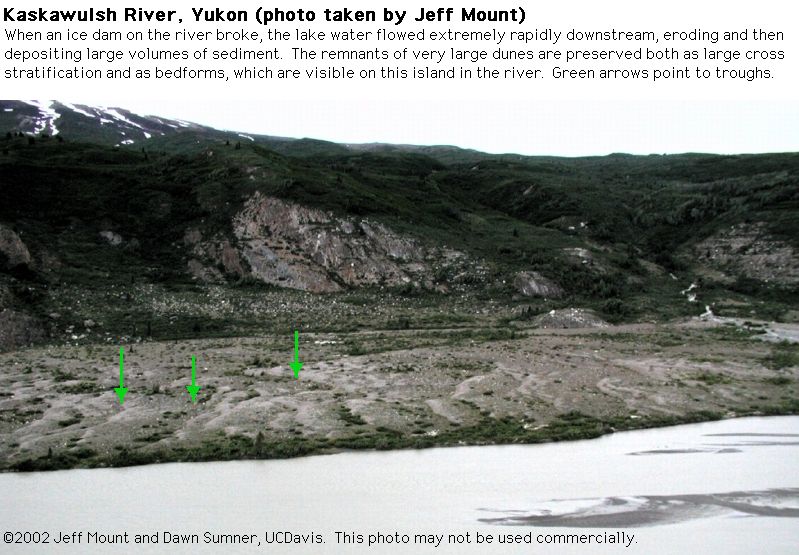
Figure \(\PageIndex{30}\): Remnants of giant dunes that migrated during the flood
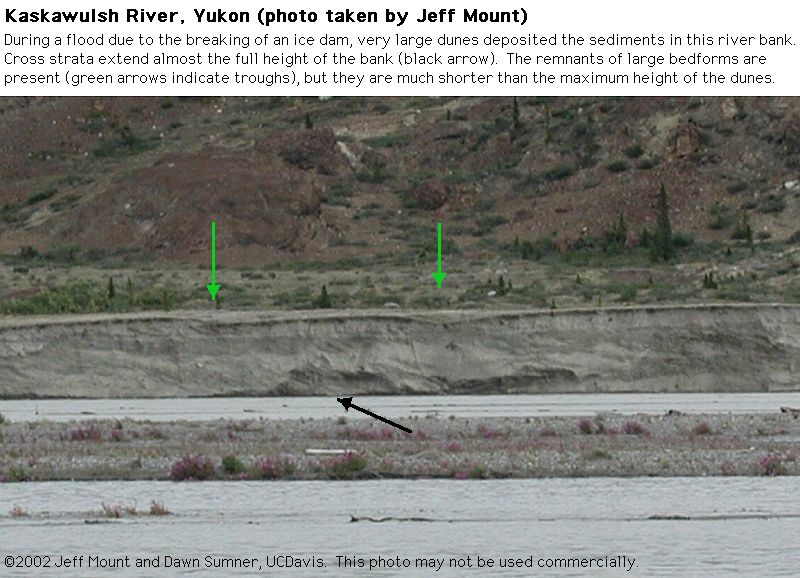
Figure \(\PageIndex{31}\): Large dune cross stratification and remnants of giant dunes
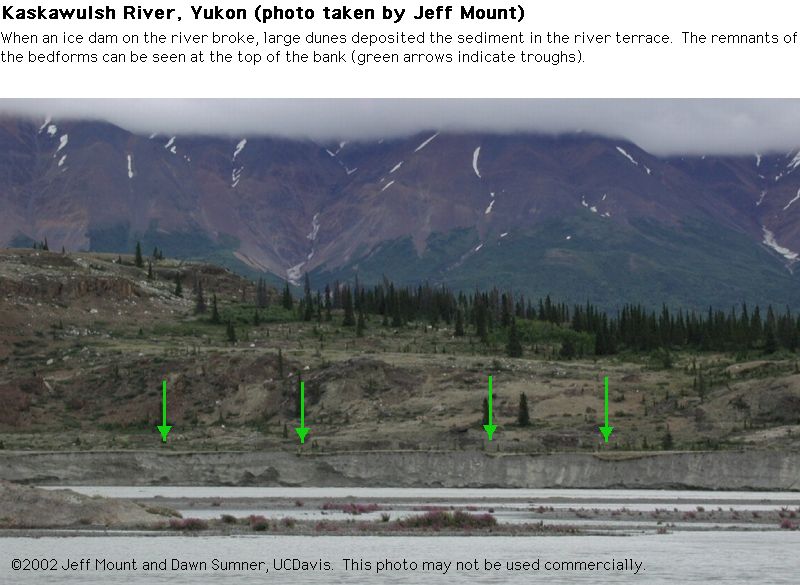
Figure \(\PageIndex{32}\): Large dune cross stratification and remnants of giant dunes
Return to Sedimentary Structures