
7.2.3: Protecting Your Foundation
- Page ID
- 6243

Overview
If you have a poured-concrete foundation, hit it with a hammer to check on its quality. If the hammer makes a dull thud rather than a sharp ping, there are thoroughgoing cracks more than one-eighth inch wide, or the concrete is crumbly, get professional help.
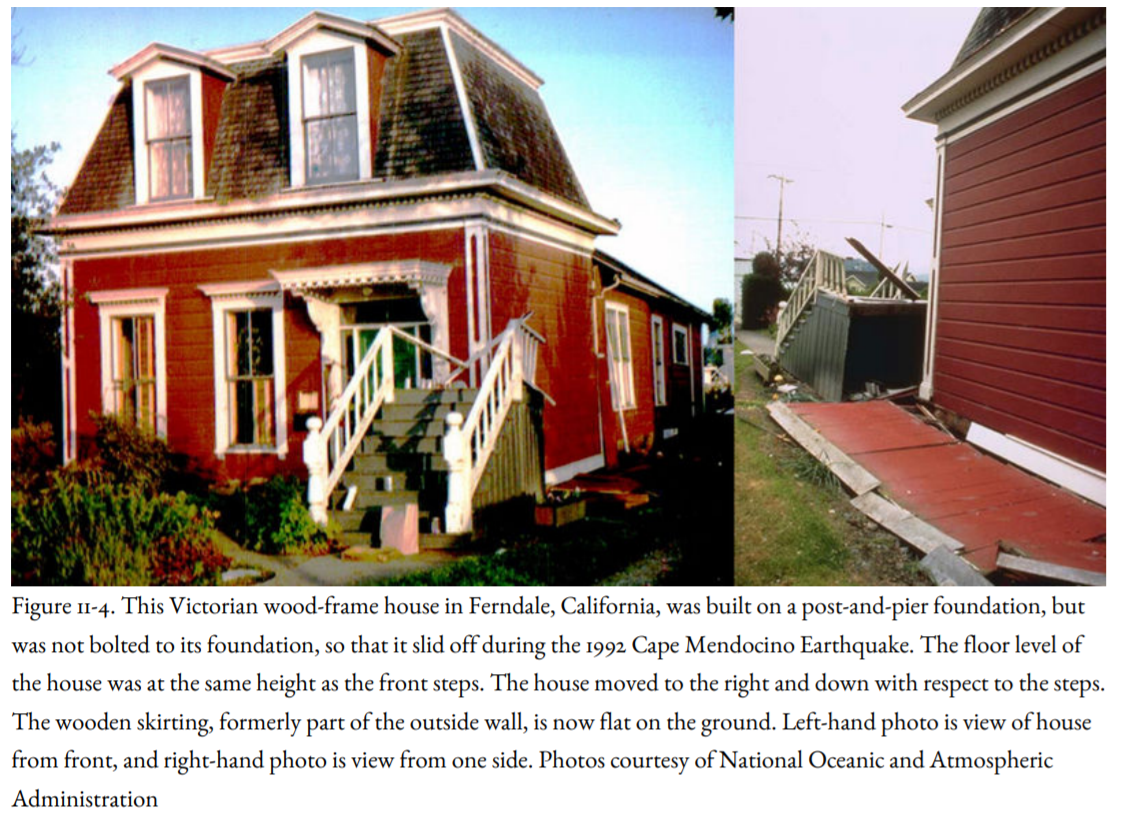
Let’s assume that the concrete is okay. The next job is to see if your house is bolted to the foundation and is adequately braced. Otherwise, horizontal inertial forces could slide the foundation out from under the house, which happened to wood-frame houses in northern California during earthquakes in October 1989 and April 1992 (Figure 11-4).
Some houses are built on a concrete slab or floor. Others have a concrete foundation around the edge of the house. In these, a board called a mudsill is generally found between the house and its foundation. Older houses were not required to be bolted to the foundation through the mudsill. In 1973, the Uniform Building Code began to require that walls be anchored to foundations (Figures 11-1, 11-2, 11-3).
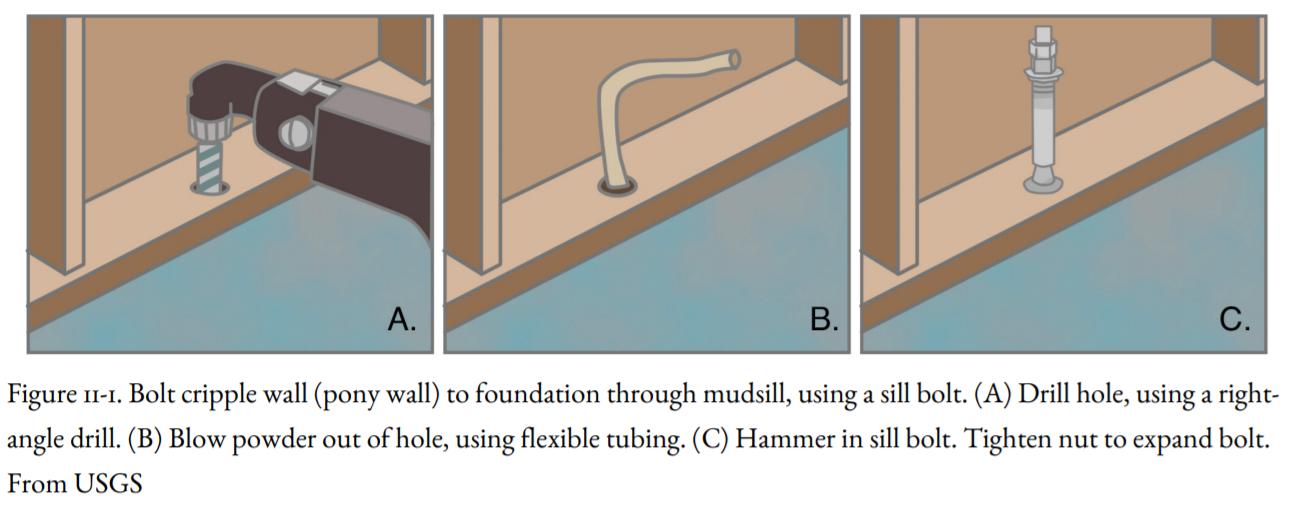
The standard retrofit technique is to drill a hole through the mudsill and into the foundation with a rotary hammer or a right-angle drill, which can be rented, although you should purchase your own drill bit. Next, using a sledgehammer, drive a sill bolt (or anchor bolt) into the hole you’ve just drilled, having first cleaned out the hole and made sure that it’s deep enough to accommodate the sill bolt. The sill bolt has a washer on top and an expanding metal sleeve at the base that slides up, spreads, and wedges in the concrete. Bolt sizes range from one-half by seven inches to three-quarters by ten inches; the standard size is five-eighths by eight-and-one-half inches. The larger ones give more protection against lateral loads and are preferred if the house has more than one story. If the nut on top of the bolt won’t tighten, or the bolt climbs out of the hole as you tighten it, the concrete might be decomposing. If so, you could set the bolt with epoxy cement, if allowed by local building codes.
In new construction, the sill bolt is set when the foundation is poured, a fairly simple operation.
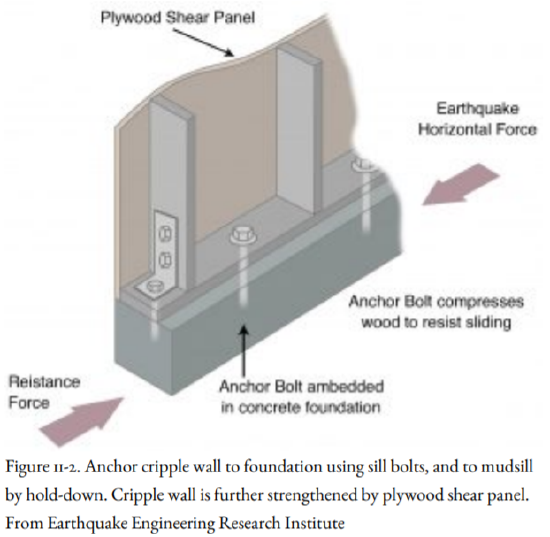
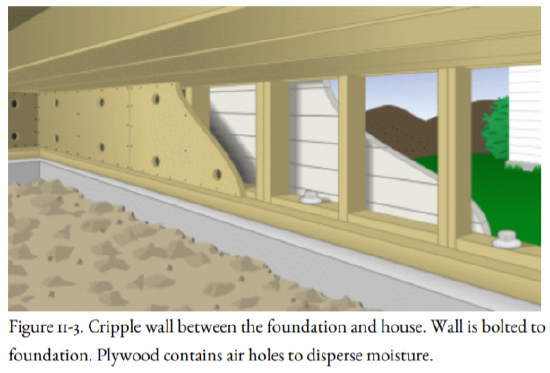
The spacing of bolts, in both new construction and in retrofits, is at least once every six feet, and one within twelve inches of the end of any mudsill (Figure 11-3). Placing the bolts midway between the studs (the vertical members that support the walls) makes it easier to work on them. The next step is stiffening the cripple wall (pony wall), which is made of short studs and sits between the mudsill and the floor joists of the house itself (Figures 11-2, 11-3). The cripple wall bounds the crawl space under the house where you’re working. The problem here is that if these vertical studs are not braced, they can tilt over like a set of dominoes due to horizontal inertial forces so that your house collapses on its crawl space and flops down on its foundation (Fig. 11-4).
Since 1973, the Uniform Building Code has required bracing of cripple walls; the bracing requirements were increased in 1991. If your home was built before those critical dates, you might need to brace the cripple wall yourself. The recommended stiffening technique is to use one-half-inch plywood; five-eighths-inch if you use a nail gun (Figures 11-2, 11-3). Treat the plywood with a preservative prior to installation to prevent rot. Ideally, you should sheathe the entire cripple wall in plywood, but at a minimum, install eight linear feet of plywood from each interior corner of the crawl space for one-story houses; sixteen feet for two-story houses. Anchor the plywood panels with eight-penny nails four inches apart around the edges of each panel and six inches apart on each interior stud. (The nailing pattern is important; one of the most memorable sounds of a house breaking up during an earthquake is the wrenching noise of nails being pulled from the walls.) Drill vent holes one inch in diameter to prevent moisture buildup.
Plywood sheeting should be at least twice as long as it is tall (Figure 11-3). If it isn’t, the sheeting should be reinforced with anchors and hold-downs (Figure 11-2). These anchors bolt into the foundation and into corner posts of the cripple walls, increasing the bracing. Another solution, particularly if the cripple wall is very short or if the floor joists of the house rest directly on the foundation, is quarter-inch structural steel bolted with expansion bolts into the foundation and into the floor joists.
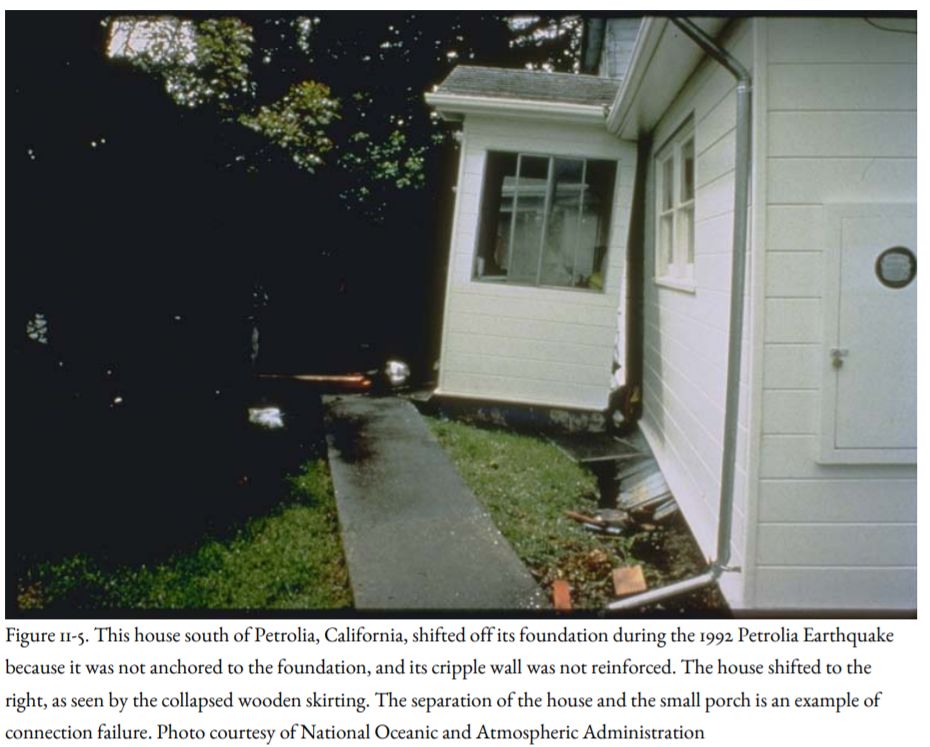
A do-it-yourselfer will spend at least $600 for the materials. However, working in crawl spaces is messy and confined, and you might wish to employ a professional. This will cost you several times as much as doing the job yourself; a contractor might charge as much as twenty-five dollars per installed bolt. But reinforcing the cripple wall and bolting to the foundation are the most important steps you can take to save your house. Cripple-wall failures are shown in Figures 11-4 and 11-5.
As insurance companies in the Pacific Northwest begin to base earthquake-insurance premiums to the details of construction of your house, as they now do in California, reinforcement will almost certainly reduce your premium. You are likely to be denied earthquake insurance if your house is not bolted to its foundation.